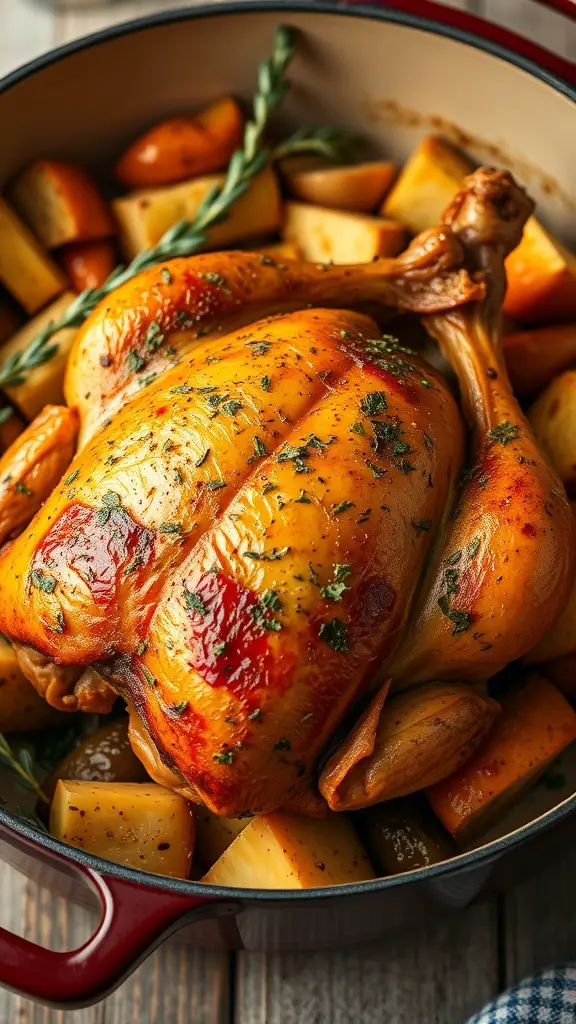
There’s something magical about the perfect balance of sweet and savory—and that’s exactly what Honey Butter Chicken delivers. This recipe was born from a craving for comfort food that felt both indulgent and homey. Picture this: crispy, golden-fried chicken generously glazed in a glossy honey-butter sauce that clings to every bite. It’s the kind of dish that satisfies your soul, making it a perfect centerpiece for a family dinner or a comforting weekend indulgence.
Whether you’re new to cooking or a seasoned home chef, this Honey Butter Chicken recipe is easy to follow and delivers restaurant-quality flavor. So, why not give it a try? One bite in, and you’ll understand why it’s become a repeat request in our kitchen.
Why I Love This Recipe

What makes Honey Butter Chicken a go-to meal in so many homes?
First, there’s that irresistible combination of textures and flavors: tender, juicy chicken encased in a crisp, golden crust, all smothered in a rich, buttery glaze that’s been kissed with honey. It’s decadent without being overly sweet, and comforting without being too heavy.
But more than that, this recipe is approachable. You don’t need to marinate overnight or hunt for obscure ingredients. It’s a dish that comes together quickly yet feels like you put in far more effort than you did. That’s the beauty of it—minimum fuss, maximum payoff.
And here’s the kicker: it’s incredibly versatile. You can serve it over rice, with mashed potatoes, or even tucked into a sandwich bun. Plus, it works as well for a quiet weeknight meal as it does for impressing guests at a dinner gathering. You’re not just making chicken; you’re making a memory.
Ingredients for Honey Butter Chicken
Ready to make something unforgettable? Let’s talk ingredients.
The magic of this dish lies in its simplicity. Each component plays a critical role in building those layers of flavor and texture that make Honey Butter Chicken so beloved. Here’s what you’ll need:
For the Chicken:
- Boneless, skinless chicken thighs or breasts (thighs for juicier meat)
- All-purpose flour
- Cornstarch (for extra crispiness)
- Eggs
- Buttermilk (adds tang and tenderness)
- Salt and pepper
- Garlic powder
- Paprika (smoky depth)
- Oil for frying (vegetable or canola)
For the Honey Butter Sauce:
- Unsalted butter (rich and silky)
- Honey (floral sweetness)
- Garlic (a savory kick)
- Soy sauce (a hint of umami)
- A dash of hot sauce or chili flakes (optional but recommended for balance)
You’re not just gathering ingredients—you’re assembling a flavor profile. Each item on this list contributes something important, so don’t skip the cornstarch or the garlic. Together, they’re the difference between good and unforgettable.
How Much Time Will You Need
This isn’t a marathon recipe, which makes it perfect for busy cooks or last-minute dinner plans. Here’s a breakdown of what to expect:
- Prep Time: 20 minutes
- Cooking Time: 25–30 minutes
- Total Time: Around 50 minutes
You’ll be frying the chicken in batches, and while the sauce is quick to whip up, you’ll want to take your time making sure everything is evenly coated and golden perfection.
With under an hour of effort, you get a meal that tastes like it took all day.
How to Make This Honey Butter Chicken

Let’s walk through this step-by-step. Take your time—this recipe is all about layering flavor and texture.
Step – 1: Prepare the Chicken
Cut the chicken into bite-sized pieces—roughly 1.5-inch chunks work best for even cooking. Pat dry with a paper towel to ensure your coating sticks.
Season the chicken with salt, pepper, garlic powder, and paprika. Let it sit while you prep the dredging station.
Step – 2: Set Up the Dredging Station
You’ll need three bowls:
- One with seasoned flour and cornstarch.
- One with buttermilk and beaten eggs.
- Another with just flour to double-dredge for extra crunch.
Dip each piece of chicken in flour, then into the buttermilk mixture, and finally back into the flour. Press the coating in to ensure it sticks well.
Place coated chicken on a wire rack or tray to rest for 10 minutes. This helps the breading adhere during frying.
Step – 3: Fry the Chicken
Heat oil in a deep skillet or Dutch oven over medium heat. The temperature should be around 350°F (175°C). Fry the chicken in batches, being careful not to overcrowd the pan.
Cook for 5–7 minutes, turning occasionally until golden and fully cooked. Drain on a wire rack or paper towels.
Step – 4: Make the Honey Butter Sauce
In a saucepan over medium heat, melt the butter. Add minced garlic and sauté until fragrant—about 30 seconds.
Stir in honey and soy sauce. Let the sauce simmer for 1–2 minutes until slightly thickened. If using, add a dash of hot sauce or chili flakes for a spicy contrast.
Step – 5: Coat the Chicken
Once the sauce is ready, gently toss the fried chicken in the warm honey butter until each piece is coated.
Serve immediately while the glaze is still warm and glossy. It clings to the crispy surface and creates a bite that’s sweet, savory, and slightly sticky—in the best way.
Substitutions
Don’t have buttermilk or want to make this gluten-free? No problem.
- Buttermilk Substitute: Mix 1 cup of milk with 1 tablespoon of vinegar or lemon juice. Let sit for 5 minutes and use as you would buttermilk.
- Gluten-Free Option: Use a gluten-free flour blend in place of regular flour. Make sure your soy sauce is also gluten-free.
- Chicken Alternatives: Try boneless pork chops or tofu for a non-chicken twist.
- Vegan Variation: Use firm tofu and swap butter with a plant-based alternative. Agave syrup can replace honey.
The base recipe is forgiving and adapts well to dietary needs or pantry limitations.
Best Side Dish of Honey Butter Chicken
Pairing Honey Butter Chicken with the right sides enhances every bite. Here are three top choices:
1. Creamy Mashed Potatoes
The smooth texture and mild flavor of mashed potatoes are a perfect contrast to the crispy, glazed chicken.
2. Buttery Corn on the Cob
Simple, sweet, and juicy corn highlights the honey notes in the glaze while adding freshness to the plate.
3. Steamed Jasmine Rice
This neutral base soaks up every bit of that golden sauce, making sure no flavor goes to waste.
These sides make the meal feel hearty and complete without overpowering the star of the show.
Serving and Presentation Tips
There’s something so satisfying about bringing a dish to the table that looks as good as it tastes.
When it comes to Honey Butter Chicken, presentation can elevate the eating experience even more. The glossy golden glaze naturally gives the dish an eye-catching appeal—but with a few thoughtful touches, you can make it restaurant-worthy.
Serve it on a large platter lined with parchment paper, and sprinkle freshly chopped parsley or green onions over the top for a burst of color and freshness. Add a few lemon wedges or red chili slices on the side for contrast and flair.
For a casual gathering, serve it in a shallow bowl with a drizzle of extra honey butter sauce on top. Or stack the chicken pieces high and add a small dish of sauce for dipping.
Presentation doesn’t need to be fancy—it just needs to show that a little love went into the details.
Tips and Tricks to Make This Recipe More Better

Want to take your Honey Butter Chicken from good to unforgettable? Here are some tried-and-true tips.
- Double dredge the chicken. That second coat of flour and cornstarch makes all the difference. It creates a craggy, ultra-crispy crust that holds up beautifully to the glaze.
- Let the breaded chicken rest. Once coated, let the chicken sit for about 10–15 minutes before frying. This helps the breading stick and reduces the risk of it falling off in the oil.
- Use a thermometer when frying. Keep your oil at 350°F (175°C) for even cooking. Too hot, and the outside will burn before the inside is cooked. Too cold, and your coating turns soggy.
- Add garlic at the right time. When making the sauce, don’t brown the garlic. Just lightly sauté it until fragrant to avoid bitterness.
- Serve immediately after glazing. That’s when the texture and flavor are at their best—warm, crisp, and glossy.
These little details may seem small, but they make a big impact.
Common Mistakes to Avoid
Even the best recipes can go sideways with a few common missteps. Here’s what to watch out for:
- Skipping the cornstarch. Flour alone won’t give you that signature crispy coating. Cornstarch is key.
- Overcrowding the pan. Frying too many pieces at once drops the oil temperature, leading to greasy, unevenly cooked chicken.
- Not seasoning the layers. Don’t just rely on the sauce for flavor. Season your flour, your chicken, and your sauce to build depth.
- Pouring sauce over cold chicken. Always toss the chicken while it’s still warm. That way, the glaze clings perfectly without making the coating soggy.
- Using margarine instead of butter. It just doesn’t give the same rich, creamy texture that real butter brings to the glaze.
Avoid these pitfalls, and your dish will shine every time.
How to Store It
Honey Butter Chicken is best enjoyed fresh, but if you have leftovers, here’s how to store them properly.
Refrigerate: Let the chicken cool completely before transferring it to an airtight container. Store in the refrigerator for up to 3 days.
Reheat: For best results, reheat in an oven or air fryer at 350°F (175°C) for 8–10 minutes. This helps restore crispiness. Avoid microwaving—it makes the coating soggy.
Freezing: Not recommended, as the fried coating can lose its texture. However, you can freeze uncoated, seasoned chicken and fry fresh when needed.
Always store the sauce separately if possible, and reheat gently over low heat to keep the butter from separating.
FAQ
Can I bake the chicken instead of frying?
Yes, but the texture won’t be quite as crispy. Bake at 400°F (200°C) for 25–30 minutes, flipping halfway through. Use a wire rack over a baking sheet for best results.
Can I make this ahead of time?
You can prep the chicken and the sauce ahead of time, but it’s best to fry and glaze right before serving for optimal texture.
Is this recipe spicy?
Not unless you add chili flakes or hot sauce to the glaze. Feel free to adjust the heat to your liking.
What kind of honey should I use?
Use a mild, floral honey like clover or wildflower. Avoid darker, stronger honeys that may overpower the other flavors.
Can I use bone-in chicken?
Yes, but you’ll need to adjust the cooking time significantly. Boneless cuts are preferred for quicker, more even frying.

Honey Butter Chicken
- Total Time: 50 minutes
- Yield: 4 1x
- Diet: Halal
Description
Honey Butter Chicken is the perfect blend of crispy, golden-fried chicken tossed in a sweet, garlicky butter glaze. It’s a crowd-pleaser with the kind of flavor that makes people come back for seconds—and thirds. This dish is incredibly versatile, working just as well for casual family dinners as it does for weekend guests. Plus, it comes together quickly and doesn’t require fancy ingredients. If you’re looking for a comfort food classic with a little Southern charm and a whole lot of flavor, this one’s for you.
Ingredients
- 1.5 lbs boneless, skinless chicken thighs or breasts, cut into chunks
- 1 cup all-purpose flour
- 1/2 cup cornstarch
- 2 large eggs
- 1/2 cup buttermilk
- 1 tsp salt
- 1/2 tsp black pepper
- 1 tsp garlic powder
- 1/2 tsp paprika
- Oil for frying
2. Honey Butter Sauce:
Instructions
- Season chicken with salt, pepper, garlic powder, and paprika.
- Set up a dredging station with flour/cornstarch mix, eggs mixed with buttermilk, and another bowl of flour.
- Dredge each chicken piece: flour → egg mix → flour again.
- Let coated chicken rest 10–15 minutes.
- Heat oil to 350°F (175°C), fry chicken in batches until golden and cooked through.
- In a pan, melt butter, then add garlic, honey, soy sauce, and chili flakes (if using).
- Simmer sauce for 1–2 minutes.
- Toss hot chicken in the sauce and serve immediately.
Notes
- Use a thermometer to maintain oil temperature.
- Add a squeeze of lemon over the chicken before serving for a burst of brightness.
- Serve over rice, mashed potatoes, or in a sandwich bun.
- Prep Time: 20 minutes
- Cook Time: 30 minutes
- Category: Main Dish
- Method: Frying
- Cuisine: American
Nutrition
- Serving Size: 4
- Calories: 570
- Sugar: 14g
- Sodium: 610mg
- Fat: 28g
- Saturated Fat: 10g
- Unsaturated Fat: 15g
- Trans Fat: 0g
- Carbohydrates: 46g
- Fiber: 1g
- Protein: 35g
- Cholesterol: 125mg