If you’re looking to skip the yeast and still enjoy some delicious bread, you’re in the right spot! This collection of 43+ yeast-free bread recipes offers a variety of options that are easy to follow, tasty, and perfect for any meal. From quick flatbreads to hearty loaves, there’s something here for everyone who wants to bake without yeast.
Chickpea Flour Focaccia

Chickpea flour focaccia is a delightful twist on the traditional Italian bread. This version is yeast-free, making it a quick and easy option for those who want fresh bread without the wait. The image shows a beautifully baked focaccia, topped with fresh rosemary and a sprinkle of sea salt. The golden crust and soft interior are sure to impress anyone who tries it.
To make this focaccia, you’ll need chickpea flour, water, olive oil, and some seasonings. The chickpea flour gives it a unique flavor and texture, while the rosemary adds a fragrant touch. This bread is perfect for dipping in olive oil or serving alongside soups and salads.
Here’s how to whip up your own chickpea flour focaccia:
Coconut Flour Bread Loaf
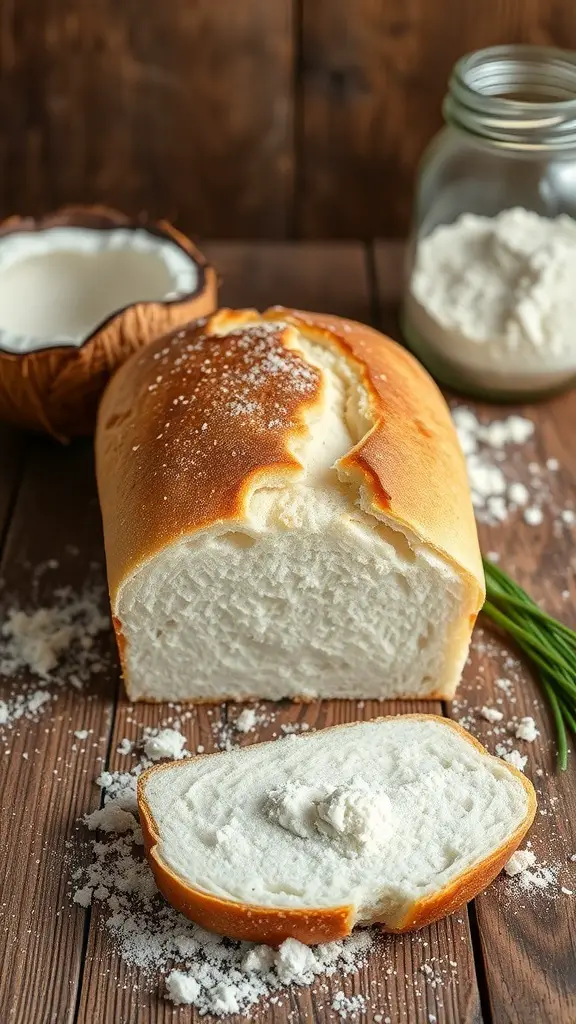
Coconut flour bread is a fantastic option for those looking for a yeast-free alternative. This bread is light, fluffy, and has a subtle coconut flavor that pairs well with various toppings. The image shows a beautifully baked loaf, golden on the outside and soft on the inside, ready to be sliced. You can see the texture of the bread, which is perfect for sandwiches or simply enjoying with butter.
Making coconut flour bread is straightforward. You only need a few ingredients, and the process is quick. This bread is not just gluten-free but also packed with fiber, making it a healthy choice for any meal.
Ingredients
- 1 cup coconut flour
- 6 large eggs
- 1/2 cup coconut oil, melted
- 1/2 teaspoon salt
- 1 teaspoon baking powder
- 1/4 cup unsweetened almond milk
Instructions
- Preheat your oven to 350°F (175°C) and grease a loaf pan.
- In a bowl, mix coconut flour, baking powder, and salt.
- In another bowl, whisk together eggs, melted coconut oil, and almond milk until well combined.
- Gradually add the dry ingredients to the wet ingredients, mixing until smooth.
- Pour the batter into the prepared loaf pan and smooth the top.
- Bake for 30-35 minutes or until a toothpick inserted in the center comes out clean.
- Let it cool in the pan for a few minutes before transferring it to a wire rack to cool completely.
Buckwheat Banana Bread
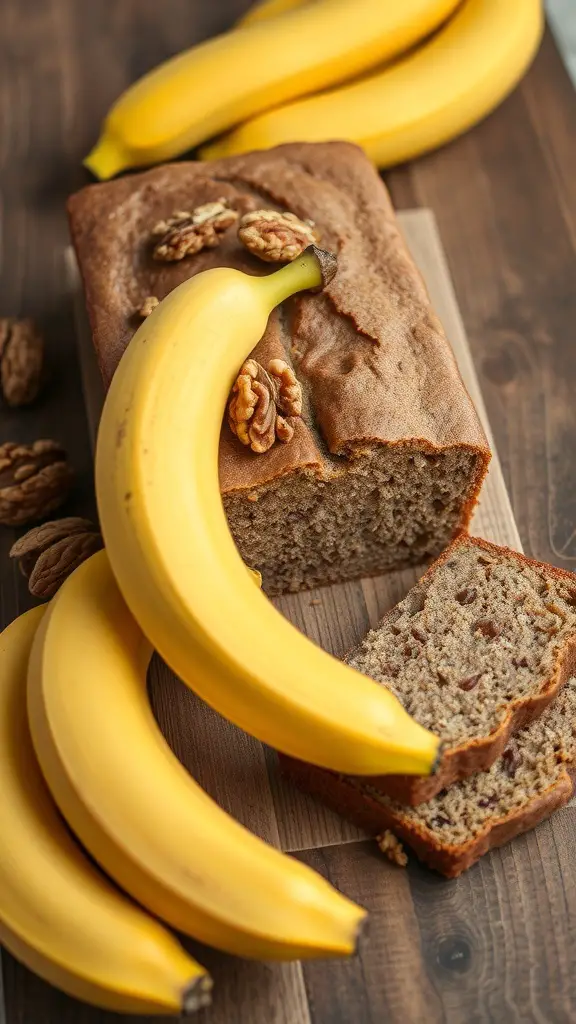
Buckwheat banana bread is a delightful twist on the classic recipe. It combines the nutty flavor of buckwheat flour with the natural sweetness of ripe bananas. The image shows a loaf of this bread, perfectly baked and sliced, with whole bananas and walnuts nearby. The warm tones of the bread and the bright yellow of the bananas create a cozy and inviting scene.
This recipe is not only yeast-free but also gluten-free, making it a great option for those with dietary restrictions. The bananas add moisture and flavor, while the walnuts provide a satisfying crunch. Enjoy a slice for breakfast, as a snack, or even as a dessert!
Ingredients
- 2 cups buckwheat flour
- 3 ripe bananas, mashed
- 1/2 cup walnuts, chopped
- 1/4 cup honey or maple syrup
- 1/4 cup coconut oil, melted
- 1 teaspoon baking soda
- 1/2 teaspoon salt
- 1 teaspoon vanilla extract
Instructions
- Preheat your oven to 350°F (175°C) and grease a loaf pan.
- In a large bowl, mix the mashed bananas, honey (or maple syrup), melted coconut oil, and vanilla extract until well combined.
- In another bowl, whisk together the buckwheat flour, baking soda, and salt.
- Gradually add the dry ingredients to the wet mixture, stirring until just combined. Fold in the chopped walnuts.
- Pour the batter into the prepared loaf pan and smooth the top.
- Bake for 45-50 minutes, or until a toothpick inserted in the center comes out clean.
- Let the bread cool in the pan for 10 minutes before transferring it to a wire rack to cool completely.
Almond Meal Pancakes
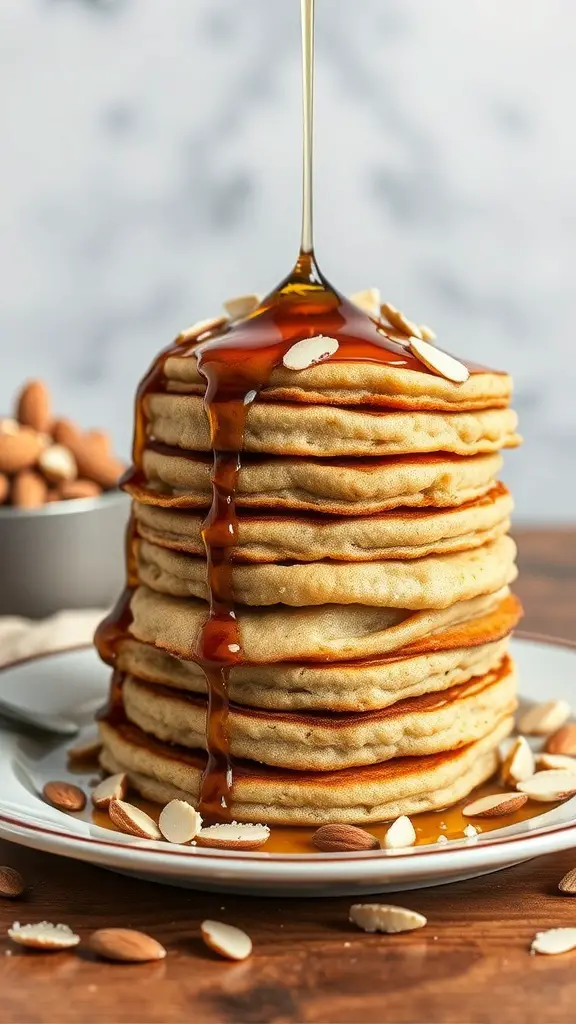
These almond meal pancakes are a delightful twist on traditional pancakes. They are fluffy, nutty, and perfect for a cozy breakfast or brunch. The image shows a tall stack of golden pancakes drizzled with syrup and topped with sliced almonds, making them look irresistible.
Using almond meal instead of regular flour gives these pancakes a unique flavor and texture. They are also gluten-free, making them a great option for those with dietary restrictions. The addition of syrup and almonds adds a sweet and crunchy element that elevates the dish.
Making these pancakes is simple and quick. You can whip them up in no time, making them perfect for busy mornings. Serve them with fresh fruit or yogurt for an extra boost of flavor.
Ingredients
- 1 cup almond meal
- 1/2 teaspoon baking powder
- 1/4 teaspoon salt
- 2 large eggs
- 1/4 cup milk (or dairy-free alternative)
- 1 tablespoon honey or maple syrup
- 1 teaspoon vanilla extract
- Butter or oil for cooking
Instructions
- In a bowl, mix almond meal, baking powder, and salt.
- In another bowl, whisk together eggs, milk, honey, and vanilla extract.
- Combine the wet and dry ingredients until just mixed.
- Heat a skillet over medium heat and add a little butter or oil.
- Pour batter onto the skillet, forming pancakes of your desired size.
- Cook until bubbles form on the surface, then flip and cook until golden brown.
- Serve warm with syrup and sliced almonds on top.
Zucchini and Corn Bread
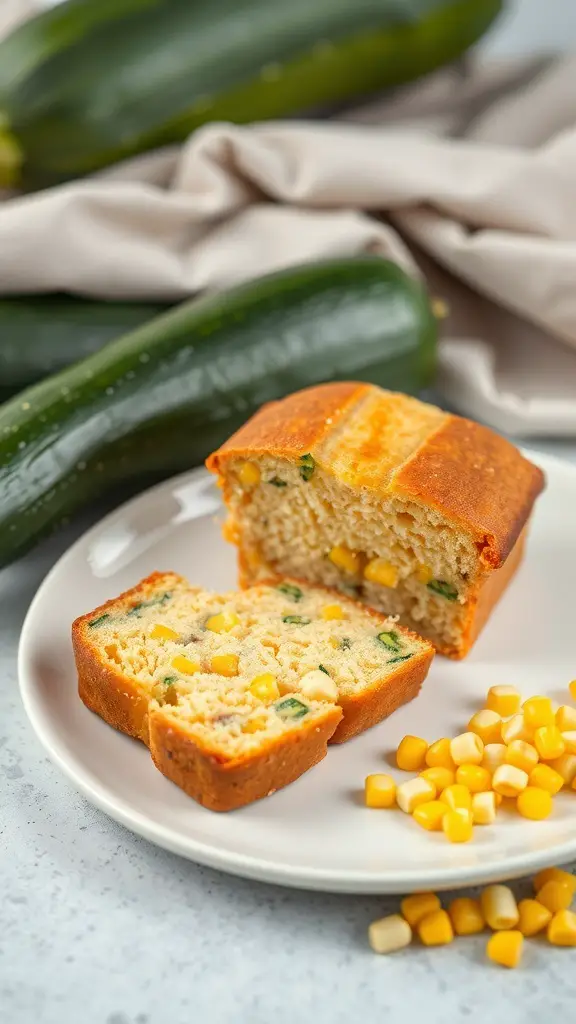
This Zucchini and Corn Bread is a delightful twist on traditional bread. The combination of fresh zucchini and sweet corn makes it moist and flavorful. It’s perfect for breakfast or as a side dish at dinner. Plus, it’s yeast-free, making it a quick and easy option for any day of the week.
The image showcases a beautifully baked loaf, with a golden crust and visible chunks of corn and zucchini. The texture looks soft and inviting, making it hard to resist a slice. Whether you enjoy it plain or with a spread, this bread is sure to please.
Ingredients
- 1 ½ cups all-purpose flour
- 1 cup grated zucchini (squeezed dry)
- 1 cup corn kernels (fresh or frozen)
- ½ cup granulated sugar
- 1 teaspoon baking powder
- ½ teaspoon baking soda
- ½ teaspoon salt
- 1 large egg
- ½ cup milk
- ¼ cup vegetable oil
- 1 teaspoon vanilla extract
Instructions
- Preheat your oven to 350°F (175°C). Grease a loaf pan and set aside.
- In a large bowl, mix together the flour, sugar, baking powder, baking soda, and salt.
- In another bowl, whisk the egg, milk, vegetable oil, and vanilla extract until well combined.
- Pour the wet ingredients into the dry ingredients and stir until just combined. Fold in the grated zucchini and corn.
- Pour the batter into the prepared loaf pan and smooth the top.
- Bake for 45-50 minutes, or until a toothpick inserted in the center comes out clean.
- Allow the bread to cool in the pan for 10 minutes before transferring it to a wire rack to cool completely.
Savory Herb and Garlic Flatbread

This Savory Herb and Garlic Flatbread is a delightful addition to any meal. It’s golden brown, soft, and topped with fresh herbs that give it a wonderful aroma. The garlic adds a nice kick, making it perfect for dipping or enjoying on its own.
Making this flatbread is simple and fun. You can easily customize it with your favorite herbs, whether it’s rosemary, thyme, or parsley. The flatbread pairs well with soups, salads, or as a side for any main dish.
Let’s get started on this tasty recipe!
Ingredients
- 2 cups all-purpose flour
- 1 teaspoon baking powder
- 1 teaspoon salt
- 1 tablespoon olive oil
- 3/4 cup warm water
- 2 cloves garlic, minced
- 1 tablespoon fresh parsley, chopped
- 1 tablespoon fresh thyme, chopped
Instructions
- Mix Dry Ingredients: In a large bowl, combine flour, baking powder, and salt.
- Add Wet Ingredients: Stir in olive oil and warm water until a dough forms.
- Knead the Dough: Transfer the dough to a floured surface and knead for about 5 minutes until smooth.
- Rest the Dough: Cover the dough with a cloth and let it rest for 30 minutes.
- Prepare the Flatbread: Divide the dough into small balls. Roll each ball into a flat circle.
- Add Toppings: Sprinkle minced garlic and chopped herbs over the top of each flatbread.
- Cook: Heat a skillet over medium heat. Cook each flatbread for about 2-3 minutes on each side until golden brown.
- Serve: Enjoy warm with your favorite dip or as a side dish!
Nutty Quinoa Bread
Nutty Quinoa Bread is a fantastic option for those looking to enjoy a hearty, yeast-free loaf. This bread is not only nutritious but also packed with flavor. The quinoa adds a lovely texture and nutty taste, making it perfect for sandwiches or simply toasted with a bit of butter.
The image shows a beautifully baked loaf with a golden crust and a soft, inviting interior. The bread is adorned with crunchy seeds on top, hinting at the delightful crunch you can expect with each bite. It’s a great choice for breakfast or as a snack throughout the day.
Making this bread is simple and fun. You’ll love how easy it is to whip up a batch, and the aroma that fills your kitchen while it bakes is simply irresistible.
Ingredients
- 1 cup quinoa, rinsed
- 2 cups water
- 2 cups whole wheat flour
- 1 teaspoon baking powder
- 1 teaspoon salt
- 1/4 cup olive oil
- 1 tablespoon honey or maple syrup
- 1/2 cup sunflower seeds (optional)
Instructions
- Cook the Quinoa: In a pot, combine the rinsed quinoa and water. Bring to a boil, then reduce heat and simmer for about 15 minutes, or until the quinoa is fluffy and water is absorbed. Let it cool.
- Mix Dry Ingredients: In a large bowl, whisk together the whole wheat flour, baking powder, and salt.
- Add Wet Ingredients: Stir in the cooked quinoa, olive oil, and honey or maple syrup. Mix until a dough forms.
- Shape the Loaf: Transfer the dough to a greased loaf pan. Sprinkle sunflower seeds on top if desired.
- Bake: Preheat your oven to 350°F (175°C) and bake for 30-35 minutes, or until the bread is golden and a toothpick comes out clean.
- Cool and Serve: Let the bread cool in the pan for a few minutes before transferring it to a wire rack. Slice and enjoy!
Sweet Potato and Oat Bread

Sweet Potato and Oat Bread is a delightful twist on traditional bread. This recipe combines the natural sweetness of sweet potatoes with the hearty texture of oats. The result is a moist, flavorful loaf that’s perfect for breakfast or as a snack. The golden hue of the bread, along with the visible chunks of sweet potato and oats on top, makes it visually appealing too!
This bread is not only tasty but also packed with nutrients. Sweet potatoes are rich in vitamins, while oats provide fiber. Together, they create a wholesome option for those looking to enjoy bread without yeast. Whether you spread some butter on a warm slice or enjoy it plain, this bread is sure to satisfy.
Ready to make your own Sweet Potato and Oat Bread? Here’s how:
Ingredients
- 2 cups mashed sweet potatoes (about 2 medium sweet potatoes)
- 1 cup rolled oats
- 1 1/2 cups whole wheat flour
- 1/4 cup honey or maple syrup
- 1/4 cup olive oil
- 1 teaspoon baking powder
- 1/2 teaspoon baking soda
- 1 teaspoon salt
- 1 teaspoon cinnamon
- 1/2 cup chopped nuts or dried fruit (optional)
Instructions
- Prepare the Sweet Potatoes: Preheat your oven to 375°F (190°C). Peel and chop the sweet potatoes, then boil them until tender. Drain and mash them until smooth.
- Mix the Ingredients: In a large bowl, combine the mashed sweet potatoes, honey (or maple syrup), and olive oil. Mix well. In another bowl, whisk together the oats, flour, baking powder, baking soda, salt, and cinnamon.
- Combine: Gradually add the dry ingredients to the wet mixture. Stir until just combined. If using, fold in the nuts or dried fruit.
- Bake: Pour the batter into a greased loaf pan. Bake for 45-50 minutes or until a toothpick inserted in the center comes out clean.
- Cool and Serve: Let the bread cool in the pan for 10 minutes before transferring it to a wire rack. Slice and enjoy!
Cinnamon Apple Scones

Cinnamon apple scones are a delightful treat that combines the warmth of cinnamon with the sweetness of fresh apples. These scones are perfect for breakfast or an afternoon snack. Imagine biting into a soft, flaky scone that has chunks of juicy apples and a hint of cinnamon. It’s a cozy way to enjoy the flavors of fall any time of the year.
Making these scones is simple and fun. You’ll start by mixing together your dry ingredients, then cut in some cold butter until the mixture resembles coarse crumbs. Next, fold in diced apples and a sprinkle of cinnamon for that signature flavor. After forming the dough, cut it into triangles and bake until golden brown. The aroma that fills your kitchen will have everyone eager to taste!
These scones are best served warm, perhaps with a drizzle of honey or a pat of butter. They also pair wonderfully with a cup of tea or coffee. Enjoy them fresh out of the oven or store them for a quick breakfast option during the week.
Ingredients
- 2 cups all-purpose flour
- 1/4 cup granulated sugar
- 1 tablespoon baking powder
- 1/2 teaspoon salt
- 1/2 teaspoon ground cinnamon
- 1/2 cup unsalted butter, cold and cubed
- 1 cup diced apples (about 1 medium apple)
- 1/2 cup milk
- 1 large egg
- 1 teaspoon vanilla extract
Instructions
- Preheat your oven to 400°F (200°C) and line a baking sheet with parchment paper.
- In a large bowl, whisk together flour, sugar, baking powder, salt, and cinnamon.
- Cut in the cold butter until the mixture resembles coarse crumbs.
- Fold in the diced apples.
- In a separate bowl, mix together milk, egg, and vanilla. Add this to the dry ingredients and stir until just combined.
- Turn the dough onto a floured surface and gently knead it a few times. Pat it into a circle about 1 inch thick.
- Cut the dough into wedges and place them on the prepared baking sheet.
- Bake for 15-20 minutes or until golden brown. Let cool slightly before serving.
Sesame Seed Crackers

Sesame seed crackers are a delightful snack that’s both crunchy and satisfying. They are perfect for dipping or enjoying on their own. The image showcases a plate filled with golden-brown crackers, sprinkled with sesame seeds, and a bowl of creamy dip in the center. This combination makes for a tasty treat that’s easy to prepare.
These crackers are yeast-free, making them a great option for those avoiding yeast in their diet. The nutty flavor of sesame seeds adds a unique twist, while the crispy texture makes them hard to resist. Pair them with your favorite dips for a fun snack or appetizer.
Ingredients
- 1 cup almond flour
- 1/4 cup sesame seeds
- 1/4 teaspoon salt
- 1/4 teaspoon garlic powder
- 1/4 teaspoon onion powder
- 1/4 cup water
- 2 tablespoons olive oil
Instructions
- Preheat your oven to 350°F (175°C).
- In a bowl, mix almond flour, sesame seeds, salt, garlic powder, and onion powder.
- Add water and olive oil to the dry ingredients. Stir until a dough forms.
- Place the dough between two sheets of parchment paper and roll it out to about 1/8 inch thick.
- Cut the dough into desired shapes and transfer them to a baking sheet.
- Bake for 15-20 minutes or until golden brown and crispy.
- Let them cool before serving with your favorite dip.
Pumpkin Spice Muffins

These pumpkin spice muffins are a delightful treat, perfect for any time of the year, but especially during the fall. The image shows a batch of freshly baked muffins, golden brown and fluffy, resting on a cooling rack. Surrounding them are vibrant pumpkins, hinting at the warm, cozy flavors that await.
Made without yeast, these muffins are simple to whip up. The combination of pumpkin puree and warm spices creates a comforting aroma that fills the kitchen. Each bite is soft and moist, making them a favorite for breakfast or a snack.
Let’s get into the ingredients and steps to make these delicious muffins!
Ingredients
- 1 cup pumpkin puree
- 1/2 cup granulated sugar
- 1/4 cup brown sugar
- 1/2 cup vegetable oil
- 2 large eggs
- 1 1/2 cups all-purpose flour
- 1 teaspoon baking soda
- 1/2 teaspoon baking powder
- 1 teaspoon ground cinnamon
- 1/2 teaspoon ground nutmeg
- 1/4 teaspoon ground ginger
- 1/4 teaspoon salt
- 1/2 teaspoon vanilla extract
Instructions
- Preheat the Oven: Start by preheating your oven to 350°F (175°C). Line a muffin tin with paper liners.
- Mix Wet Ingredients: In a large bowl, combine pumpkin puree, granulated sugar, brown sugar, vegetable oil, and eggs. Mix until smooth.
- Combine Dry Ingredients: In another bowl, whisk together flour, baking soda, baking powder, cinnamon, nutmeg, ginger, and salt.
- Combine Mixtures: Gradually add the dry ingredients to the wet mixture, stirring until just combined. Be careful not to overmix.
- Fill Muffin Tin: Spoon the batter into the prepared muffin tin, filling each cup about 2/3 full.
- Bake: Bake for 18-20 minutes, or until a toothpick inserted into the center comes out clean. Let them cool in the pan for a few minutes before transferring to a wire rack.
Cauliflower Pizza Crust
Cauliflower pizza crust is a fantastic alternative for those looking to enjoy pizza without the carbs. This crust is made primarily from cauliflower, making it a healthy choice that still delivers on taste. The image shows a beautifully baked cauliflower pizza crust topped with fresh ingredients like cherry tomatoes, herbs, and cheese. It’s colorful and inviting, perfect for a casual dinner or a fun gathering.
Making cauliflower crust is simple and requires just a few ingredients. You can customize it with your favorite toppings, making it versatile for everyone’s taste. The crust is crispy on the outside and soft on the inside, providing a satisfying base for all your favorite pizza toppings.
Ingredients
- 1 medium head of cauliflower, riced
- 1 cup shredded mozzarella cheese
- 1/4 cup grated Parmesan cheese
- 1 large egg
- 1 teaspoon dried oregano
- 1 teaspoon garlic powder
- Salt and pepper to taste
Instructions
- Preheat your oven to 425°F (220°C) and line a baking sheet with parchment paper.
- Rice the cauliflower using a food processor or box grater until it resembles fine grains.
- Steam the riced cauliflower for about 5 minutes until tender. Let it cool, then squeeze out excess moisture using a clean kitchen towel.
- In a bowl, combine the riced cauliflower, mozzarella, Parmesan, egg, oregano, garlic powder, salt, and pepper. Mix until well combined.
- Spread the mixture onto the prepared baking sheet, shaping it into a round crust about 1/4 inch thick.
- Bake for 15-20 minutes until golden brown and crispy.
- Remove from the oven, add your favorite toppings, and bake for an additional 10 minutes until the cheese is melted and bubbly.
Oatmeal and Raisin Cookies
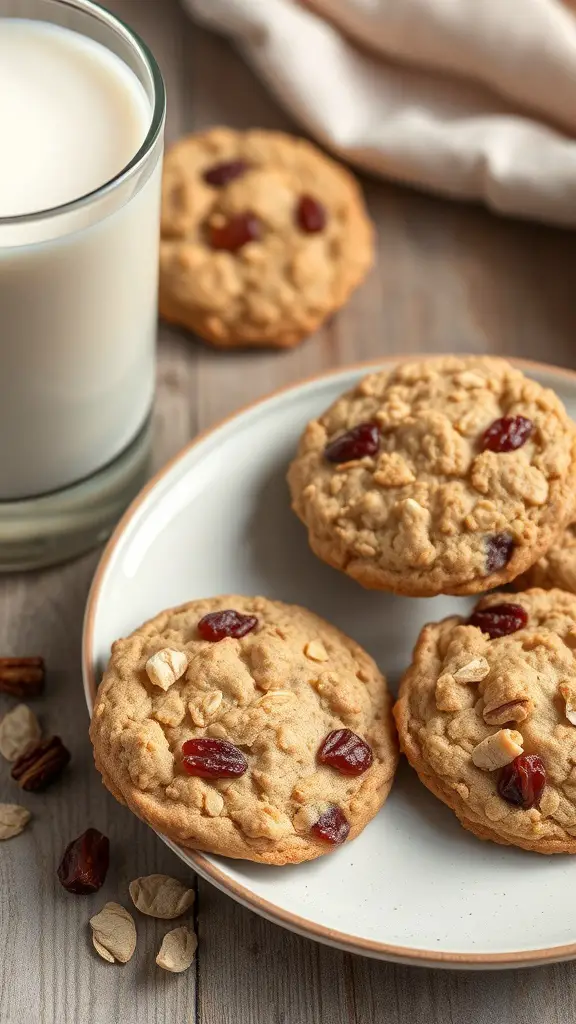
Oatmeal and raisin cookies are a classic treat that brings comfort and joy. They are chewy, sweet, and packed with wholesome oats and plump raisins. The combination of flavors makes them a favorite for many. Enjoy them with a glass of milk for a delightful snack!
These cookies are not just tasty; they are also simple to make. You can whip them up in no time, making them perfect for any occasion. Whether you’re baking for a family gathering or just for yourself, these cookies will surely satisfy your sweet tooth.
Ingredients
- 1 cup unsalted butter, softened
- 1 cup brown sugar, packed
- 1/2 cup granulated sugar
- 2 large eggs
- 1 teaspoon vanilla extract
- 1 1/2 cups all-purpose flour
- 1 teaspoon baking soda
- 1 teaspoon ground cinnamon
- 1/2 teaspoon salt
- 3 cups rolled oats
- 1 cup raisins
Instructions
- Preheat the oven to 350°F (175°C). Line a baking sheet with parchment paper.
- In a large bowl, cream together the softened butter, brown sugar, and granulated sugar until smooth.
- Add the eggs and vanilla extract, mixing well until combined.
- In another bowl, whisk together the flour, baking soda, cinnamon, and salt.
- Gradually add the dry ingredients to the wet mixture, stirring until just combined.
- Fold in the oats and raisins until evenly distributed.
- Drop spoonfuls of dough onto the prepared baking sheet, spacing them about 2 inches apart.
- Bake for 10-12 minutes, or until the edges are golden brown. Allow to cool on the baking sheet for a few minutes before transferring to a wire rack.
Rice Flour Tortillas
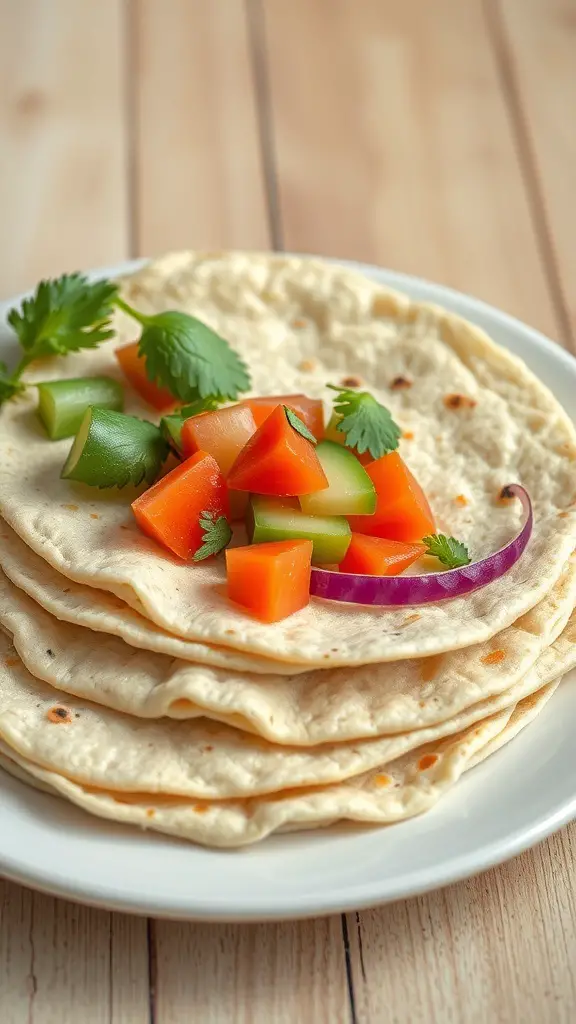
Rice flour tortillas are a fantastic option for those looking for a gluten-free alternative. They are soft, pliable, and perfect for wrapping around your favorite fillings. The image shows a stack of these tortillas topped with fresh, colorful veggies, making them not only tasty but also visually appealing.
Making rice flour tortillas is simple. You can enjoy them with various fillings, from grilled meats to fresh veggies, or even as a side for soups and stews. They are versatile and can be used in many dishes, making them a great addition to your meal rotation.
Ingredients
- 2 cups rice flour
- 1/2 teaspoon salt
- 3/4 cup warm water
- 1 tablespoon olive oil (optional)
Instructions
- Mix the Ingredients: In a bowl, combine rice flour and salt. Gradually add warm water and olive oil, mixing until a dough forms.
- Knead the Dough: Knead the dough on a clean surface for a few minutes until smooth. Divide it into small balls.
- Roll Out the Tortillas: Using a rolling pin, flatten each ball into a thin circle. Aim for about 1/8 inch thick.
- Cook the Tortillas: Heat a skillet over medium heat. Cook each tortilla for about 1-2 minutes on each side until lightly browned.
- Keep Warm: Stack the cooked tortillas on a plate and cover them with a clean towel to keep warm.
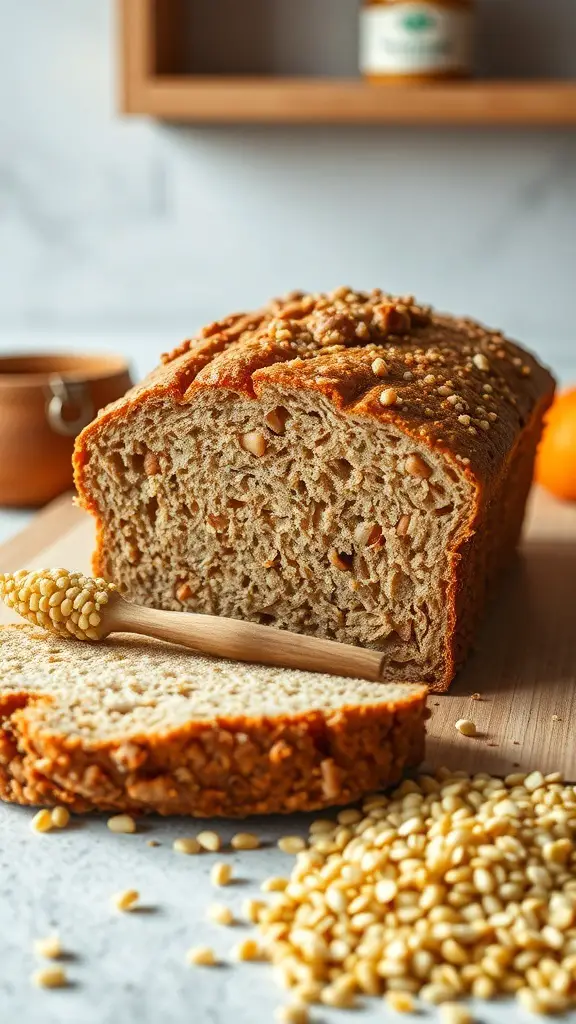
Millet and Flaxseed Bread
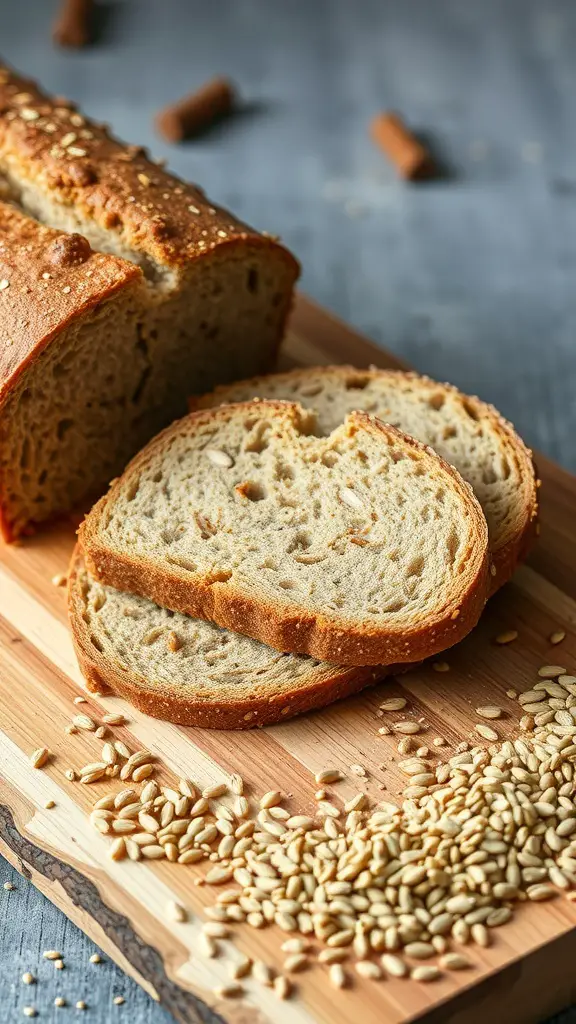
This Millet and Flaxseed Bread is a delightful option for anyone looking to enjoy a yeast-free loaf. The image shows a beautifully baked bread, golden brown on the outside with a soft, inviting interior. The slices reveal a hearty texture, perfect for sandwiches or toast.
Millet is a nutritious grain that adds a subtle flavor and a nice crumb to the bread. Flaxseeds not only enhance the nutritional profile but also contribute to the moistness of the loaf. Together, they create a wholesome bread that’s easy to make and delicious to eat.
For those who are avoiding yeast, this recipe is a great alternative. It’s simple and requires minimal ingredients, making it perfect for a quick baking session.
Ingredients
- 2 cups millet flour
- 1/2 cup ground flaxseed
- 1 teaspoon baking soda
- 1 teaspoon salt
- 1 tablespoon honey or maple syrup
- 2 cups water
- 1/4 cup olive oil
Instructions
- Preheat your oven to 350°F (175°C) and grease a loaf pan.
- In a large bowl, mix millet flour, ground flaxseed, baking soda, and salt.
- In another bowl, combine honey (or maple syrup), water, and olive oil. Stir well.
- Pour the wet ingredients into the dry ingredients and mix until just combined.
- Transfer the batter to the prepared loaf pan and smooth the top.
- Bake for 40-45 minutes or until a toothpick inserted in the center comes out clean.
- Let the bread cool in the pan for 10 minutes, then transfer to a wire rack to cool completely before slicing.