I first came across this nostalgic Woolworth Cheesecake recipe while flipping through my grandmother’s handwritten cookbook, tucked neatly in a tattered recipe binder she kept since the 1950s. As I ran my fingers over the fading ink, I was instantly transported to a time when desserts were simple yet special—made with care, shared with love, and often served at department store lunch counters where memories were as thick as the cheesecake filling. Woolworth’s, in particular, was famous for this airy, creamy, lemony no-bake cheesecake that sat in chilled glass cases waiting to brighten someone’s afternoon.
This isn’t your heavy New York-style cheesecake. This one is refreshingly light, slightly tangy, subtly sweet, and wonderfully nostalgic. I recreated it not just for the flavor but for the feeling it brings—the same joy I imagine someone once felt in a Woolworth’s booth, sipping on cola and savoring a slice. If you’re looking for a dessert that’s as charming as it is easy to make, keep reading—this classic might just become your go-to.
Why I Love This Recipe

The Woolworth Cheesecake isn’t just a dessert—it’s a delightful experience layered with memories.
What makes it truly special is the unexpected texture. Unlike dense, traditional cheesecakes, this version is airy and almost mousse-like, thanks to whipped evaporated milk and cream cheese softened with lemon gelatin. It offers a dreamy mouthfeel and a refreshing brightness that keeps you coming back for another bite.
It’s also ridiculously easy to make. You don’t need a water bath, oven, or springform pan. This is the kind of recipe your grandmother would have whipped up in minutes and chilled just in time for guests. It’s a no-fuss, no-fail kind of dessert—and I love that.
It’s perfect for gatherings, potlucks, or a weeknight dessert when you want something that feels fancy without too much effort. Plus, the crumb crust made from crushed graham crackers or Nilla wafers adds a golden, buttery contrast to the fluffy filling—making every bite a balance of textures and flavors.
Ingredients for Woolworth Cheesecake
Before we get started, let’s talk ingredients.
This recipe calls for pantry-friendly staples—nothing too fancy or hard to find. But every ingredient plays a role in building that nostalgic, tangy, fluffy magic.
You’ll need evaporated milk, and yes—it must be chilled thoroughly. This is one of the key secrets to achieving that signature fluffy texture. When whipped, it expands in volume and gives the cheesecake its cloud-like lightness.
The lemon gelatin gives it that gentle citrus zing and helps set the filling. The cream cheese brings richness, and a touch of sugar sweetens the deal. Finally, crushed graham crackers or vanilla wafers create a buttery base that complements the airy filling.
Here’s what you’ll need:
- Evaporated Milk – Chilled overnight, this whips into a light, foamy base. Regular milk or cream won’t work the same way.
- Lemon Gelatin – This not only adds flavor but also helps the cheesecake hold its shape.
- Cream Cheese – Room temperature for easy mixing and a silky finish.
- Granulated Sugar – To balance the tart lemon and cream cheese.
- Vanilla Extract – Just a splash to round out the flavors.
- Crushed Graham Crackers or Nilla Wafers – For that crumbly, buttery crust.
- Butter – Melted and mixed into the crumbs to form the perfect base.
The ingredients are simple, but when combined, they create something truly wonderful—light, creamy, and full of charm.
How Much Time Will You Need
This is one of those make-ahead desserts that rewards your patience.
- Prep time: About 30 minutes
- Chill time: At least 4 hours, preferably overnight
Since this cheesecake needs time to set, I usually prepare it the night before I plan to serve it. That way, it’s perfectly firm and chilled by the time dessert rolls around.
You won’t need to turn on the oven, and cleanup is minimal—another reason it’s become one of my favorite recipes.
How to Make This Woolworth Cheesecake
Step-by-step instructions are essential when it comes to recreating a classic. Follow this guide closely, and you’ll be rewarded with a cheesecake that tastes like it’s straight out of a 1950s soda fountain.
Step – 1: Prepare the Evaporated Milk
Start by placing your can of evaporated milk in the fridge the night before. Cold milk is essential—it whips much better when thoroughly chilled. If you forgot to chill it, you can place it in the freezer for about 30–40 minutes (but don’t let it freeze).
Step – 2: Dissolve the Lemon Gelatin
In a small bowl, dissolve the lemon gelatin in ¾ cup of boiling water. Stir until completely dissolved. Set aside to cool to room temperature. Don’t skip the cooling process—hot gelatin can break down the whipped milk later.
Step – 3: Make the Crust
In a mixing bowl, combine 1½ cups of crushed graham crackers (or vanilla wafer crumbs) with 1/3 cup of melted butter. Mix until the texture resembles wet sand.
Press about two-thirds of the crumb mixture firmly into the bottom of a 9×13-inch pan to form an even crust layer. Reserve the rest for sprinkling on top. Place the crust in the fridge while you prepare the filling.
Step – 4: Whip the Evaporated Milk
Pour the chilled evaporated milk into a large mixing bowl and beat it on high speed until it becomes light and fluffy—almost like whipped cream. This can take 3–5 minutes, so be patient.
Set aside once it’s nice and foamy.
Step – 5: Make the Cream Cheese Filling
In another bowl, beat the softened cream cheese until smooth. Add in the sugar and vanilla extract, and continue to beat until fully combined.
Slowly pour in the cooled lemon gelatin while beating continuously. This creates a silky, lemony base.
Step – 6: Fold Everything Together
Gently fold the whipped evaporated milk into the cream cheese mixture. Use a spatula and take your time—fold until well combined, being careful not to deflate the whipped milk too much.
This step is key to the cheesecake’s fluffy texture.
Step – 7: Assemble and Chill
Pour the filling mixture over the prepared crust, smoothing out the top with a spatula. Sprinkle the remaining crumb mixture evenly over the top.
Cover the dish with plastic wrap and refrigerate for at least 4 hours, or overnight, to let it set completely.
Once set, slice into squares and serve cold.
Substitutions
If you’re short on an ingredient or need to adjust for dietary needs, don’t worry—this recipe is flexible.
You can substitute graham crackers with vanilla wafers, digestive biscuits, or even gingersnaps for a spicy twist.
No evaporated milk? Whipping cream can be used, but you won’t get the same classic airy texture.
Need to make it a bit more citrusy? Swap lemon gelatin with lime for a fun flavor change. Or use orange gelatin for a creamsicle-inspired variation.
Cream cheese can be swapped for Neufchâtel if you’re looking for a lighter option, and you can always adjust the sugar level to suit your taste.
Best Side Dishes for Woolworth Cheesecake
This light and tangy cheesecake pairs beautifully with a variety of sides. Here are a few favorites to make dessert even better:
- Fresh Berry Salad – A medley of strawberries, blueberries, and raspberries tossed in a touch of honey adds a fresh contrast.
- Iced Coffee or Espresso – The slight bitterness of coffee balances the sweetness of the cheesecake.
- Lemonade or Iced Tea – These refreshing drinks mirror the citrus notes in the filling and make for a lovely summer pairing.
Serving and Presentation Tips
A dessert this nostalgic deserves to be served with a bit of old-fashioned flair.
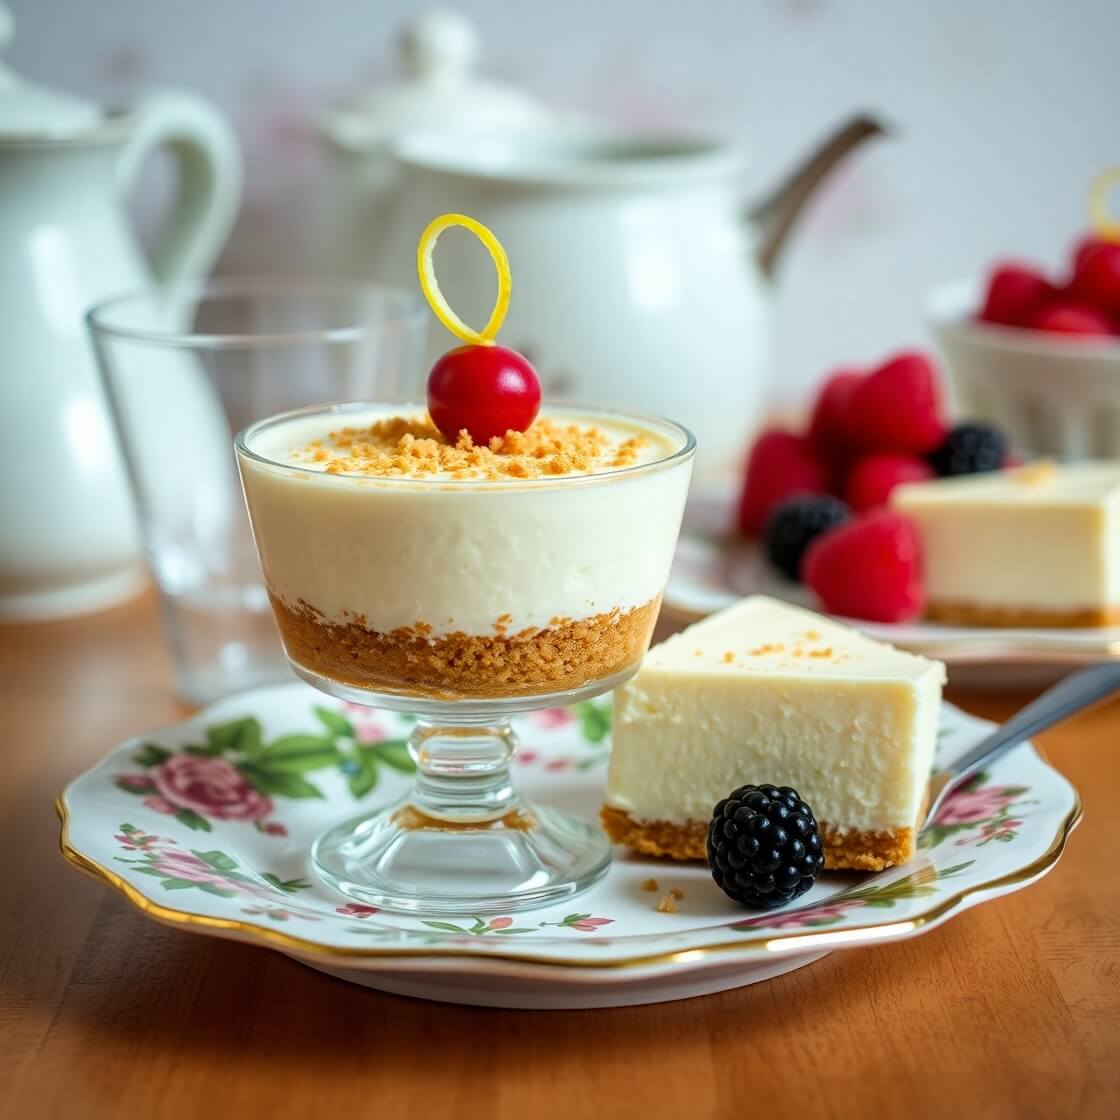
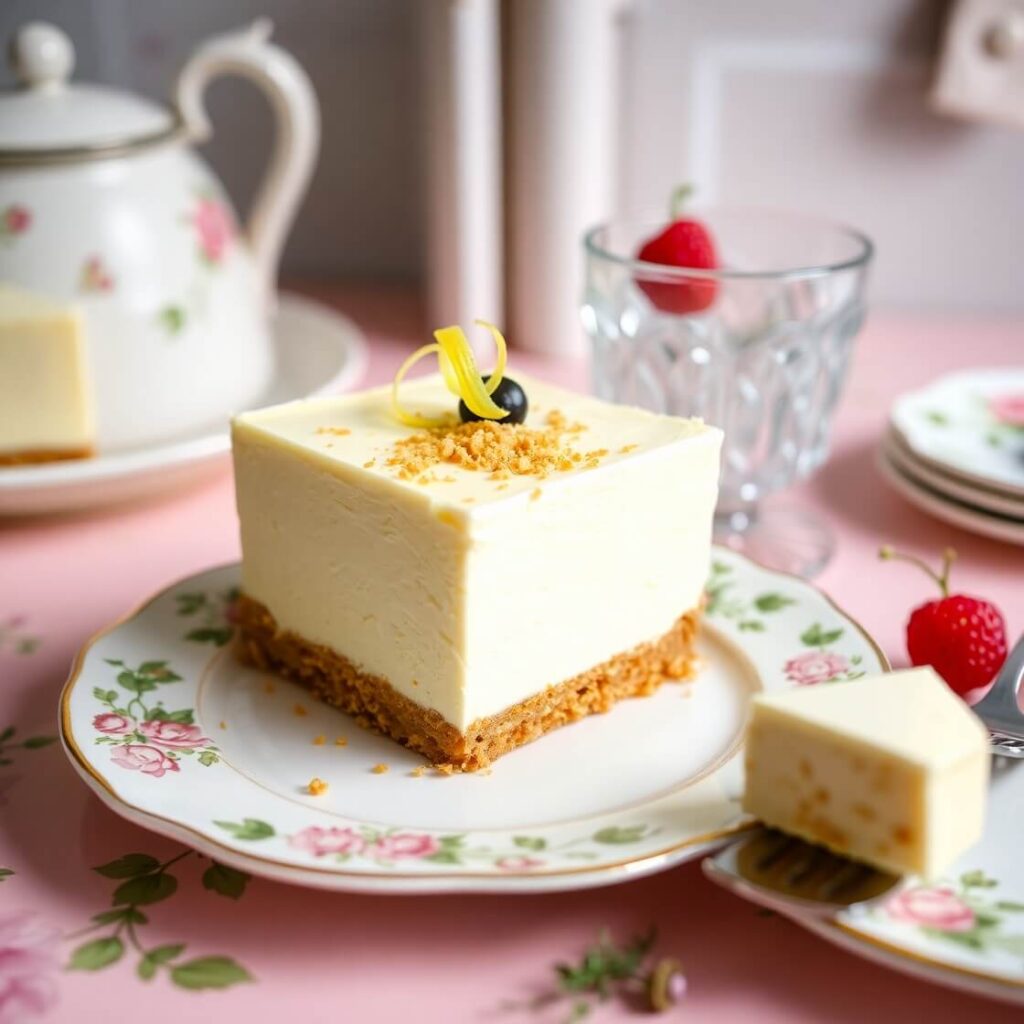
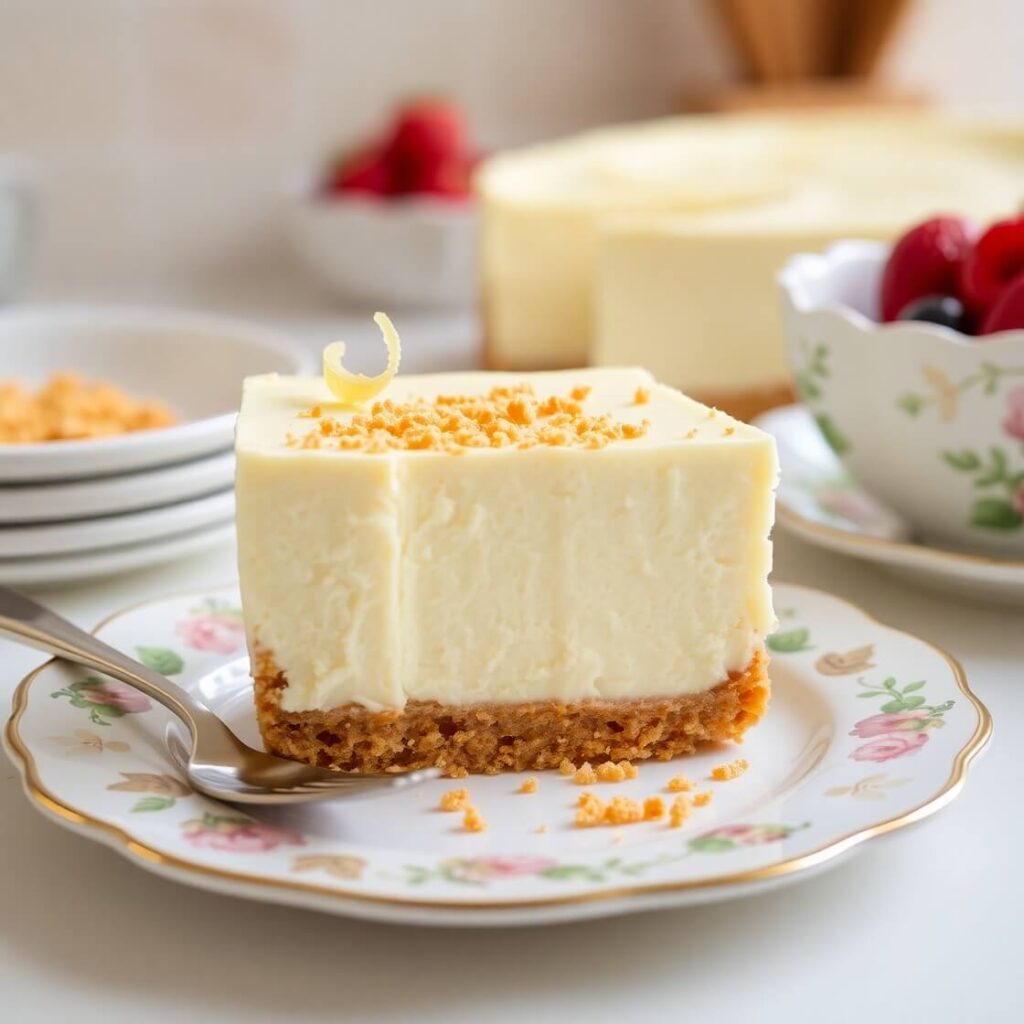
The Woolworth Cheesecake is beautifully simple, so you don’t need to overdo the presentation. I like to slice it into neat squares using a sharp knife wiped clean between each cut. The clean lines make it look bakery-perfect.
For a touch of charm, serve each slice on a vintage dessert plate—floral porcelain works beautifully—and garnish with a thin twist of lemon or a few fresh berries. A dollop of whipped cream on the side adds an extra luxurious feel without overpowering the airy texture.
If you’re hosting a party, consider serving it in individual parfait glasses. Just press the crumb mixture into the bottom of the glass, spoon in the filling, and top with a sprinkle of crumbs and berries. It’s a crowd-pleasing, mess-free way to elevate the presentation.
Tips and Tricks to Make This Recipe Even Better
This isn’t a complicated recipe, but a few insider tricks will ensure your Woolworth Cheesecake turns out perfect every single time.
Chill the evaporated milk overnight. This is non-negotiable if you want that signature fluffy texture. Even an hour or two in the fridge isn’t enough—overnight is best.
Cool the gelatin completely. If you add hot gelatin to the cream cheese mixture, it will melt everything and ruin the texture. Be patient.
Use full-fat cream cheese. It’s tempting to go light, but full-fat gives you that creamy richness that holds up beautifully when chilled.
Don’t overmix after combining. When folding the whipped milk into the gelatin-cream cheese mix, go slowly and gently. You want to keep as much air as possible in the mixture.
Chill for a full 4 hours (or overnight). This is a make-ahead dessert for a reason. The longer it chills, the better it sets and tastes.
Common Mistakes to Avoid
Even simple recipes have their pitfalls. Here are a few things to avoid:
Skipping the chilling step. Rushing this recipe will leave you with a runny mess instead of a firm, sliceable dessert.
Using unchilled evaporated milk. Room-temp milk won’t whip properly, and your filling won’t hold its airy structure.
Overheating the gelatin. Boiling water is fine to dissolve, but let it come to room temperature before mixing.
Overmixing after folding. You worked hard to whip that milk—don’t deflate it by over-stirring at the end.
Too much butter in the crust. This can make the base soggy rather than crisp. Stick to the recommended ratio.
How to Store It
The Woolworth Cheesecake stores beautifully, which makes it ideal for preparing ahead of time.
Once fully chilled and set, cover the dish tightly with plastic wrap or an airtight lid. It will keep in the fridge for up to 5 days—if it lasts that long!
For longer storage, you can freeze individual slices wrapped in plastic and placed in an airtight container. Let them thaw overnight in the fridge before serving. The texture may be slightly softer after freezing but still delicious.
Avoid storing it at room temperature for long—this cheesecake is meant to be served cold.
FAQ
Can I make Woolworth Cheesecake ahead of time?
Absolutely. In fact, it’s best made a day ahead so it has time to chill and firm up.
Can I use whipped cream instead of evaporated milk?
You can, but it won’t have the exact same light, mousse-like texture. Evaporated milk gives the classic result.
What kind of gelatin should I use?
Use lemon-flavored gelatin like Jell-O. It adds a light citrus flavor and helps set the cheesecake perfectly.
Can I add fruit to the filling?
Yes! You can gently fold in drained crushed pineapple or finely chopped strawberries for a fruity variation.
Can I use a springform pan instead of a 9×13 dish?
Definitely. Just make sure to line the bottom with parchment paper for easy removal.

Woolworth Cheesecake Recipe
- Total Time: 4 hours 30 minutes
- Yield: 12–16 1x
- Diet: Vegetarian
Description
A light and airy no-bake cheesecake that’s brimming with nostalgia and lemony charm. Inspired by the classic Woolworth lunch counter dessert, this cheesecake features a graham cracker crust and a whipped cream cheese filling made fluffy with evaporated milk and lemon gelatin. It’s refreshingly tangy, melt-in-your-mouth creamy, and perfect for potlucks, parties, or a sweet treat after dinner. Best of all, it’s incredibly easy to make and even easier to love. This retro dessert proves that sometimes the simplest recipes really are the most memorable.
Ingredients
- 1 can (12 oz) evaporated milk, chilled overnight
- 1 package (3 oz) lemon-flavored gelatin
- ¾ cup boiling water
- 8 oz cream cheese, softened
- 1 cup granulated sugar
- 1 tsp vanilla extract
- 1½ cups graham cracker or vanilla wafer crumbs
- 1/3 cup unsalted butter, melted
Instructions
- Dissolve gelatin in boiling water and let cool completely.
- In a bowl, combine graham crumbs and melted butter. Press ⅔ into the bottom of a 9×13 pan.
- Whip the cold evaporated milk until fluffy; set aside.
- In another bowl, beat cream cheese until smooth. Add sugar and vanilla, mix well.
- Slowly pour in the cooled gelatin and mix until smooth.
- Gently fold in the whipped evaporated milk until fully combined.
- Pour filling over crust and smooth the top. Sprinkle with remaining crumbs.
- Chill at least 4 hours or overnight.
Notes
- Use chilled evaporated milk for the best whipped volume.
- Let gelatin cool fully before adding to cream cheese.
- For extra citrus flavor, add a bit of lemon zest to the filling.
- Prep Time: 30 minutes
- Cook Time: 4 hours
- Category: Dessert
- Method: No-bake
- Cuisine: American
Nutrition
- Serving Size: 12–16
- Calories: 260
- Sugar: 17g
- Sodium: 190mg
- Fat: 14g
- Saturated Fat: 8g
- Unsaturated Fat: 5g
- Trans Fat: 0g
- Carbohydrates: 30g
- Fiber: 0.5g
- Protein: 4g
- Cholesterol: 35mg