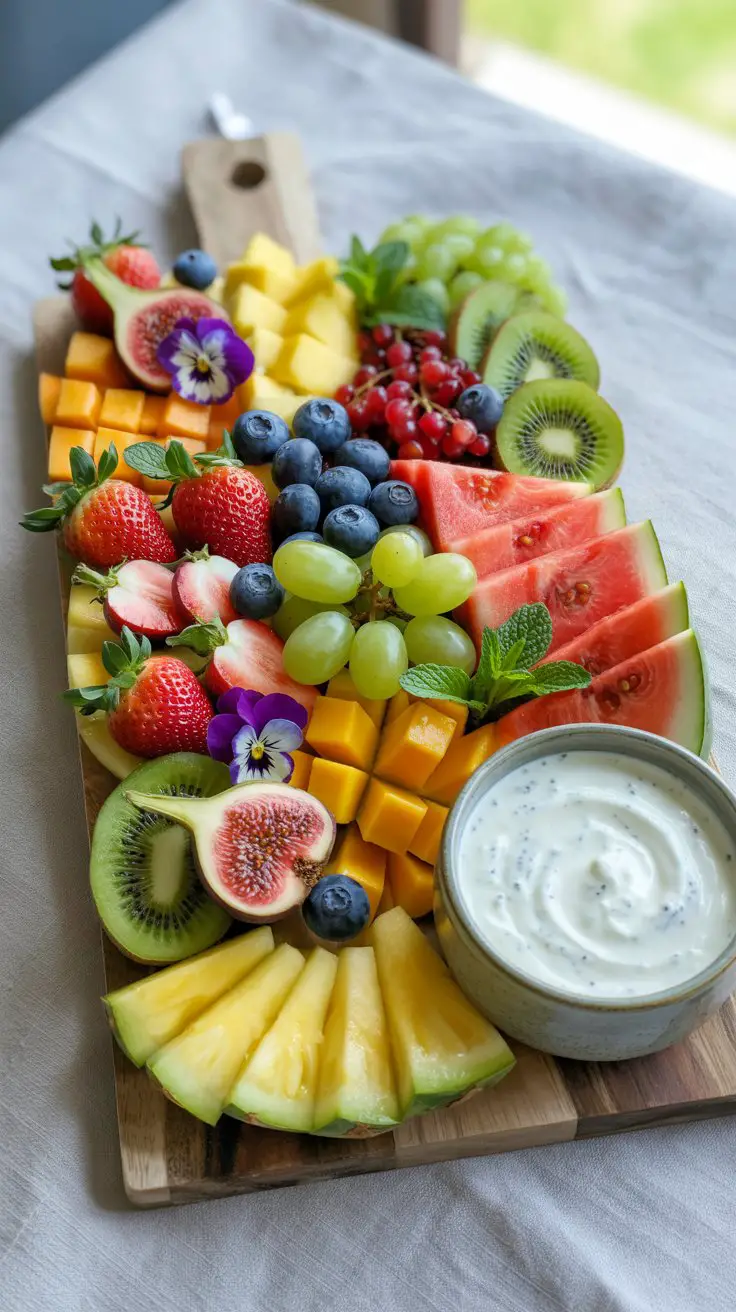
A pretty fruit platter isn’t just a healthy snack—it’s a celebration of color, freshness, and simplicity. I first put this platter together for a last-minute brunch with friends when I had no time to bake or prep anything complicated. The result? Everyone went silent. Not out of politeness—but because they were too busy eating.
This recipe has since become my go-to for any event: summer parties, cozy family breakfasts, or when I just want to feel like I’m eating something beautiful and good for me. Whether you’re hosting a crowd or making something special just for yourself, this fruit platter feels like a little luxury on a plate.
It’s not about throwing fruit on a tray—it’s about turning nature’s candy into a visual masterpiece.
Why I Love This Recipe?

There’s something effortlessly elegant about a well-arranged fruit platter.
Yes, it’s healthy. Yes, it’s vibrant. But what really makes this recipe shine is how it turns everyday ingredients into something that feels curated and indulgent.
The versatility is unmatched—you can use seasonal produce, clean out your fridge, or build around a theme (tropical, Mediterranean, etc.). It works for everyone—vegans, kids, picky eaters, guests watching their sugar. It’s also a guilt-free option when dessert feels too heavy.
And the best part? You don’t have to cook. No baking. No blending. Just prep, arrange, and serve. That means more time enjoying the moment and less time in the kitchen.
It’s not just a recipe—it’s a mood.
Ingredients for Pretty Fruit Platter
What makes a fruit platter “pretty” isn’t just the fruit—it’s how you layer color, texture, and shape.
To start, always aim for variety: in taste (sweet, tart, mild), texture (juicy, crisp, soft), and color (think rainbow). That’s what elevates this from “cut-up fruit” to a styled presentation.
Here’s what you’ll need to build a beautifully balanced fruit platter:
Core Fruits (choose 4–6):
- Strawberries (halved with leaves intact)
- Blueberries
- Grapes (red and green)
- Kiwi (peeled and sliced into rounds)
- Pineapple (sliced into spears or stars)
- Watermelon (cut with cookie cutters or into triangles)
- Mango (sliced or cubed from the seed)
- Raspberries
Additions for Luxury and Contrast:
- Figs (halved for a rich, floral note)
- Blackberries (for dark contrast)
- Pomegranate seeds (sprinkled for sparkle)
- Dragon fruit (for an exotic twist)
- Starfruit (for shape and novelty)
Optional Extras:
- Fresh mint leaves (for garnish)
- Lime or lemon wedges (for flavor and freshness)
- Edible flowers (like pansies or violets)
- A small bowl of honey or yogurt dip in the center
Tip: Use fruit that’s firm, ripe, and not overly juicy to avoid soggy spots on the platter.
How Much Time Will You Need?
The magic of this platter is that it looks like you’ve spent hours—but really, it’s ready in under 30 minutes.
Estimated prep time: 20–25 minutes (washing, peeling, slicing, arranging)
Cook time: None—this is a no-cook recipe.
If you’re planning to serve this for a party or event, you can prep most of it ahead and assemble closer to the serving time.
How to Make This Pretty Fruit Platter
Let’s walk through the process of putting this together like a pro stylist. The goal is visual variety, freshness, and balance on every section of the board.
Step – 1: Choose and prep your surface
Start with a large platter, wooden board, or even a baking sheet covered with parchment. A neutral background (wood, marble, white) lets the fruit shine.
Make sure it’s clean and completely dry.
Step – 2: Wash and dry all your fruits
Gently rinse your berries, grapes, and other fruits under cold water. Dry thoroughly with paper towels—wet fruit makes the board soggy and shortens shelf life.
For fruits like watermelon or mango, cut right before serving to retain freshness.
Step – 3: Cut for beauty and bite-size ease
Slice larger fruits (kiwi, oranges, melons) into rounds or wedges. Use a melon baller for uniformity or cookie cutters for decorative shapes.
Leave the stems on strawberries—they’re pretty and useful for grabbing.
For visual interest, slice some fruits (like mango or kiwi) in half or at a diagonal.
Step – 4: Start with the anchor fruits
Place your larger, most colorful pieces first—usually watermelon slices, pineapple spears, or halved mango. This creates structure and draws the eye.
Don’t just place in a straight line—angle, layer, and fan pieces slightly.
Step – 5: Fill in with medium fruits
Next, add your berries, grapes, and figs around and between the larger pieces. Cluster similar colors together but leave small gaps for contrast.
You’re not aiming for symmetry—you’re aiming for balance.
Step – 6: Sprinkle in small, “pop” fruits
Drop pomegranate seeds, blueberries, and raspberries into empty spaces. Think of them as edible confetti.
They help make the board feel full and luxurious.
Step – 7: Garnish like a stylist
Tuck in mint leaves and a few edible flowers for a pop of freshness. You can also add a drizzle of lime over the melon or a sprinkle of sea salt on pineapple for extra flavor.
Place a small dipping bowl of honey or yogurt off-center for variety.
Substitutions
Not every fruit platter needs to look the same—and that’s the beauty of it.
If you don’t have access to tropical or specialty fruits, you can still create an amazing platter with what you have. Here are some smart substitutions:
- No dragon fruit? Use peeled plums or nectarines for a similar color.
- Can’t find figs? Dried figs or dates (sliced) add sweetness and texture.
- Avoiding citrus? Apples (tossed in lemon to prevent browning) add crunch.
- Low sugar option? Use more berries, melon, and kiwi which are lower on the glycemic index.
Every season offers new options—persimmons in fall, cherries in spring, even roasted fruits in winter.
This platter is more of a canvas than a strict recipe—paint with what you’ve got.
Best Side Dish of Pretty Fruit Platter
To make this even more special, pair it with small bites that complement the freshness of fruit:
- Mini Cheese Board – Soft brie, aged cheddar, and some crackers round out the sweetness with savory contrast.
- Herbed Yogurt Dip – A tangy Greek yogurt dip with honey and mint makes every bite feel like a composed dessert.
- Breakfast Pastries – Buttery croissants or almond danishes bring indulgence without overpowering the lightness of the fruit.
Serving and Presentation Tips
There’s no denying it—a well-arranged fruit platter can easily become the centerpiece of any table.
To make the biggest impression, don’t just serve it… style it.
Use a mix of heights and textures—wooden boards, ceramic trays, marble slabs, or tiered stands if you’re serving a larger crowd. White platters offer a clean look that lets color pop, while wooden boards give a rustic, earthy vibe.
Avoid crowding all the fruit flat in a single layer. Instead, layer, overlap, and stack gently. A few pieces of fruit leaning against each other can look much more natural and full.
Serve with small tongs or cocktail forks to keep things neat, especially if it’s a group setting. Place the dip bowl slightly off-center or tuck it in a corner to avoid symmetry—which often looks less dynamic.
Always serve chilled, not cold. Leave the platter out for about 10–15 minutes after refrigeration to allow flavors to open up and textures to soften just right.
Tips and Tricks to Make This Recipe Even Better

It’s one thing to slice fruit and pile it on a plate. It’s another thing entirely to make people stop and say, “That looks amazing.”
Here’s how to level up your fruit platter from nice to next-level:
- Use odd numbers – Grouping fruits in odd numbers (like 3 or 5 clusters of grapes) tends to look more organic and visually appealing.
- Layer textures – Combine juicy fruits like oranges with drier ones like bananas (sliced just before serving) for bite-to-bite variety.
- Pre-cut fruits wisely – Avoid slicing bananas or apples too early, as they brown quickly. If you must, coat them lightly with lemon juice to preserve color.
- Use cookie cutters – Watermelon stars or heart-shaped pineapple slices can be fun, especially for kids or themed events.
- Plan for color flow – Alternate bright and muted colors. Don’t place red next to red—space it out with green, yellow, or white fruits in between.
The goal is to make every section of the platter feel intentional. No two bites should feel the same.
Common Mistakes to Avoid
Fruit platters seem simple—but there are a few key mistakes that can make even the freshest fruits look flat or unappetizing.
Avoid these and your platter will shine every time:
- Using overripe fruit – While soft fruit is great for smoothies, it doesn’t hold its shape or look appealing on a platter.
- Serving wet fruit – Moisture from rinsed fruit can pool on the platter. Always dry thoroughly before arranging.
- Ignoring balance – Don’t pile all heavy fruits (like melons) on one side—it will feel lopsided in weight and color.
- Cutting everything the same way – Mix up shapes! Use rounds, spears, wedges, and cubes to add texture.
- Skimping on garnish – A few sprigs of mint or edible flowers take the whole board to the next level with minimal effort.
Attention to detail is everything.
How to Store It
Fruit is delicate—but with smart storage, you can prep ahead and reduce waste.
If you’re making the platter in advance:
- Pre-cut and store the fruit in separate containers. Keep berries, melons, and citrus fruits in airtight containers lined with a paper towel to absorb moisture.
- Avoid combining fruits until just before serving. This keeps everything crisp and prevents bleeding (like strawberries staining kiwi).
- Wrap the entire platter in plastic wrap or cover with a lid if transporting.
For leftovers:
- Refrigerate immediately in a sealed container. Eat within 1–2 days for best taste and texture.
- Avoid freezing—most fruits lose texture and become mushy once thawed.
If you’re repurposing leftover fruit, add it to smoothies, yogurt bowls, or fruit-infused water the next day.
FAQ
Here are the most commonly asked questions about making the perfect fruit platter:
Can I make this fruit platter the night before?
Yes, but store the cut fruit separately and assemble just before serving to keep everything fresh and visually perfect.
What fruits should I avoid for a platter?
Avoid very soft or easily browned fruits like bananas or overly juicy ones like ripe peaches—unless serving immediately.
How do I keep apples or bananas from browning?
Toss with a little lemon or lime juice to slow oxidation. Even better, slice them just before serving.
What size should the fruit pieces be?
Aim for bite-sized portions that are easy to pick up. Too large and they’ll be messy; too small and they lose impact.
Can I include dried fruits or nuts?
Absolutely. A handful of dried apricots, dates, or nuts like almonds or pistachios adds texture and richness.

Pretty Fruit Platter
Description
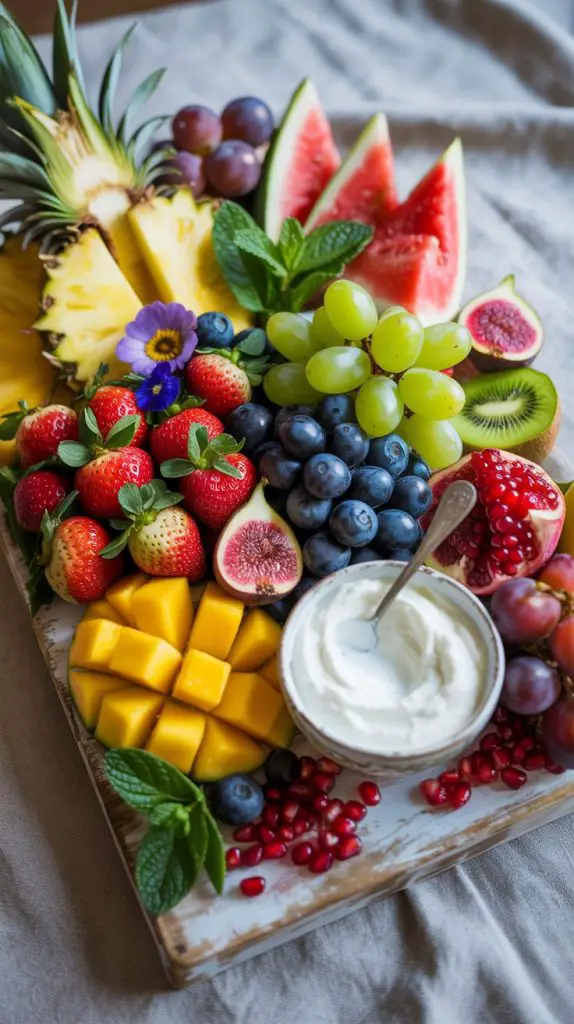
A bright, fresh, and stunning fruit platter that’s easy to prepare but sure to impress. Featuring a colorful mix of seasonal fruits, this no-cook recipe is perfect for breakfast, brunch, picnics, or as a healthy dessert alternative. Whether you’re making it for guests or treating yourself, this platter makes clean eating feel luxurious. With endless options for customization and a beautiful visual impact, it’s one of the easiest ways to serve something that looks and tastes amazing. Assemble it in under 30 minutes and prepare for compliments.
Ingredients
- 1 cup strawberries, halved
- 1 cup blueberries
- 1 cup green grapes
- 1 cup red grapes
- 2 kiwi, peeled and sliced
- 1 mango, cubed or sliced
- 1/2 small watermelon, sliced into wedges or shapes
- 1/2 pineapple, cut into spears or rounds
- 4 fresh figs, halved
- 1/4 cup pomegranate seeds
- A few sprigs of mint (for garnish)
- 1/2 cup Greek yogurt or honey (optional dip)
Instructions
- Wash and dry all fruit thoroughly.
- Slice and prep fruits—aim for variety in shape and size.
- Start arranging the largest fruits (like watermelon and pineapple) on the platter.
- Layer in mid-sized fruits like grapes, mango, and kiwi.
- Fill gaps with smaller items—berries, pomegranate seeds, or figs.
- Add fresh mint and flowers as garnish.
- Place a bowl of yogurt or honey in the center or off to the side.
- Serve immediately or cover and refrigerate until ready.
Notes
- Use fruit that’s ripe but still firm.
- Store cut fruit in separate containers if prepping ahead.
- Add lemon juice to apples or bananas to avoid browning.
- For themed events, stick to a color palette—like all red fruits or tropical fruits only.