Pea salad is one of those humble, comforting dishes that instantly transports you to a warm-weather picnic or a backyard barbecue. It’s creamy, crunchy, and just a little bit tangy—an old-fashioned favorite that still holds its place on the table.
I first made this dish during a family gathering where I needed something quick, cold, and crowd-pleasing. I wanted a dish that would stand out among the usual suspects like potato salad and coleslaw. Little did I know, pea salad would become the most-requested recipe of the day.
There’s something undeniably nostalgic about it. It brings back memories of potlucks, church socials, and grandma’s kitchen. If you’ve never made it before, you’re in for a delightful surprise—and if you have, this version might just become your new favorite. Stick around and see what makes this pea salad a standout.
Why I Love This Recipe

There’s a reason this salad has stood the test of time.
Pea salad is effortlessly simple but full of personality. It’s a fantastic mix of flavors and textures: the sweetness of the peas, the sharp bite from red onion, the creamy dressing, and the irresistible crunch of crispy bacon. Every bite gives you a little of everything, and that balance is what makes this dish so special.
It’s also incredibly versatile. Whether you’re serving it with grilled meats at a summer cookout or packing it up for lunch during the week, it holds its own beautifully. And unlike many side salads, it actually gets better as it sits in the fridge, letting all those flavors meld together.
Another reason I love it? It’s the kind of recipe that doesn’t require a grocery list a mile long. Most of the ingredients are pantry or freezer staples, making this a go-to dish when you need something quick and satisfying.
This recipe is the perfect example of how something so easy to make can be so wonderfully delicious.
Ingredients for Pea Salad
Let’s talk ingredients—the real stars of the show.
You don’t need anything fancy to make pea salad, and that’s part of its charm. But don’t let the simplicity fool you. Every ingredient here plays a role in creating a dish that’s creamy, crunchy, savory, and sweet all at once.
Here’s what you’ll need:
Frozen Peas – You want sweet green peas, not canned. Frozen peas hold their shape and freshness so much better. Make sure they’re thawed before mixing—no one wants icy bites in their salad.
Red Onion – This adds just the right amount of sharpness and color. Dice it finely so it doesn’t overpower each bite.
Cheddar Cheese – Sharp cheddar is classic here. Cubed is traditional, but shredded works if you prefer a more even mix. The cheddar adds a rich, salty depth that balances the sweetness of the peas.
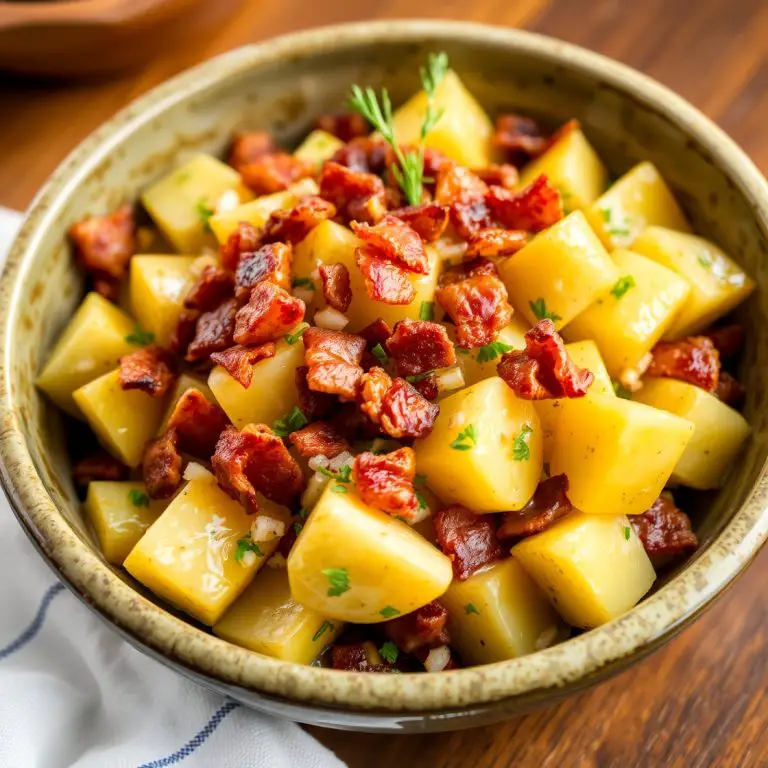
Bacon – Crispy bacon is a must. It brings smoky, salty crunch that ties everything together. Cook it until it’s crisp and crumble it into bite-sized pieces.
Mayonnaise – This forms the creamy base of the dressing. Full-fat mayo is recommended for the best flavor and texture.
Sour Cream – To lighten the mayo a bit and add some tang, sour cream is the perfect complement.
Apple Cider Vinegar – Just a splash helps brighten the whole dish and balance out the richness of the mayo and bacon.
Sugar – A small pinch of sugar enhances the natural sweetness of the peas and rounds out the dressing.
Salt & Pepper – Don’t forget to season! A good pea salad needs a little salt and a crack of black pepper to bring all the flavors to life.
That’s it. Simple ingredients, bold flavor.
How Much Time Will You Nee
Pea salad is a true 30-minute dish—if that. Most of the time goes into chopping and prepping, and there’s no actual cooking involved except for the bacon.
Here’s a rough breakdown:
- Prep Time: 15 minutes (mostly for chopping and mixing)
- Cook Time: 10 minutes (to crisp the bacon)
- Chill Time (Optional): 30 minutes for best flavor
- Total Time: About 25–30 minutes active time, or an hour if chilling
If you’re in a rush, you can absolutely serve it right after mixing. But if you’ve got time to chill it in the fridge, it only gets better.
How to Make This Pea Salad

Ready to make your new favorite side dish? Follow these simple steps and you’ll have a perfect pea salad in no time.
Step – 1: Thaw the Peas
Start with a 16-ounce bag of frozen peas. You can thaw them in the fridge overnight or place them in a colander and run cool water over them until they’re no longer icy. Drain well—excess water will make your salad watery.
Step – 2: Cook the Bacon
While the peas are thawing, fry up about 6 strips of bacon until crispy. You want that nice golden crunch. Drain them on a paper towel and once they’re cool, crumble into small bits.
Step – 3: Chop the Onion and Cheese
Dice half of a red onion very finely—no one wants a huge bite of raw onion. Then cut your cheddar into small cubes. About 1 cup of cheddar should be plenty.
Step – 4: Mix the Dressing
In a large mixing bowl, combine ½ cup mayonnaise, ¼ cup sour cream, 1 teaspoon apple cider vinegar, ½ teaspoon sugar, and a good pinch of salt and black pepper. Whisk until smooth.
Step – 5: Combine Everything
Add the thawed peas to the dressing. Gently fold in the onion, cheese, and most of the bacon (save a little for garnish). Stir until everything is evenly coated. Be gentle—you don’t want to mash the peas.
Step – 6: Chill (Optional)
You can serve it right away, but if you’ve got 30 minutes, pop it in the fridge. This lets the flavors really settle in.
Step – 7: Garnish and Serve
Sprinkle the reserved bacon on top just before serving for extra crunch and presentation.
That’s it. You’re ready to impress.
Substitutions
One of the best things about this recipe is how easily you can tweak it to suit your taste or dietary needs.
Maybe you don’t have all the ingredients, or maybe you’re just looking to mix it up—either way, here are a few swaps that work beautifully:
- Greek Yogurt for Sour Cream – Want to lighten it up? Greek yogurt offers the same tang but with more protein and less fat.
- Turkey Bacon or Vegetarian Bacon – For a healthier or meat-free version, swap in turkey bacon or your favorite plant-based option. Just make sure it’s crispy.
- Red Wine Vinegar or Lemon Juice for Apple Cider Vinegar – A splash of acidity is all you need, so use what you have on hand.
- Monterey Jack or Pepper Jack Cheese – Want a creamier or spicier twist? These cheeses melt into the salad just a little and offer fun flavor variations.
- Green Onions Instead of Red Onion – If red onion is too strong, try chopped green onions for a milder taste.
- Vegan Mayo and Dairy-Free Cheese – Want to go completely plant-based? Vegan options work well here and still deliver on taste.
The key is keeping the balance of creamy, crunchy, savory, and sweet. As long as you maintain that, you can get creative.
Best Side Dishes for Pea Salad
Pea salad is incredibly versatile, but it really shines when paired with the right main dish or side. Here are three options that will elevate your meal:
Grilled Chicken
Simple, juicy grilled chicken makes the perfect partner. The smoky char of the grill pairs beautifully with the cool creaminess of the salad.
Pulled Pork Sandwiches
A classic BBQ dish like pulled pork needs something tangy and refreshing to balance it out, and pea salad fits the bill perfectly.
Baked Potatoes
Load up a baked potato and serve this salad on the side—it’s a comfort food combo you didn’t know you needed.
Serving and Presentation Tips
A good dish becomes a great one with the right presentation—and pea salad is no exception.
Because it’s so visually fresh with pops of green, pink from the bacon, and orange from the cheddar, this salad doesn’t need much to look appealing. But how you serve it can elevate the entire experience.
For family meals, scoop it into a wide, shallow serving bowl and top with the reserved bacon and a sprinkle of freshly ground black pepper or chopped parsley for a little color and contrast. Want to impress at a gathering? Try serving it in individual ramekins or small glass jars for a fun, modern twist on classic picnic fare.
Pea salad also looks stunning in a white or pastel-colored ceramic dish that makes the vibrant ingredients pop—perfect for spring and summer gatherings.
If you’re serving outdoors, place the salad bowl over a bed of ice in a larger container to keep it cool and safe to eat. This tip is especially useful for picnics and barbecues.
Tips and Tricks to Make This Recipe Even Better

Want to make your pea salad stand out from every other version at the potluck? These tips and tricks will help you take it from good to unforgettable.
- Use Fresh Peas (If You Can Find Them): If you happen to find fresh sweet peas at the farmer’s market, use them. Blanch them quickly in boiling water for 1–2 minutes and then shock them in ice water to keep their bright color and tender texture.
- Let It Chill: If you have the time, chilling the salad for 30–60 minutes really enhances the flavor. It allows the dressing to soak into the peas and meld everything together beautifully.
- Double the Bacon: If your crowd loves bacon (and who doesn’t?), go ahead and double it. Just make sure you keep some pieces super crispy for that final sprinkle on top.
- Add Fresh Herbs: A touch of finely chopped dill or parsley can add freshness and complexity without overpowering the dish.
- Toss Gently: Peas are delicate. Stir gently to keep them whole—mashed peas will change the texture and appearance of the salad.
- Balance the Sweetness: Everyone’s taste is different. If you like things less sweet, reduce or skip the sugar. If you enjoy a more traditional Southern-style pea salad, keep it in.
Common Mistakes to Avoid
It’s a simple recipe, but even the classics can trip you up if you’re not careful. Here’s what to watch out for when making pea salad:
- Using Canned Peas: Canned peas are mushy and lack the bright flavor and firm bite that frozen peas provide. Stick to frozen or fresh for the best texture.
- Skipping the Chill Time: While you can eat it right away, the flavor improves significantly after resting. Give it a little time in the fridge if you can.
- Overmixing: Stirring too vigorously will crush the peas and break up the cheese. Use a light hand to keep everything intact.
- Not Draining the Peas: Water clinging to the peas will dilute the dressing, leaving your salad watery. Make sure your peas are thoroughly drained and patted dry if necessary.
- Too Much Dressing: The dressing should coat the ingredients, not drown them. Start with the amount in the recipe and add more only if needed.
How to Store It
Pea salad stores beautifully, making it an ideal make-ahead dish.
Transfer any leftovers to an airtight container and store in the refrigerator for up to 3 days. The flavors actually improve after the first day, so it’s perfect for prepping in advance.
If your salad seems a little dry after being refrigerated, stir in a small spoonful of mayonnaise or sour cream to refresh the texture.
Avoid freezing pea salad. The dairy-based dressing and peas don’t hold up well after thawing, resulting in a mushy, separated mess.
Always store the salad chilled and never leave it out at room temperature for more than two hours, especially if you’re serving it outdoors.
FAQ
Can I make pea salad ahead of time?
Absolutely. In fact, it tastes even better after sitting in the fridge for a bit. Just be sure to wait until right before serving to add the final bacon garnish for maximum crispness.
Can I use canned peas instead of frozen?
It’s not recommended. Canned peas are too soft and will likely turn mushy. Frozen peas hold their shape and flavor much better.
What type of cheese works best?
Sharp cheddar is the traditional choice because it stands up to the other bold flavors. However, Monterey Jack, Colby, or even crumbled feta can add fun variations.
Is this recipe gluten-free?
Yes, this pea salad is naturally gluten-free, provided all your ingredients (like the bacon) are certified gluten-free.
Can I make this without bacon?
Absolutely. Just skip the bacon or use a vegetarian alternative. You might also try adding sunflower seeds or toasted almonds for crunch.

Pea Salad Recipe
- Total Time: 25 minutes (plus optional chill time)
- Yield: 6 1x
- Diet: Gluten Free
Description
This creamy, crunchy pea salad is a timeless side dish that belongs at every summer gathering, potluck, or casual weeknight dinner. Made with sweet green peas, crispy bacon, sharp cheddar cheese, and a creamy dressing, this salad strikes the perfect balance of sweet and savory. It’s quick to make, easy to prepare in advance, and endlessly customizable. Whether you’re pairing it with grilled meats, sandwiches, or serving it on its own, this simple dish never fails to satisfy.
Ingredients
Instructions
- Thaw peas and drain thoroughly. Pat dry with paper towels if necessary.
- In a skillet, cook bacon until crispy. Drain on paper towels and crumble.
- Dice red onion and cube cheddar cheese into small bite-sized pieces.
- In a large bowl, whisk together mayonnaise, sour cream, vinegar, sugar, salt, and pepper until smooth.
- Add the peas, onion, cheese, and most of the bacon. Stir gently to coat everything in the dressing.
- Chill for at least 30 minutes if possible. Just before serving, sprinkle the remaining bacon on top.
Notes
- For a tangier twist, add a teaspoon of Dijon mustard to the dressing.
- If making ahead, store the salad in the fridge and wait to add bacon until serving.
- Taste and adjust seasoning as needed before serving.
- Prep Time: 15 minutes
- Cook Time: 10 minutes (bacon)
- Category: Side Dish
- Method: No-cook
- Cuisine: American
Nutrition
- Serving Size: 6
- Calories: 295
- Sugar: 4g
- Sodium: 460mg
- Fat: 24g
- Saturated Fat: 7g
- Unsaturated Fat: 12g
- Trans Fat: 0g
- Carbohydrates: 10g
- Fiber: 3g
- Protein: 9g
- Cholesterol: 35mg