Ever find yourself craving a dessert that’s both indulgent and easy to make, yet has that wow factor for family and friends? That’s exactly why I created this Oreo Pie Crust recipe. I’ve always loved the combination of chocolate and cream, and I wanted a base that could carry any filling—be it a creamy cheesecake, chocolate mousse, or a fruity delight—while still standing out on its own.
This recipe is a game-changer because it’s simple, requires only a few ingredients, and delivers a rich, chocolatey flavor with a crunchy texture. You don’t have to be a professional baker to make a pie that looks like it belongs in a fancy bakery. I’m going to guide you step-by-step so you can master this crust and wow everyone at your next gathering.
Whether you’re making it for a birthday, a holiday, or just a casual treat at home, this Oreo Pie Crust will quickly become a staple in your dessert repertoire. Keep reading, because by the end, you’ll know exactly how to make a crust that’s both delicious and impressively professional-looking.
Why I Love This Recipe

There’s something magical about a dessert that feels both indulgent and approachable, and that’s exactly what this Oreo Pie Crust does.
First, the flavor. You get the chocolate richness from the cookies, balanced perfectly with a hint of buttery goodness. It’s the kind of crust that melts in your mouth but also holds together beautifully, which is crucial when you’re adding creamy fillings.
Second, the versatility. I love making this crust because I can use it for any kind of pie or tart. Chocolate lovers, fruit enthusiasts, or fans of cream pies—everyone finds something to adore about this crust.
Lastly, it’s an instant crowd-pleaser. There’s a reason Oreo desserts are universally loved. This pie crust turns ordinary pies into something extraordinary without requiring complicated techniques or hard-to-find ingredients. It’s fun to make, easy to customize, and always leaves people asking for the recipe.
Ingredients for Oreo Pie Crust
To make this recipe perfect, it’s important to have the right ingredients on hand. Here’s what you’ll need:
- Oreo cookies – 24 cookies (the classic kind with cream filling). I prefer crushing them myself to control the texture, but you can also use a food processor.
- Unsalted butter – 6 tablespoons, melted. The butter binds the crumbs together and adds a touch of richness.
- Optional: a pinch of salt to enhance the chocolate flavor.
I love keeping it simple because the quality of these three ingredients alone is enough to create a flavorful and sturdy crust. The cookies provide the base flavor, the butter adds cohesion and richness, and the pinch of salt lifts all the flavors to perfection.
How Much Time Will You Need
The beauty of this recipe is that it’s incredibly fast and straightforward.
- Prep time: 10 minutes
- Chill time (if needed): 15–20 minutes
- Total time: 25–30 minutes
You can whip up this crust in no time, which makes it perfect for last-minute desserts. If you’re preparing it for a no-bake filling, you might want to chill it a bit longer to help it set perfectly.
How to Make This Oreo Pie Crust
Making this Oreo Pie Crust is easier than most people think. Just follow my step-by-step guide:
Step – 1: Preheat your oven to 350°F (175°C) if you’re baking the crust. For no-bake pies, you can skip this step.
Step – 2: Crush the Oreo cookies. Remove the filling if you prefer, or leave it in for extra sweetness. You can use a food processor or place them in a plastic bag and crush with a rolling pin until they become fine crumbs.
Step – 3: Mix the crushed cookies with melted butter. Stir until every crumb is coated with butter. This helps the crust stick together and hold its shape.
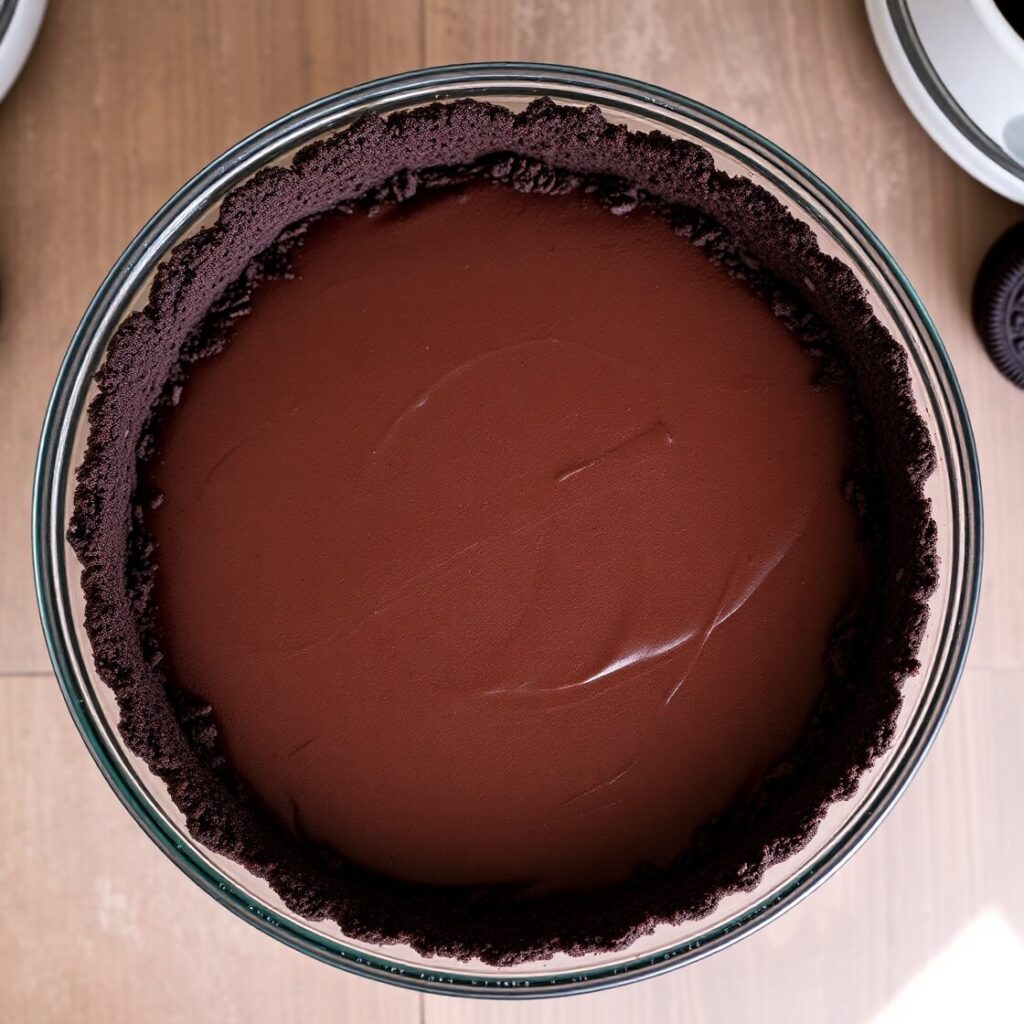
Step – 4: Press the mixture into a 9-inch pie pan. Use the bottom of a measuring cup to press firmly and evenly, creating a solid, compact crust. Don’t forget to press a little along the edges to form a neat border.
Step – 5: Chill or bake the crust. For a no-bake pie, place the crust in the fridge for at least 15 minutes. For a baked crust, put it in the preheated oven for 8–10 minutes, then allow it to cool completely before adding your filling.
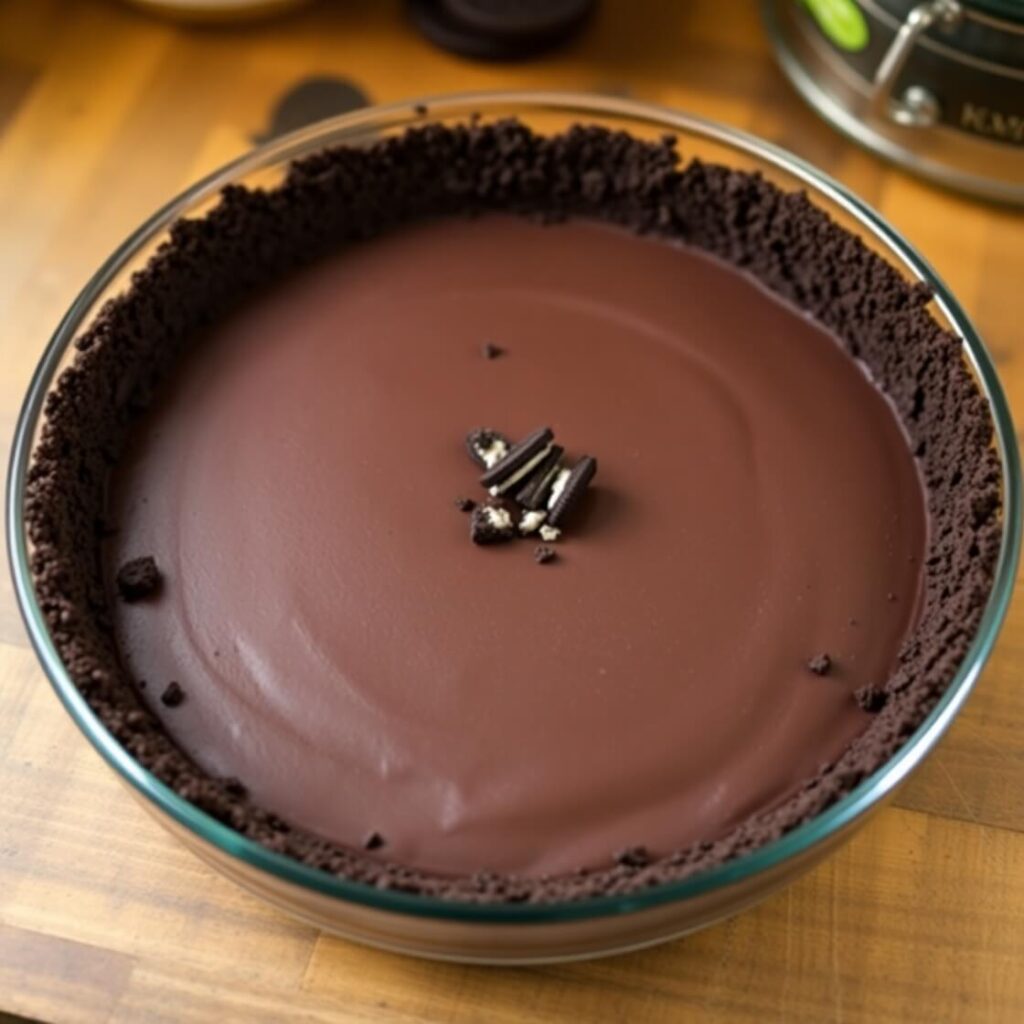
Step – 6: Once cooled or chilled, your Oreo Pie Crust is ready to be filled with your favorite pie filling, whether it’s chocolate ganache, cheesecake, or fresh fruit.
This step-by-step method ensures that even a beginner baker can achieve a professional-looking crust that’s crunchy, flavorful, and perfect for any dessert.
Substitutions
Want to switch things up or need alternatives? Here are some ideas:
- Instead of classic Oreos, you can use chocolate sandwich cookies or gluten-free cookies if needed.
- For a dairy-free version, substitute butter with coconut oil or a vegan butter alternative.
- If you prefer a slightly less sweet crust, remove the cream filling from the cookies before crushing.
These substitutions allow you to adapt the recipe for dietary needs or personal taste preferences without compromising the texture or flavor of the crust.
Best Side Dishes of Oreo Pie Crust
While the crust itself is a dessert base, pairing it with complementary treats can elevate the eating experience:
- Whipped cream – A simple dollop adds lightness and balances the richness.
- Fresh berries – Strawberries, raspberries, or blueberries bring a refreshing burst of flavor.
- Ice cream – Vanilla or chocolate ice cream pairs beautifully with the chocolatey crust.
These sides make serving the pie more exciting and enhance every bite, creating a complete dessert experience.
Serving and Presentation Tips
Serving your Oreo Pie Crust is just as important as making it. A well-presented dessert instantly grabs attention and makes the eating experience more enjoyable.
I love to start by carefully slicing the pie to ensure clean edges. Using a hot knife works wonders; just dip it in hot water and wipe dry before slicing. This prevents crumbs from sticking and gives you perfect slices.
For an extra touch, I often garnish the top of the pie with chocolate shavings, crushed Oreos, or a drizzle of chocolate sauce. Adding a dollop of whipped cream or a few fresh berries around the edges instantly elevates the presentation.
Plating is also key. A simple, white serving plate allows the rich, dark color of the crust to shine, while a glass pie dish shows off the layered texture beautifully. These small details make your dessert feel gourmet without extra effort.
Tips and Tricks to Make This Recipe Even Better
Even though this Oreo Pie Crust is straightforward, a few small tweaks can take it to the next level:
- Use room-temperature butter. It blends more evenly with the cookie crumbs, resulting in a smoother, more cohesive crust.
- Don’t skip pressing the crust firmly. A loosely packed crust can crumble when slicing or serving.
- Chill before baking. Even for baked pies, letting the crust rest in the fridge for 10–15 minutes helps it hold its shape.
- Mix cookie crumbs to different textures. I sometimes leave a few larger pieces for added crunch—it creates a more interesting bite.
- Avoid overbaking. The crust should feel set but not hard. A few extra minutes in the oven can turn it too dry.
These tips ensure your crust is perfectly balanced—crispy, flavorful, and easy to slice.
Common Mistakes to Avoid
Making desserts can be intimidating, but a few common mistakes are easy to sidestep:
- Not crushing the cookies evenly. Fine crumbs are ideal for a smooth, cohesive crust.
- Skipping the butter or using too little. Without enough fat, the crust won’t hold together.
- Overpacking the crust. Press firmly, but don’t make it rock-hard; it will become difficult to cut.
- Adding fillings to a warm crust. Let baked crusts cool completely; otherwise, creamy fillings can melt or become runny.
- Ignoring chilling time. A cold crust holds fillings better and slices more cleanly.
By avoiding these missteps, you’ll consistently achieve a professional-quality crust every time.
How to Store It
Storage is simple, but a few rules help maintain freshness and texture:
- For unbaked crusts: Cover with plastic wrap and refrigerate up to 2 days before filling.
- For baked crusts: Store in an airtight container at room temperature for 3–4 days or in the fridge for up to a week.
- Freeze for longer storage: Wrap tightly in plastic wrap and foil; freeze up to 2 months. Thaw in the fridge before filling.
Proper storage ensures that your crust stays crisp, flavorful, and ready for any dessert creation.
Frequently Asked Questions
Can I make this crust gluten-free?
Yes! Simply use gluten-free chocolate sandwich cookies instead of Oreos. The texture may be slightly different, but the flavor remains excellent.
Do I have to bake the crust?
Not at all. This recipe works perfectly as a no-bake crust, ideal for cheesecakes, mousse pies, or pudding pies.
Can I use margarine instead of butter?
Yes, but I recommend unsalted butter for the best flavor and consistency. Margarine may slightly alter taste and texture.
How long does the crust stay crisp after filling?
It’s best enjoyed within 24–48 hours for maximum crunch. If using very wet fillings, consider lining the crust with a thin layer of melted chocolate to help prevent sogginess.
Can I double the recipe for a larger pan?
Absolutely! Just adjust the amount of butter accordingly and ensure you press it evenly in the pan.

Oreo Pie Crust
- Total Time: 25 minutes
- Yield: 19 1x
- Diet: Vegetarian
Description
This Oreo Pie Crust is the perfect base for any dessert. With a rich chocolate flavor and firm, crunchy texture, it pairs beautifully with cheesecakes, cream pies, mousse pies, or even fresh fruit toppings. Easy to make, versatile, and universally loved, this crust is a must-have in any baker’s repertoire. You’ll find yourself making it over and over for birthdays, holidays, or simply because life is better with Oreos.
Ingredients
- 24 Oreo cookies (with or without cream filling)
- 6 tablespoons unsalted butter, melted
- Optional: pinch of salt
Instructions
- Crush the Oreo cookies into fine crumbs.
- Mix the crumbs with melted butter until fully combined.
- Press the mixture into a 9-inch pie pan, evenly along the bottom and sides.
- Chill for 15–20 minutes for a no-bake crust, or bake at 350°F (175°C) for 8–10 minutes and cool completely.
- Fill with your favorite pie filling and serve.
Notes
- For added texture, leave a few larger cookie pieces.
- Chill before slicing for cleaner cuts.
- Line crust with melted chocolate for wet fillings to prevent sogginess.
- Prep Time: 10 minutes
- Cook Time: 10 minutes (optional)
- Category: Dessert
- Method: Baking (optional)
- Cuisine: American
Nutrition
- Serving Size: 19
- Calories: 210
- Sugar: 14g
- Sodium: 90mg
- Fat: 12g
- Saturated Fat: 7g
- Unsaturated Fat: 4g
- Trans Fat: 0g
- Carbohydrates: 28g
- Fiber: 1g
- Protein: 2g
- Cholesterol: 20mg