I remember the first time I made Oreo frosting—it was for my niece’s birthday cake. I wanted something that had the creamy sweetness of classic frosting but with that unmistakable crunch and flavor of Oreos. The result? A frosting so indulgent that everyone at the party couldn’t resist going back for seconds. Oreo frosting isn’t just for cakes—it’s perfect for cupcakes, cookies, or even as a decadent dip for fruits and snacks.
What I love about this recipe is how simple it is to make, yet it transforms any dessert into a showstopper. With just a few ingredients, you can create a rich, creamy, and delightfully crunchy frosting that screams comfort and celebration. Once you try it, you’ll understand why it’s a favorite for so many home bakers.
If you’ve ever wanted that perfect balance of smooth creaminess with bits of crunchy Oreos, you’re in for a treat. Keep reading, and I’ll show you step-by-step how to make the ultimate Oreo frosting in your own kitchen.
Why I Love This Recipe

Oreo frosting is the ultimate crowd-pleaser. There’s something magical about the way sweet, creamy frosting combines with the slight crunch of crushed Oreos. I love this recipe because it’s incredibly versatile—you can pipe it onto cupcakes, spread it thick on a layered cake, or even serve it as a frosting dip for brownies.
The specialty of this frosting lies in its texture. The base is rich and smooth, but the crushed cookies add a subtle crunch that makes every bite exciting. It’s not too sweet, not too heavy, and it holds its shape beautifully, making it perfect for decorating.
For me, making this frosting is also about the joy of sharing it. I’ve seen friends and family light up when they taste it, and I love knowing that such a simple recipe can create that kind of happiness. It’s indulgent, comforting, and a little nostalgic—who doesn’t love Oreos from their childhood?
Ingredients for Oreo Frosting
To make the perfect Oreo frosting, you’ll need a few simple ingredients. I always recommend using high-quality ingredients because the flavor truly shines through.
- Unsalted butter: This is the base of your frosting. Make sure it’s soft and at room temperature for the creamiest results.
- Powdered sugar: This adds sweetness and gives the frosting a silky texture. Sift it first to avoid lumps.
- Heavy cream: Just a splash to make the frosting smooth and spreadable.
- Vanilla extract: This elevates the flavor and adds a warm, comforting aroma.
- Oreos: The stars of the show! Crush them finely or coarsely, depending on your preference. Some people like larger chunks for added crunch.
These ingredients come together to create a frosting that’s decadent but not overwhelming. You don’t need anything fancy—just simple pantry staples and your favorite Oreos.
How Much Time Will You Need
One of the reasons I adore this recipe is how quick it is to make. From start to finish, you’re looking at about 15 to 20 minutes. That’s right—less than half an hour for a frosting that tastes like it came from a bakery.
- Prep time: 10 minutes (this includes crushing the Oreos)
- Mixing time: 5–10 minutes
It’s perfect for last-minute cakes or cupcakes, or even when you’re just craving something sweet and creamy.
How to Make Oreo Frosting
Step-by-step instructions make this recipe foolproof. I promise, even if you’ve never made frosting before, you’ll be able to follow along.
Step – 1: Soften the butter
Start by placing your unsalted butter in a large mixing bowl. Use a hand mixer or stand mixer to beat it until it’s smooth and creamy. This step ensures your frosting won’t have lumps and will be perfectly silky.
Step – 2: Add powdered sugar
Gradually add the sifted powdered sugar, one cup at a time. Beat on low speed at first to avoid a cloud of sugar, then increase to medium-high. Mix until fully incorporated and smooth.
Step – 3: Mix in heavy cream and vanilla
Add a splash of heavy cream and the vanilla extract. Beat for another 2–3 minutes. This is when the frosting becomes creamy and spreadable. Adjust the cream slightly if you want a thinner or thicker consistency.
Step – 4: Crush Oreos
While the frosting is mixing, crush your Oreos. You can use a food processor for a finer texture or a rolling pin for chunkier pieces. I like a mix of finely crushed and small chunks—it adds a fun texture.
Step – 5: Fold in Oreos
Gently fold the crushed Oreos into the frosting using a spatula. Be careful not to overmix, or the frosting might lose some of its fluffiness. You want the cookies evenly distributed throughout.
Step – 6: Taste and adjust
Give your frosting a taste. If you want it sweeter, add a little more powdered sugar. For extra creaminess, add a bit more heavy cream. Once satisfied, it’s ready to use!
Substitutions
Don’t have Oreos or butter on hand? No problem. You can use chocolate sandwich cookies instead of Oreos—the taste will be slightly different but still delicious. For a dairy-free version, try using vegan butter and a non-dairy cream, such as coconut cream.
If you want a less sweet version, reduce the powdered sugar slightly, or for a richer flavor, consider adding a touch of cream cheese. Each substitution tweaks the flavor in a fun way, allowing you to make this frosting uniquely yours.
Best Side Dish of Oreo Frosting
Oreo frosting is incredibly versatile, but pairing it with the right dessert can elevate your experience. Here are three of my favorites:
- Classic chocolate cake: The creamy Oreo frosting pairs perfectly with moist chocolate layers.
- Vanilla cupcakes: A simple vanilla base allows the frosting to shine.
- Brownies: Spread a thick layer on fudgy brownies for a decadent treat.
Each of these combinations highlights the rich, creamy, and slightly crunchy texture of the frosting in a different way, making every bite a delight.
Serving and Presentation Tips
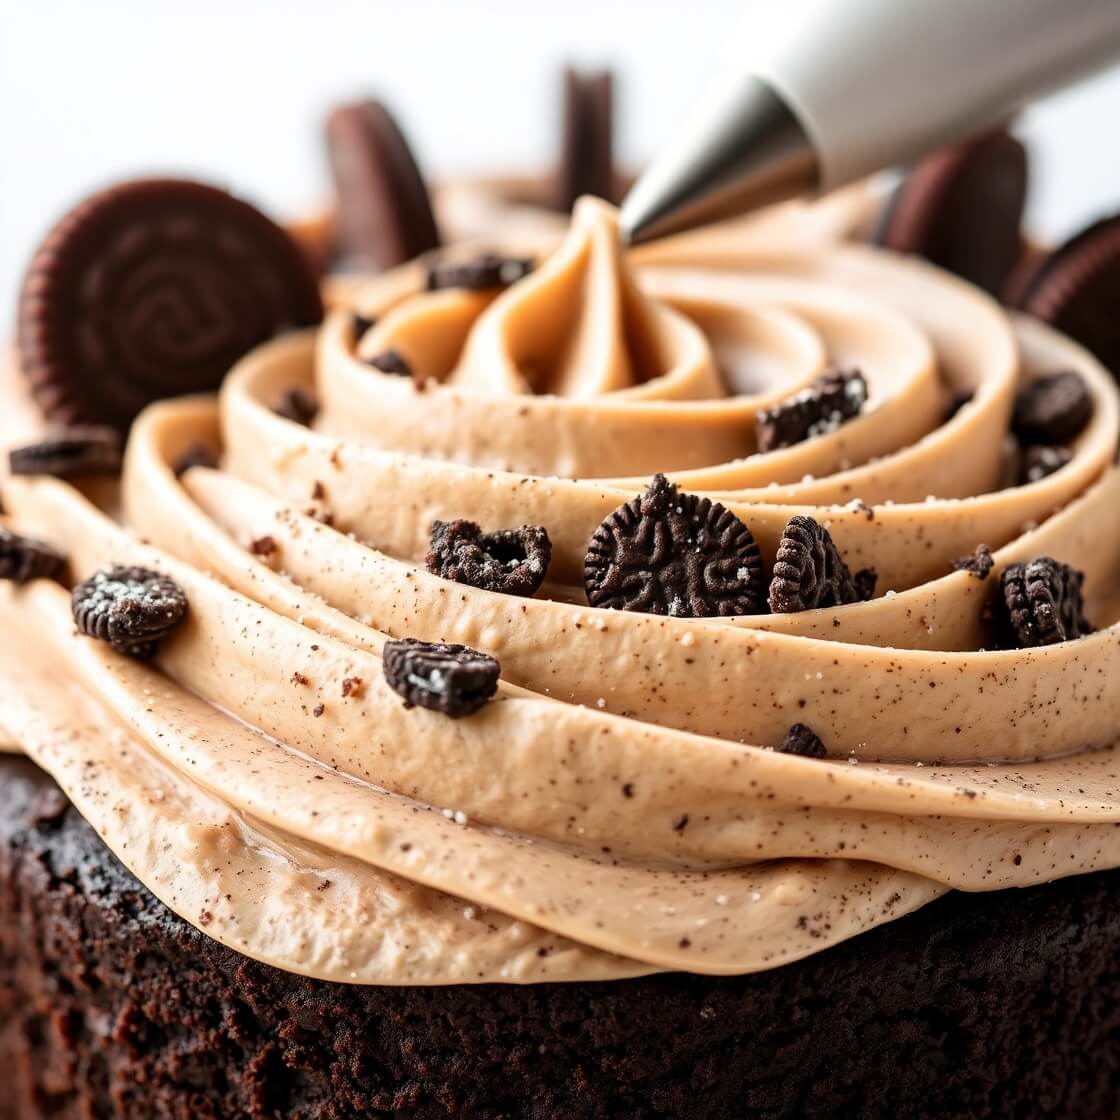
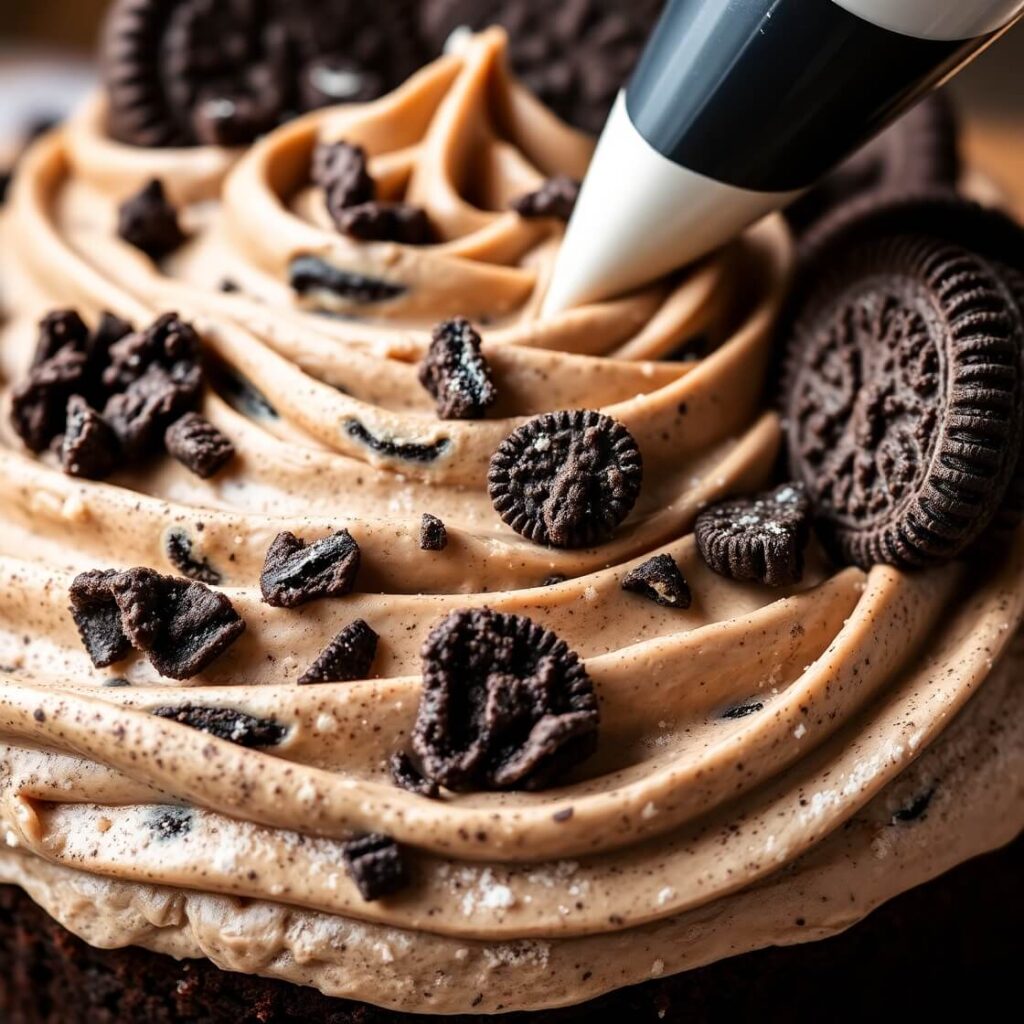
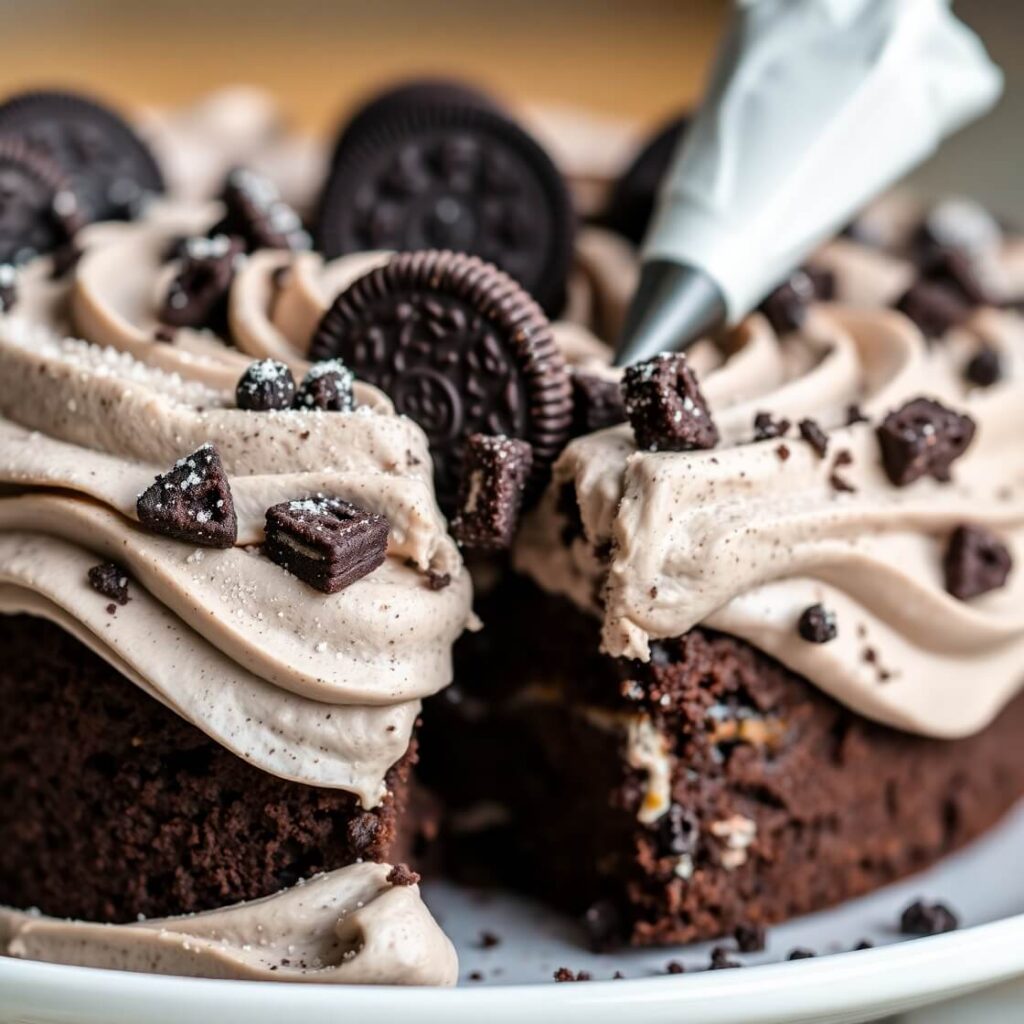
When it comes to serving Oreo frosting, presentation can make all the difference. I love using a piping bag with a large star tip to create beautiful swirls on cupcakes or cakes—it instantly makes the dessert look bakery-quality.
Sprinkle a few crushed Oreos on top for an added visual touch and texture. You can also add a drizzle of melted chocolate over the frosting for a touch of elegance. If you’re feeling playful, whole mini Oreos can be placed upright on cupcakes or along the edge of a frosted cake to create a fun, whimsical look.
For a more casual presentation, simply spread the frosting generously with an offset spatula—it looks rustic and inviting. The key is to make it look as indulgent as it tastes, because we eat with our eyes first!
Tips and Tricks to Make This Recipe Even Better
I’ve made this frosting dozens of times, and I’ve learned a few tricks that make it absolutely perfect every time.
- Make sure your butter is at room temperature—it should be soft but not melting. This ensures a smooth, creamy texture.
- Sift your powdered sugar to avoid any lumps in the frosting. Lumpy frosting can be frustrating to spread or pipe.
- Don’t overmix once you add the Oreos. Gentle folding preserves the fluffiness of your frosting and keeps the cookie pieces intact.
- For extra stability, especially if you’re decorating a layered cake, chill the frosting for 15–20 minutes before piping.
- Customize the cookie texture. Some people love a completely smooth frosting, while others prefer larger chunks of Oreos for extra crunch. Mix according to your preference.
These small adjustments can make a big difference, especially if you want your frosting to hold up beautifully and taste indulgent.
Common Mistakes to Avoid
Even simple recipes can have pitfalls. Here’s what I see most often with Oreo frosting:
- Using cold butter: It won’t mix smoothly and can result in a lumpy frosting.
- Adding Oreos too early: If you mix them in at the beginning, the frosting can become too dense and lose its fluffy texture.
- Skipping the sift: Powdered sugar can clump, making your frosting gritty instead of silky.
- Overmixing: Once the cookies are in, overmixing can crush them too much, ruining the texture.
- Not adjusting cream: If your frosting is too thick to spread, don’t panic—add a teaspoon of heavy cream at a time until it’s the perfect consistency.
Avoiding these common mistakes ensures your frosting turns out creamy, fluffy, and irresistible every time.
How to Store It
Oreo frosting can be stored in an airtight container in the refrigerator for up to a week. I like to bring it to room temperature before using it, then give it a quick whisk to restore its creamy texture.
For longer storage, you can freeze Oreo frosting for up to three months. Thaw it overnight in the fridge, then whip it again before using. This makes it convenient if you want to prepare frosting ahead of time for a special occasion.
FAQ
Can I use low-fat ingredients for Oreo frosting?
Yes, but keep in mind that the texture may be slightly less creamy. Full-fat butter and cream provide the best consistency and flavor.
Can I make this frosting without a mixer?
Absolutely! You can use a whisk or a sturdy spoon, but it will take more effort to achieve the same smooth, fluffy texture.
How many Oreos should I add?
I typically use 8–10 standard Oreos for a batch of frosting. You can adjust based on your preference for cookie chunks.
Can I use this frosting on cookies instead of cakes?
Yes! It works beautifully as a filling for sandwich cookies or as a topping for simple sugar cookies.
Is this frosting suitable for kids?
Definitely. It’s sweet, creamy, and safe for children. Just be mindful of portion sizes since it’s rich.

Oreo Frosting
- Total Time: 15–20 minutes
- Yield: 12 1x
- Diet: Vegetarian
Description
This Oreo frosting is creamy, dreamy, and perfect for any dessert. Packed with crushed Oreo cookies and velvety buttercream, it’s a sweet indulgence that works on cakes, cupcakes, brownies, and even as a dip for fruits. Quick to make and versatile, it’s a must-try for anyone who loves the classic cookie flavor with a rich, creamy twist. Perfect for birthdays, celebrations, or simply treating yourself.
Ingredients
- 1 cup unsalted butter, softened
- 3 cups powdered sugar, sifted
- 2–3 tablespoons heavy cream
- 1 teaspoon vanilla extract
- 8–10 Oreo cookies, crushed
Instructions
- Beat softened butter until creamy.
- Gradually add powdered sugar, beating until smooth.
- Mix in heavy cream and vanilla extract.
- Crush Oreos and fold gently into frosting.
- Adjust sweetness or cream as needed.
- Frost your cake, cupcakes, or dessert as desired.
Notes
- Chill frosting briefly before piping for better structure.
- Adjust Oreo chunks for smoother or crunchier texture.
- Store in an airtight container in the fridge or freezer.
- Prep Time: 10 minutes
- Cook Time: 0 minutes
- Category: Dessert
- Method: No-bake
- Cuisine: American
Nutrition
- Serving Size: 12
- Calories: 200
- Sugar: 22g
- Sodium: 50mg
- Fat: 12g
- Saturated Fat: 7g
- Unsaturated Fat: 7g
- Trans Fat: 0g
- Carbohydrates: 26g
- Fiber: 0.5g
- Protein: 1g
- Cholesterol: 25mg