There are a handful of desserts in my life that instantly transport me back to childhood, and Oreo cake is one of them. I remember the first time I attempted something like this—on a random Saturday afternoon when I had a serious craving for something chocolatey but didn’t want the usual brownies or cupcakes. I rummaged around the pantry, spotted a half-full pack of Oreos (a miracle in itself), and thought, “Why not turn these into a cake?”
That first version wasn’t perfect, but the reaction from my family was unforgettable. My sister took one bite and said it tasted like a giant, soft Oreo cookie—creamy, chocolatey, and nostalgic in the best way. Ever since then, this oreo cake recipe has become one of my go-to crowd-pleasers, whether it’s for birthdays, lazy weekends, or just when someone needs a little comfort.
What I love about making Oreo cake is that it feels fun and playful. There’s something about crushing cookies, folding them into a fluffy batter, and frosting it all with a creamy, cookies-and-cream topping that makes the whole kitchen smell just a little sweeter. It’s the kind of recipe that looks impressive but is incredibly approachable, even if baking isn’t your strong suit.
If you adore Oreos—or if you simply want a dessert guaranteed to make people smile—this cake belongs in your recipe box. It’s moist, rich, and unapologetically indulgent, exactly the way an Oreo dessert should be.
So let’s dive into what makes this one special.
Why I Love This Recipe
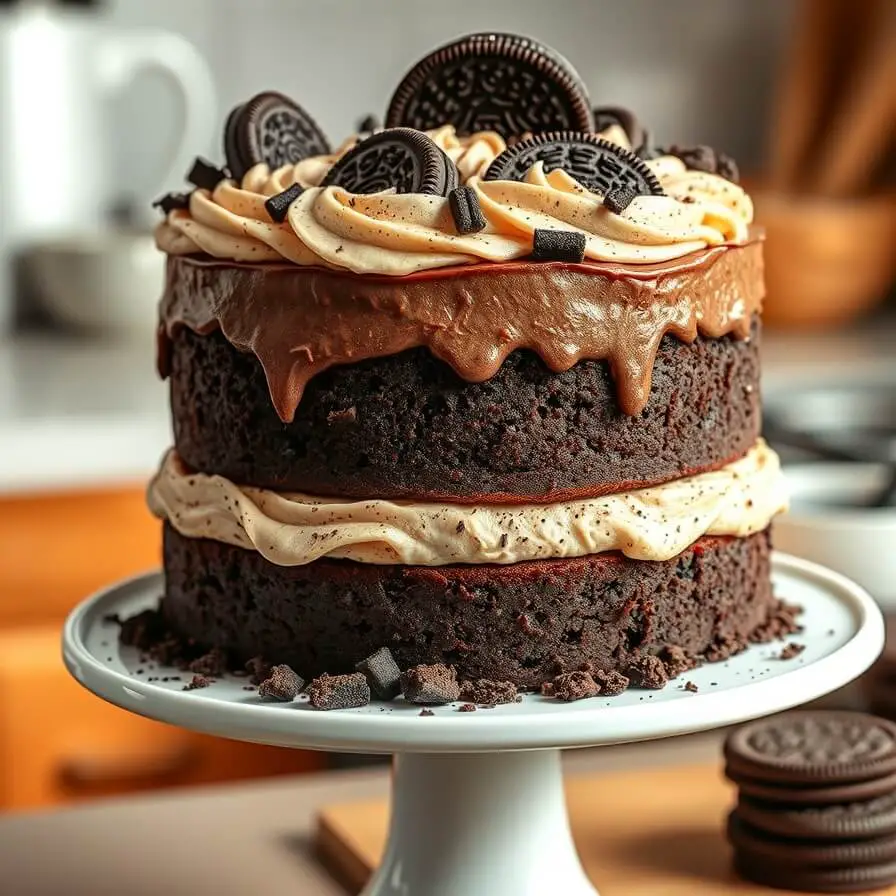
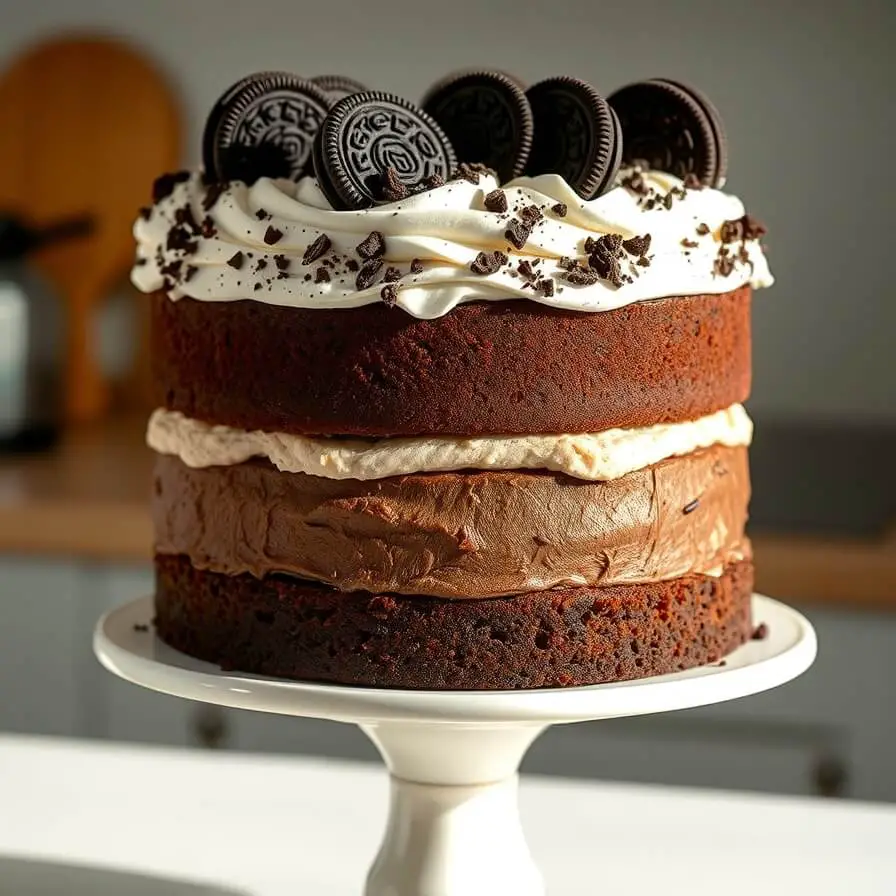
There are so many chocolate cakes in the world, but this Oreo cake stands out because it strikes the perfect balance between light, creamy sweetness and deep chocolate flavor. What really makes it special is that the Oreos aren’t just sprinkled on top—they’re built into every layer. You’ll taste them in the batter, see them in the frosting, and enjoy that iconic cookie crunch in each bite.

I love this recipe because it doesn’t feel overly fancy or fussy. Instead, it leans into the familiar flavor we all grew up loving. The texture is another thing I adore. While Oreos are crispy on their own, in this cake they soften slightly and become tender little pockets of chocolate within the sponge. It’s such a satisfying contrast against the velvety frosting.
This recipe is also incredibly versatile. You can serve it as a layer cake for a celebration, bake it in a simple sheet pan for a casual dessert, or even turn it into cupcakes for parties. It’s one of those recipes where no matter how you prepare it, the flavor hits the mark every single time.
And honestly, there’s something comforting about baking with ingredients that feel familiar and approachable. You don’t need exotic chocolate or special equipment—just pantry staples, a pack of Oreos, and a willingness to lick the frosting bowl afterward. This cake makes people happy, and that’s always a good enough reason to bake it.
Ingredients for Oreo Cake
When I say this recipe uses simple ingredients, I really mean it. Everything you need is something you can easily grab from your grocery store—or probably already have at home—and the Oreos do most of the flavor heavy lifting.
You’ll need classic Oreo cookies, and I always go for the regular filling, not double-stuffed. The double-stuffed ones can make the batter too sweet and the frosting too heavy. Regular Oreos give you the perfect balance of cookie crunch and cream filling.
For the cake base, you’ll use your typical baking staples: all-purpose flour for structure, sugar to keep it soft and moist, cocoa powder for that rich chocolate kick, and baking soda and baking powder for lift. You’ll also need eggs, which bind everything together, and buttermilk, which gives the cake its tender crumb and subtly tangy flavor. If you don’t usually keep buttermilk at home, trust me—this is the one recipe where it really makes a difference.
Oil plays a key role here, too. Instead of using only butter, which can sometimes create a denser cake, oil keeps the batter moist for days. And let’s be honest: a cake made with oil tastes even better the next day, which means leftovers (if you have any) will be just as delicious.
For the frosting, you’ll be making a cookies-and-cream buttercream. This includes softened butter, powdered sugar, a splash of heavy cream, a little vanilla extract, and, of course, finely crushed Oreos. Make sure the Oreo crumbs are very fine so they blend smoothly into the frosting—chunky crumbs can clog your piping bag if you’re decorating.
All the ingredients come together in a way that feels effortless but creates a cake that’s rich, soft, and absolutely irresistible.
How Much Time Will You Need
The best part about this Oreo cake is that it doesn’t take all day. From start to finish, you can have it ready in around an hour and a half, depending on how quickly you work.
Mixing the batter takes roughly 15 minutes, baking takes about 30–35 minutes, and cooling takes a bit longer—usually another 25–30 minutes. The frosting comes together in about 10 minutes, and assembling the cake adds another 10–15 minutes depending on how detailed you want to get with your decorations.
If you’re making a layer cake, plan for a full 90 minutes. If you’re baking it as a sheet cake, you might finish slightly earlier. Either way, it’s a recipe you can easily make on a weeknight or whip up on a relaxed weekend without spending hours in the kitchen.
How to Make This Oreo Cake
Step – 1: Prepare your baking pans
Start by preheating your oven to 350°F. Grease your cake pans and line the bottoms with parchment paper so the layers come out cleanly. This step makes your life so much easier later.
Step – 2: Crush your Oreos
Place several Oreos in a zip-top bag and crush them with a rolling pin until you have chunky crumbs. A few larger pieces are perfectly fine. These will fold into the batter later and create soft pockets of cookie goodness.
Step – 3: Mix the dry ingredients
In a large bowl, whisk together the flour, sugar, unsweetened cocoa powder, baking powder, baking soda, and a pinch of salt. Make sure everything is evenly mixed so your cake rises beautifully.
Step – 4: Combine the wet ingredients
In another bowl, whisk together the eggs, buttermilk, oil, and vanilla extract. This mixture should be smooth, glossy, and slightly thick.
Step – 5: Bring the batter together
Pour the wet mixture into the dry mixture and whisk until the batter is smooth. Then stir in hot water or hot coffee. This step deepens the chocolate flavor and loosens the batter—it will look thin, but that’s exactly how it should be.
Step – 6: Fold in the crushed Oreos
Gently fold in your cookie crumbs. Don’t overmix. You want the pieces to stay visible in the final cake.
Step – 7: Pour and bake
Divide the batter evenly between your prepared pans and bake for about 30–35 minutes. The cakes are ready when a toothpick inserted into the center comes out clean or with just a few moist crumbs.
Step – 8: Prepare the frosting
Beat softened butter until creamy, then gradually add powdered sugar, vanilla, and heavy cream. Once smooth, fold in finely crushed Oreos. Your frosting should look speckled and fluffy.
Step – 9: Assemble the cake
Once the layers are completely cool, spread a generous layer of frosting between them. Add more frosting around the outside and smooth it out. Decorate the top with extra Oreo crumbs or halved cookies.
Step – 10: Let it rest
Allow the cake to sit for at least 20 minutes before slicing. This helps the layers set and gives that irresistible clean cut.
Substitutions
Sometimes ingredient swaps aren’t just necessary—they can make the whole recipe easier or even tastier.
If you don’t have buttermilk, you can create your own by mixing whole milk with a tablespoon of lemon juice or white vinegar. Let it sit for a few minutes, and it will thicken beautifully. This homemade version gives the cake the same tender crumb as traditional buttermilk.
If you need the cake to be slightly less sweet, you can use dark cocoa powder instead of regular cocoa powder. This gives the cake a richer, more intense chocolate flavor.
You can also switch the oil to melted butter if you want a denser, more decadent cake. I prefer oil for the moisture it adds, but butter does create a lovely flavor.
For the frosting, if you’re not a fan of buttercream, you can use whipped cream frosting instead. It makes the cake much lighter and gives a more mousse-like texture.
And if Oreos aren’t your thing (or if you need a gluten-free option), you can swap them for another brand of chocolate sandwich cookies that fit your dietary needs.
Best Side Dish of Oreo Cake
Even though Oreo cake shines all by itself, pairing it with the right side treats or accompaniments makes the experience extra special.
A fresh glass of cold milk is the classic partner—simple but perfect.
A scoop of vanilla ice cream also pairs beautifully, offering a cool contrast to the rich chocolate cake.
And for something more grown-up, a mug of strong black coffee really brings out the chocolate flavors without overpowering the sweetness.
Serving and Presentation Tips
There’s something magical about presenting an Oreo cake. Even before anyone takes a bite, you can feel the excitement building. Oreo desserts just have that effect—nostalgic, playful, and full of charm. When I serve this cake at gatherings, people always lean in a little closer, trying to guess just how many Oreos are hiding inside.
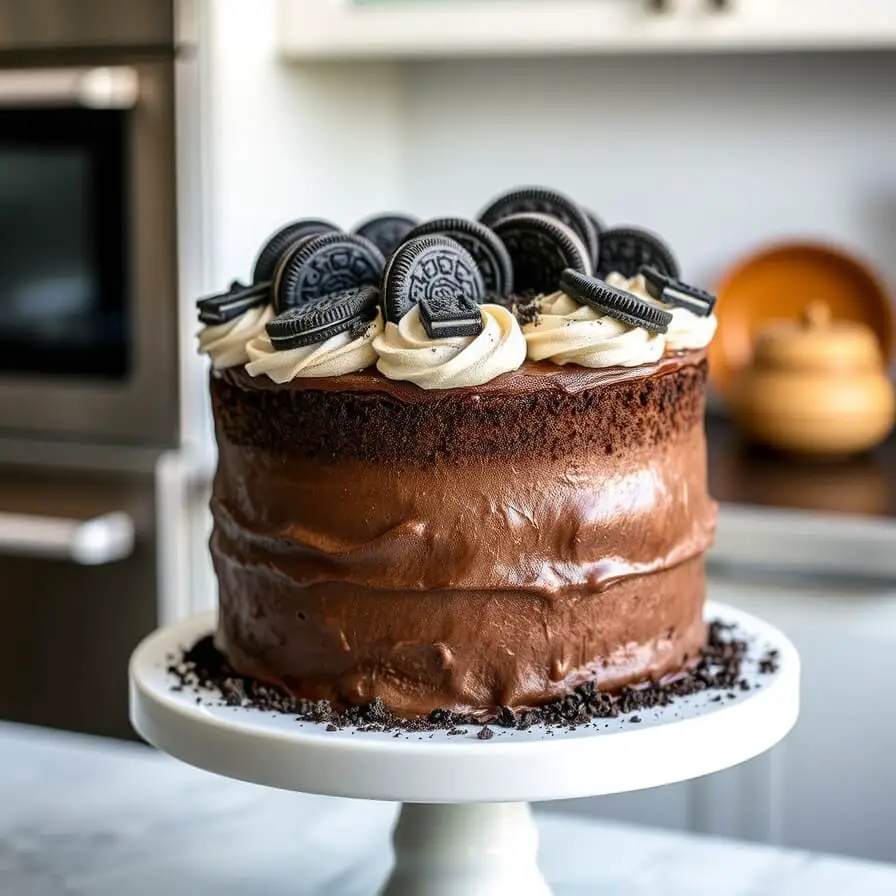
One of my favorite presentation tricks is to keep things simple but intentional. A smooth layer of cookies-and-cream frosting creates a gorgeous base, and then you can add texture by pressing crushed Oreos around the sides. It gives the cake that “bakery-style” finish without needing any complicated piping work.
If you want a more polished look, you can pipe little swirls of frosting along the top edge and place halved Oreos into each swirl. The contrast between the dark cookie and the soft, speckled frosting creates a visual that’s hard to resist.
When serving slices, wipe your knife between cuts to keep the layers clean. Oreo frosting can be a little sticky, but this small step makes each slice look perfect on the plate. And if you want to go the extra mile, drizzle a thin ribbon of warm chocolate sauce over each slice right before serving. It’s not necessary, but it does add an indulgent touch.
Tips and Tricks to Make This Recipe Better
It’s hard to go wrong with an Oreo cake, but a few smart techniques can take it from great to unforgettable. I learned these mostly by trial and error—usually on days when I tried to rush through baking and ended up with a cake that was just good, not fabulous.
One of the biggest tips I can share is to make sure your Oreos are crushed to the right consistency. For the batter, you want mostly rough crumbs with some small cookie chunks. Too fine, and they disappear; too chunky, and they sink. For the frosting, though, the crumbs need to be very fine so it stays silky.
Another tip is to use hot coffee instead of hot water in the batter. You won’t taste the coffee, but it deepens the chocolate flavor beautifully. It’s my secret trick for almost every chocolate cake I bake.
When frosting, always start with a thin “crumb coat.” This is a light layer that traps loose crumbs so they don’t get dragged across the final layer. Let the crumb coat chill for 10–15 minutes before applying the finishing layer. It makes the outside smoother and easier to decorate.
And here’s a fun one: if you want the cake to taste even better the next day, wrap the baked (but unfrosted) cake layers in plastic wrap and let them sit overnight. The moisture redistributes through the crumb, giving you a richer, more tender cake.
Common Mistakes to Avoid
You wouldn’t believe how many mistakes I made the first few times I attempted this cake. Most of them were small but had a surprisingly big effect, so here are the ones you should avoid:
First, don’t overmix the batter after adding the dry and wet ingredients together. Overmixing creates a dense cake instead of the fluffy crumb you want. Mix only until everything is combined.
Another common mistake is using large Oreo chunks in the frosting. While chunky crumbs look tempting, they cause the frosting to become uneven and difficult to spread. If you’re piping, it can even clog your bag.
Also, resist the temptation to frost the cake before it’s fully cooled. Even slightly warm layers will melt the buttercream and create a sliding, soupy mess.
Finally, don’t skip the parchment paper lining in the pans. Oreo cakes are soft and moist, and releasing them without a liner is far more stressful than it needs to be.
How to Store It
This Oreo cake stores beautifully, which is great because the flavors actually intensify after a day. If you’re planning to eat it within two days, you can keep it in an airtight container at room temperature. Just make sure the container is tall enough so you don’t smudge the frosting.
For longer storage—up to five days—place the cake in the refrigerator. Cover it well so it doesn’t absorb fridge odors. Before serving, let it sit at room temperature for about 20–25 minutes so the frosting softens slightly.
If you want to freeze the cake, freeze the unfrosted layers individually. Wrap them in plastic wrap and then in aluminum foil. They’ll stay fresh for up to three months. Thaw at room temperature before frosting.
FAQ
How do I keep my Oreo cake moist?
Using oil instead of all butter, along with buttermilk, helps keep the cake soft and moist for days. Avoid overbaking.
Can I make this cake ahead of time?
Yes. Bake the layers a day early, wrap tightly, and frost the next day. The flavor actually improves.
Can I use double-stuffed Oreos?
You can, but the cake becomes sweeter. Regular Oreos work best for flavor balance.
Can I make this as cupcakes?
Absolutely. Reduce the bake time to around 18–20 minutes.
Can I use whipped cream instead of buttercream?
Yes, but it must be kept refrigerated. It creates a lighter, mousse-like texture.

Oreo Cake Recipe
- Total Time: 55 minutes
- Yield: 2 1x
- Diet: Vegetarian
Description
Oreo cake is the kind of dessert that brings pure joy with every bite. It has the rich flavor of chocolate cake, the nostalgia of childhood cookies, and the creamy smoothness of cookies-and-cream frosting. What makes this recipe special is that the Oreos aren’t just decoration—they’re folded into the batter, blended into the frosting, and sprinkled on top, giving you layers of chocolatey crunch and soft, velvety sweetness. This cake is soft, moist, indulgent, and perfect for celebrations or even a simple weekend dessert when you want to spoil yourself. It’s easy to make, fun to serve, and guaranteed to make everyone ask for seconds.
Ingredients
- All-purpose flour
- Granulated sugar
- Unsweetened cocoa powder
- Baking soda
- Baking powder
- Salt
- Eggs
- Buttermilk
- Oil
- Vanilla extract
- Hot water or coffee
- Oreo cookies (crushed)
- Butter
- Powdered sugar
- Heavy cream
Instructions
- Whisk together the dry ingredients.
- Mix the wet ingredients until smooth.
- Combine wet and dry mixtures, then stir in the hot coffee or water.
- Fold in crushed Oreos.
- Prepare and bake in greased pans.
- Make the cookies-and-cream frosting.
- Frost cooled cake layers and decorate with extra Oreos.
Notes
- Using hot coffee deepens the chocolate flavor and gives the cake a richer taste. Make sure the frosting Oreos are finely crushed to keep the texture smooth.
- Prep Time: 20 minutes
- Cook Time: 35 minutes
- Category: Dessert
- Method: Baking
- Cuisine: American
Nutrition
- Serving Size: 2
- Calories: 420
- Sugar: 38g
- Sodium: 210mg
- Fat: 20g
- Saturated Fat: 10g
- Unsaturated Fat: 7g
- Trans Fat: 0g
- Carbohydrates: 56g
- Fiber: 2g
- Protein: 4g
- Cholesterol: 55mg