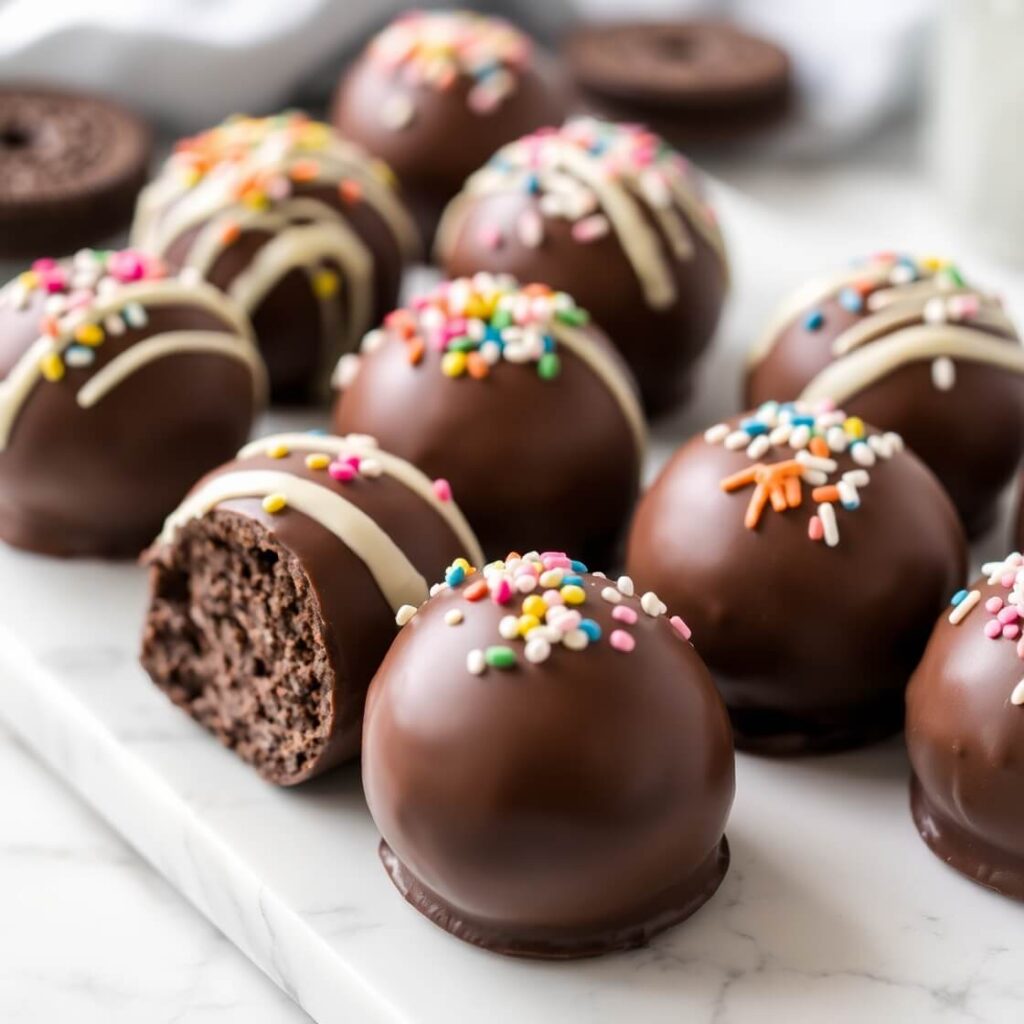
I first discovered Oreo Balls a few years ago when I was looking for a quick and indulgent treat to make for a family gathering. Life was busy, and I wanted something that felt decadent without taking hours to prepare or requiring complicated techniques. That’s when I stumbled upon these little chocolatey spheres of joy. I couldn’t believe how simple they were to make, yet how impressively delicious they turned out. Every bite is a perfect balance of creamy, crunchy, and rich chocolate flavor that melts in your mouth.
The beauty of Oreo Balls lies in their versatility. You can make them for any occasion—birthdays, holidays, school events, or even just a quiet evening craving something sweet. They’re perfect for when you want to serve a dessert that looks elegant, yet you don’t want to spend all day in the kitchen. I promise, once you try this recipe, these little treats will become a staple in your dessert repertoire.
If you’ve ever wanted to make a treat that combines ease, flavor, and that irresistible chocolate-cookie magic, Oreo Balls are your go-to recipe. Read on, and I’ll guide you through every step of the process so that your first batch is perfect—and maybe even better than your favorite bakery’s version.
Why I Love This Recipe

What’s not to love about Oreo Balls? For me, it’s the combination of simplicity and elegance. There’s something incredibly satisfying about taking a handful of common ingredients—Oreos, cream cheese, chocolate—and transforming them into bite-sized masterpieces.
People make this recipe for several reasons. First, it’s incredibly fast to prepare. From crushing the cookies to dipping the balls in chocolate, the process is straightforward, even for someone who doesn’t spend much time in the kitchen. Second, it’s versatile. You can roll these balls in white chocolate, milk chocolate, dark chocolate, or even sprinkle them with festive toppings to match the season. And third, they taste amazing. The creamy texture of the cream cheese combined with the crunch of the Oreo cookie creates a flavor profile that’s utterly addictive.
One of the special things about Oreo Balls is that they’re universally loved. Kids, adults, and even picky eaters can’t resist them. Whether you’re hosting a party, preparing a school snack, or gifting them in a beautiful box, Oreo Balls never fail to impress.
Ingredients for Oreo Balls
Before you start, let’s make sure you have all the right ingredients. The best thing about this recipe is that it’s simple, but each ingredient plays an important role in creating that perfect flavor and texture.
You’ll need:
- Oreos: The classic chocolate sandwich cookie is essential. I always use regular Oreos, but you can experiment with flavored versions for something unique.
- Cream cheese: This adds the creamy texture that binds the cookies together. Full-fat cream cheese works best, but you can try reduced-fat versions if you prefer.
- Chocolate for coating: You can use milk, dark, or white chocolate. I like to use high-quality chocolate chips or melting wafers for a smooth finish.
- Optional toppings: Sprinkles, crushed nuts, or drizzle of contrasting chocolate to add a decorative touch.
That’s really all you need. No complicated ingredients, no fancy equipment. Just a few pantry staples and a couple of kitchen tools like a mixing bowl, food processor or rolling pin, and a baking sheet.
How Much Time Will You Need
One of the things I love about Oreo Balls is how efficient they are to make. Here’s a realistic estimate:
- Preparation time: 15–20 minutes to crush the Oreos, mix with cream cheese, and shape into balls.
- Chilling time: 1 hour. This step is crucial to help the balls firm up before dipping.
- Dipping and decorating: 20–30 minutes depending on how meticulous you are.
In total, you’re looking at about 1 hour and 45 minutes from start to finish, but most of that is chilling time. The hands-on work is minimal, which makes it perfect for busy days.
How to Make Oreo Balls
Here’s the step-by-step process that I follow to ensure each Oreo Ball comes out perfect.
Step – 1: Crush the Oreos
Start by placing your Oreos in a food processor. If you don’t have one, place them in a ziplock bag and crush them with a rolling pin until they turn into fine crumbs. Make sure there are no large chunks left; the smoother the crumbs, the easier it is to mix with the cream cheese.
Step – 2: Mix with cream cheese
Transfer the crumbs into a mixing bowl and add softened cream cheese. Use a spatula or your hands to combine the two ingredients thoroughly. You’re aiming for a uniform mixture that holds together when pressed. This is what forms the base of your Oreo Balls.
Step – 3: Shape into balls
Use a spoon or small cookie scoop to portion out the mixture. Roll each portion between your palms to create a smooth ball. The size is up to you, but I find that about one inch in diameter works perfectly—small enough to pop in your mouth but large enough to savor.
Step – 4: Chill the balls
Place the shaped balls on a baking sheet lined with parchment paper and refrigerate for at least an hour. This step is essential; it helps the balls firm up so they don’t fall apart during the chocolate dipping process.
Step – 5: Melt the chocolate
While the balls are chilling, melt your chosen chocolate in a microwave or over a double boiler. If using a microwave, heat in short bursts and stir frequently to avoid burning.
Step – 6: Dip the balls in chocolate
Using a fork or toothpick, dip each chilled ball into the melted chocolate. Make sure it’s fully coated, then gently tap off any excess. Place the coated balls back on the parchment paper. If you want, you can add sprinkles or a drizzle of contrasting chocolate while the coating is still wet.
Step – 7: Let them set
Once all the balls are coated, refrigerate them again for 15–20 minutes until the chocolate hardens. Then, they’re ready to enjoy!
Substitutions
One of the best things about Oreo Balls is how adaptable they are. You can make a few substitutions to suit your taste or dietary needs:
- Cookies: Try different flavors of sandwich cookies, like mint or golden Oreos. You can even use gluten-free cookies if needed.
- Cream cheese: If you want a lighter version, Greek yogurt or mascarpone can work, but cream cheese gives the most classic texture.
- Chocolate: Mix milk and white chocolate or add a hint of coconut oil to the chocolate for a smoother coating.
Experimenting with toppings like chopped nuts, cocoa powder, or crushed candy can also make your Oreo Balls unique and festive.
Best Side Dish for Oreo Balls
While Oreo Balls are delightful on their own, pairing them with a few complementary treats can elevate your dessert experience. I like to serve them with:
- Vanilla ice cream: The creamy coldness pairs beautifully with the rich chocolate flavor.
- Fresh berries: Strawberries or raspberries add a refreshing tang that balances the sweetness.
- Hot chocolate or coffee: A warm drink alongside these little bites creates the perfect cozy pairing.
Serving and Presentation Tips
Presentation matters, especially with bite-sized treats like Oreo Balls. They may be small, but they can make a big visual impact. When I serve Oreo Balls at gatherings, I like to arrange them on a pretty plate or tiered dessert tray. Using a liner, like mini cupcake liners, adds a touch of elegance and makes them easy to pick up without smudging the chocolate coating.
For special occasions, you can drizzle a contrasting chocolate over the balls for a decorative effect, or sprinkle crushed nuts, colored sprinkles, or even edible glitter. Grouping them by flavor or color on the platter can also make the display visually appealing. I’ve found that even a simple white tray with uniform Oreo Balls looks professionally presented—no fancy tools needed.
If you’re gifting them, a small decorative box with parchment paper or cellophane wrap makes them feel like a boutique treat. Tie it with a ribbon, and you have an instant homemade gift that’s impressive yet personal.
Tips and Tricks to Make This Recipe Even Better

Oreo Balls are already amazing, but a few little tricks can elevate them from good to extraordinary:
- Use room-temperature cream cheese: Softened cream cheese blends more smoothly with the cookie crumbs, giving a creamy, uniform texture. Cold cream cheese can create lumps that are harder to roll into smooth balls.
- Chill properly: Don’t skip the chilling steps. A firm mixture ensures that the balls don’t fall apart while dipping in chocolate. I usually refrigerate them for at least an hour, but you can also freeze for 15–20 minutes if you’re in a rush.
- Prevent cracked chocolate: If the chocolate coating cracks, it’s usually due to sudden temperature changes. Melt chocolate slowly and dip chilled balls, not frozen. Adding a teaspoon of coconut oil or shortening to the chocolate can create a smoother, shinier finish.
- Uniform size: Use a small cookie scoop or spoon to measure out equal portions. This ensures consistent cooking time (if baking is involved in other variations) and makes your presentation look polished.
- Experiment with flavors: You can mix crushed peppermint, peanut butter, or flavored extracts into the Oreo-cream cheese mixture for a seasonal twist. I like adding a tiny bit of orange extract during the holidays—it pairs wonderfully with chocolate.
Common Mistakes to Avoid
Even though Oreo Balls are straightforward, a few common mistakes can affect the outcome:
- Not crushing the cookies finely enough: Large chunks of cookies can make rolling difficult and uneven. Always aim for fine crumbs.
- Skipping chilling time: Chocolate will not adhere well if the balls are too soft. This can lead to messy, sticky treats.
- Overheating chocolate: Chocolate that burns or seizes will not coat smoothly. Melt slowly, in short bursts, and stir frequently.
- Using too much cream cheese: Too much cream cheese can make the balls overly soft and difficult to shape. Stick to the recommended amount for the perfect texture.
- Handling chocolate-coated balls too soon: Touching them before the chocolate sets can leave fingerprints and smudges. Be patient and let them harden completely.
How to Store Oreo Balls
Oreo Balls are surprisingly forgiving when it comes to storage, but following these tips will keep them fresh and delicious:
- Refrigerator storage: Place in an airtight container. They will last up to a week. I usually separate layers with parchment paper to prevent sticking.
- Freezer storage: For longer storage, you can freeze Oreo Balls. Place them on a baking sheet first, freeze until firm, then transfer to a freezer-safe bag or container. They can last up to 3 months. Thaw in the refrigerator before serving for the best texture.
- Serving straight from the fridge: They taste amazing chilled, which also makes them easier to eat without chocolate melting too fast.
FAQ
Can I make Oreo Balls without cream cheese?
Cream cheese is key for the classic creamy texture, but you can try alternatives like mascarpone or softened Greek yogurt. The flavor and texture will vary slightly, though.
Can I use gluten-free Oreos?
Absolutely! Gluten-free Oreos work just as well, making this treat accessible to those with dietary restrictions.
How long will Oreo Balls stay fresh?
Stored in an airtight container in the fridge, they last about a week. Freezing can extend this up to three months.
Can I dip them in white chocolate instead of dark or milk chocolate?
Yes! White chocolate provides a different flavor profile and allows for creative decoration with colored drizzle or sprinkles.
Can I make them ahead for a party?
Definitely. Oreo Balls are ideal make-ahead treats. Prepare them a day or two in advance, and store in the fridge until serving. They even freeze well if you need more lead time.

Oreo Balls
- Total Time: 1 hour 50 minutes
- Yield: 24 1x
- Diet: Vegetarian
Description
Oreo Balls are the ultimate no-bake treat that combines creamy, crunchy, and chocolatey goodness into a perfect bite-sized dessert. Easy to make, visually appealing, and universally loved, these treats are perfect for parties, gifts, or a simple indulgent snack. In just a few steps, you can transform everyday ingredients into elegant, delectable Oreo Balls that everyone will adore.
Ingredients
- 36 Oreo cookies (regular or flavored)
- 8 ounces cream cheese, softened
- 12 ounces chocolate for coating (milk, dark, or white)
- Optional toppings: sprinkles, crushed nuts, contrasting chocolate drizzle
Instructions
- Crush Oreos finely in a food processor or ziplock bag with rolling pin.
- Mix crumbs with softened cream cheese until uniform and creamy.
- Shape mixture into 1-inch balls and place on a parchment-lined baking sheet.
- Refrigerate for at least 1 hour to firm up.
- Melt chocolate slowly and dip each chilled ball, covering completely.
- Tap off excess chocolate, decorate if desired, and let set in the fridge 15–20 minutes.
- Serve chilled or at room temperature.
Notes
- Use room-temperature cream cheese for smoother mixture.
- Ensure balls are well chilled before dipping for the best coating.
- Try different chocolate types or add flavor extracts for variety.
- Prep Time: 20 minutes
- Cook Time: 20–30 minutes
- Category: Dessert
- Method: No-bake
- Cuisine: American
Nutrition
- Serving Size: 24
- Calories: 120
- Sugar: 11g
- Sodium: 45mg
- Fat: 7g
- Saturated Fat: 4g
- Unsaturated Fat: 2g
- Trans Fat: 0g
- Carbohydrates: 14g
- Fiber: 1g
- Protein: 1g
- Cholesterol: 10mg