There’s something irresistibly nostalgic about Oreos. Whether it was dunking them into a cold glass of milk as a kid or sneaking a few cookies as a late-night snack, Oreos have always had a place in my heart. So naturally, when I wanted to create a no-fuss dessert that still had a wow factor, the no bake Oreo cheesecake felt like the perfect recipe to develop.
I first made this cheesecake for a summer get-together when it was just too hot to turn on the oven. I wanted something creamy, indulgent, and crowd-pleasing — and this dessert checked every box. The moment I served it, everyone asked for the recipe. That’s when I knew I had something special.
And the best part? No baking, no water baths, no cracking, no stress. Just a luscious, cookie-filled, chilled slice of heaven that’s ready to impress. If you love Oreos and creamy desserts, you’re in for a treat. This no bake Oreo cheesecake might just become your new favorite indulgence.
Why I Love This Recipe

This recipe is pure comfort wrapped in a creamy, dreamy package. It combines the classic flavor of Oreos with the silky smoothness of cheesecake — and best of all, you don’t need to heat up the kitchen.
I especially love this recipe because it’s approachable, even for beginners. You don’t need any complicated baking techniques, yet the result feels like something you’d find in a fancy dessert shop. The crust is made with crushed Oreos and melted butter — simple, yet full of flavor. The filling is a perfect blend of cream cheese, whipped cream, and crushed cookies. Every bite is loaded with Oreo goodness without being overly sweet or heavy.
There’s something magical about how quickly this dessert comes together. In under 30 minutes, you can have the cheesecake assembled and chilling in the fridge — which makes it ideal for parties, holidays, or when you’re just craving something decadent without too much effort.
It’s also versatile. You can make it in a springform pan for a classic round cake look, or use individual ramekins or jars for mini versions. It’s an absolute showstopper every time, no matter how you serve it.
Ingredients for No Bake Oreo Cheesecake
Before we dive in, let me just say: if you’re an Oreo fan, this recipe is going to win your heart. It’s loaded with cookies in every layer — the crust, the filling, and even the topping.
Here’s what you’ll need to make it happen:
For the Oreo Crust:
- Regular Oreo cookies – You’ll need about 24 to 26 cookies. Don’t remove the cream — it helps bind the crust.
- Melted unsalted butter – This holds the crust together and adds richness.
For the Cheesecake Filling:
- Cream cheese – Make sure it’s at room temperature for a silky-smooth texture. I always use full-fat for the best flavor.
- Powdered sugar – It blends beautifully into the cream cheese without any grittiness.
- Vanilla extract – Adds a warm depth of flavor that complements the cookies.
- Whipping cream or heavy cream – Whipped into stiff peaks to give the cheesecake a light, mousse-like texture.
- More crushed Oreos – You’ll fold these into the filling for that signature cookies-and-cream flavor.
For the Topping (Optional but highly recommended):
- Whipped cream – A simple swirl on top makes it look polished.
- Mini Oreos or crushed Oreos – For garnish and extra texture.
- Chocolate shavings – Adds a little flair and makes the presentation pop.
All these ingredients come together effortlessly, and most of them you probably already have in your pantry or fridge.
How Much Time Will You Need
Here’s the good news — this recipe is quick. You can have it prepped and chilling in under 30 minutes. Then all it needs is a few hours in the fridge to firm up.
- Prep Time: 25 minutes
- Chill Time: Minimum 6 hours (or overnight for best results)
- Total Time: About 6 hours and 25 minutes
It’s mostly hands-off, which gives you plenty of time to focus on other things while the cheesecake sets.
How to Make This No Bake Oreo Cheesecake
Let’s walk through each step so you feel totally confident making this dessert. I promise it’s easy and worth every second.
Step – 1: Prepare the Pan
Start by lining the bottom of a 9-inch springform pan with parchment paper. This makes it easier to remove the cheesecake later. If you don’t have a springform pan, you can use a pie dish or even a square pan — just know that serving might be a little less tidy.
Step – 2: Make the Crust
Add the Oreos (cream and all) to a food processor and pulse until you get fine crumbs. You want a sandy texture with no big chunks. Pour in the melted butter and pulse again until everything is combined and the mixture resembles wet sand.
Press the crumb mixture firmly into the bottom of your prepared pan. Use the bottom of a measuring cup to flatten it evenly. Chill this in the fridge while you make the filling so it can set.
Step – 3: Whip the Cream
In a clean, chilled bowl, whip the heavy cream until stiff peaks form. This will give your cheesecake a lovely airy texture. Set it aside.
Step – 4: Make the Cheesecake Filling
In a separate large bowl, beat the cream cheese until smooth and creamy. Add the powdered sugar and vanilla extract, and mix until fully combined.
Fold the whipped cream gently into the cream cheese mixture, being careful not to deflate it. Then fold in the crushed Oreos. You want chunks in there — they add the perfect texture and flavor bursts.
Step – 5: Assemble the Cheesecake
Pour the filling over your chilled crust and smooth the top with a spatula. Cover the pan with plastic wrap and refrigerate for at least 6 hours, preferably overnight. This allows the cheesecake to firm up to a sliceable consistency.
Step – 6: Add Toppings
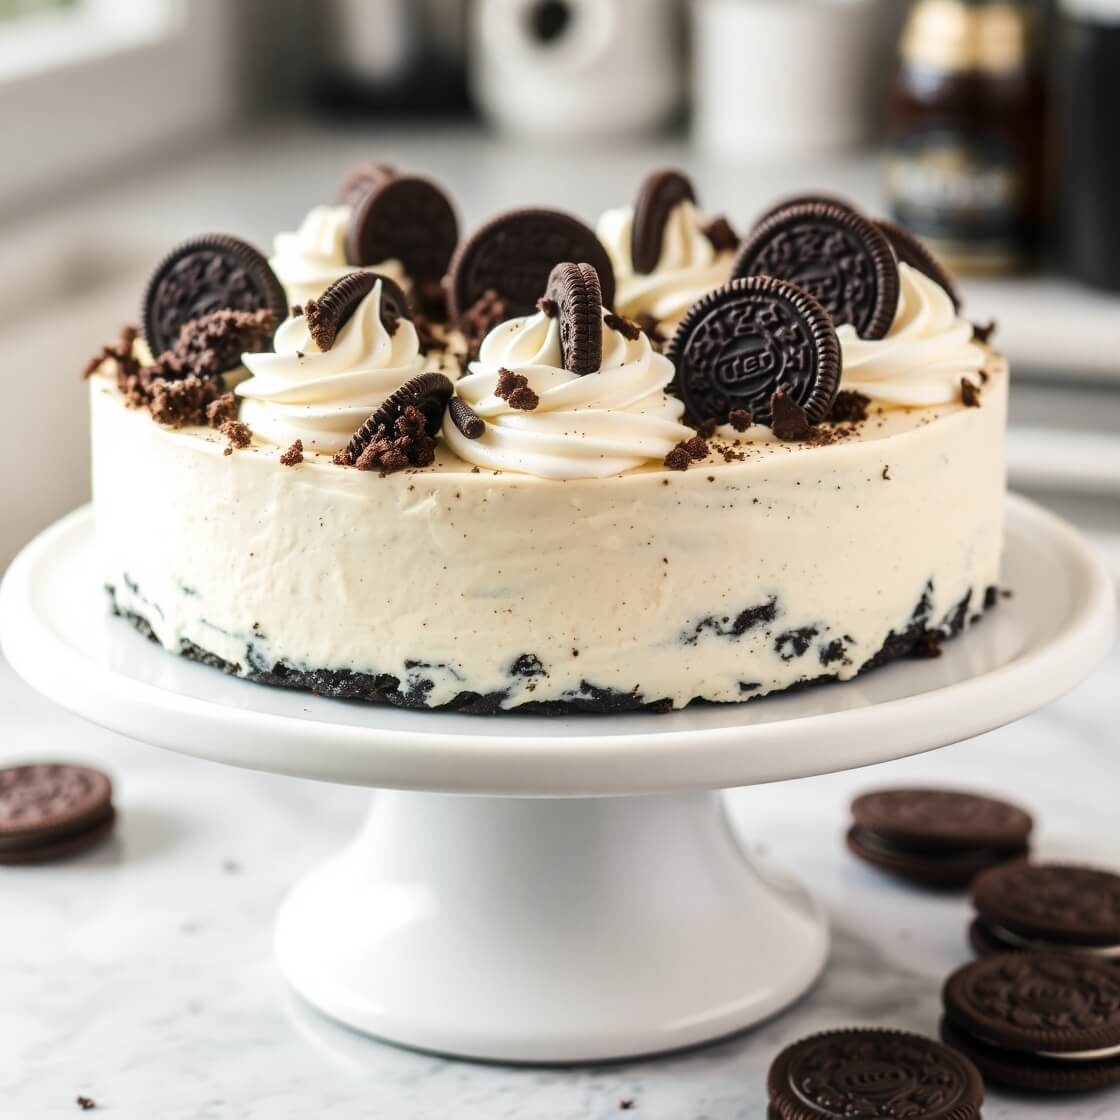
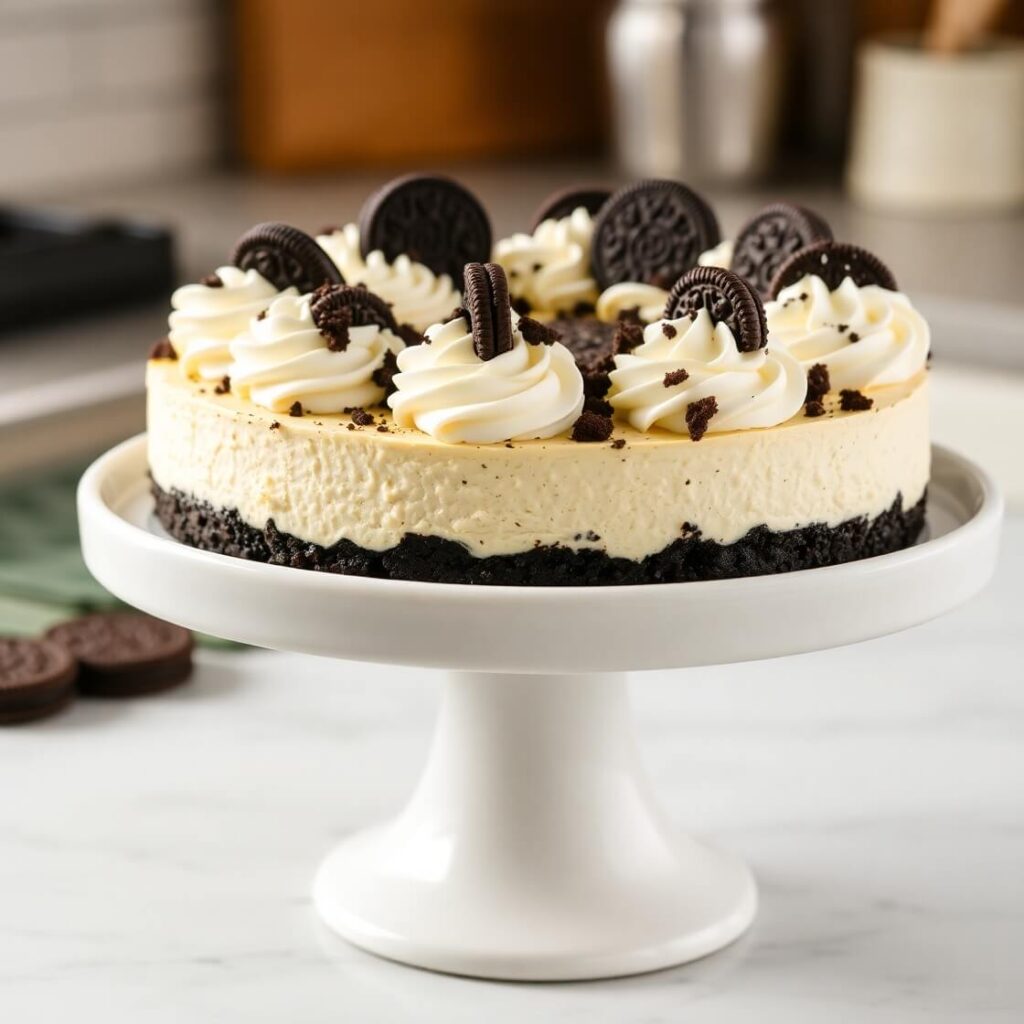
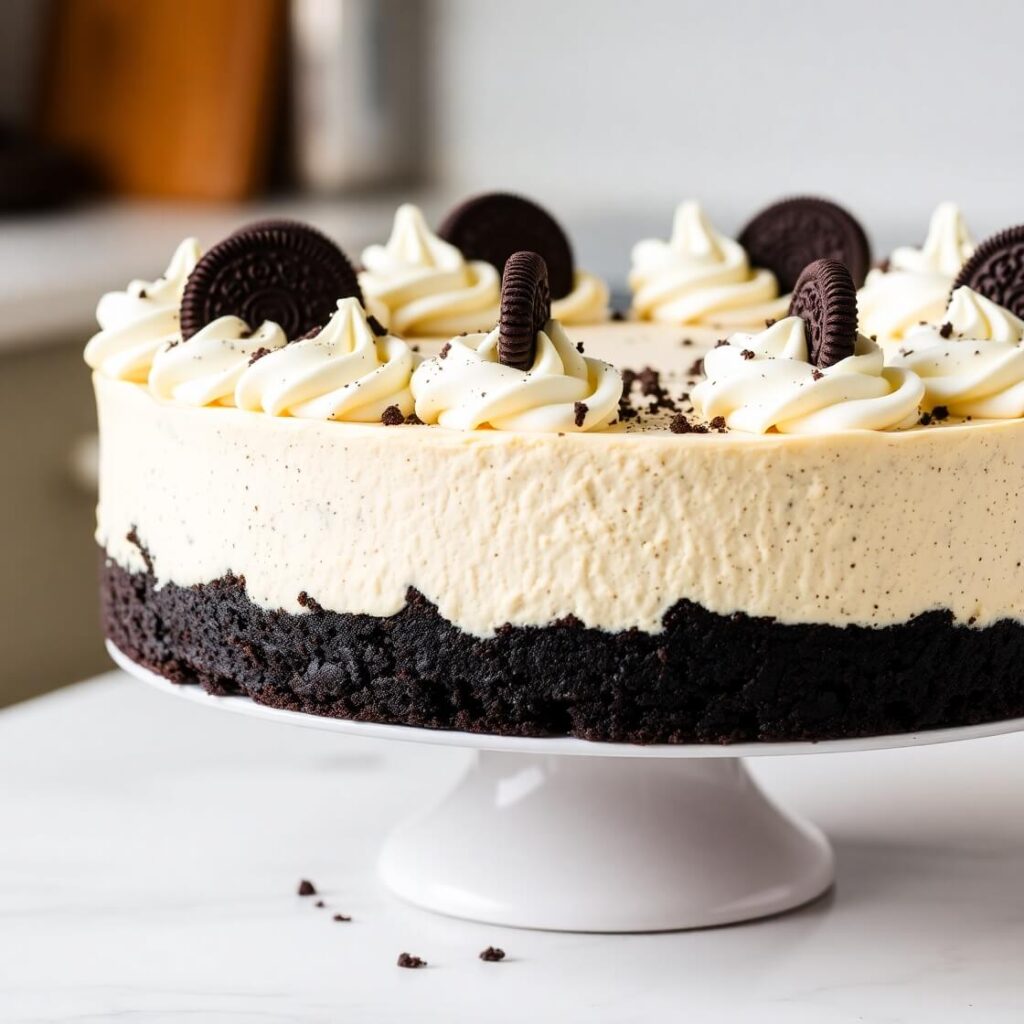
Once the cheesecake is fully set, remove it from the springform pan. Top with swirls of whipped cream, mini Oreos, or a sprinkling of crushed cookies and chocolate shavings for extra wow factor.
Slice, serve, and savor every bite.
Substitutions
If you need to make this recipe work for different dietary needs or pantry availability, here are a few ideas that still yield delicious results:
- Gluten-Free: Use gluten-free chocolate sandwich cookies instead of Oreos. There are great options available in most grocery stores now.
- Dairy-Free: Swap out the cream cheese and heavy cream for non-dairy alternatives like almond or coconut-based versions. Just be sure they’re the kind meant for baking and not the spreadable kind from tubs.
- Sugar-Free: Use a sugar substitute like monk fruit sweetener or erythritol in place of powdered sugar. And opt for sugar-free chocolate sandwich cookies.
- No Cream?: You can use whipped topping (like Cool Whip) instead of fresh whipped cream. It won’t be as rich, but it will still hold up nicely.
Substituting doesn’t mean compromising on taste — just make sure the textures stay as close to the original as possible for the best results.
Best Side Dish of No Bake Oreo Cheesecake
Pairing desserts may not be common, but trust me — these side ideas make the cheesecake experience even more delightful:
- Fresh Berries – The tartness of raspberries or strawberries balances the richness of the cheesecake.
- Espresso or Coffee – The slight bitterness complements the sweet, creamy flavors.
- Chocolate Ganache Drizzle – A warm drizzle on the plate takes this dessert to the next level.
Serving and Presentation Tips
Let’s face it — we eat with our eyes first. One of my favorite things about this no bake Oreo cheesecake is how effortlessly elegant it can look, even without a lot of fuss.
To serve it beautifully, I always start by removing it from the springform pan and placing it on a cake stand or simple white serving plate. That clean background lets the creamy filling and chocolate cookie base shine.
For a polished look:
- Use a warm knife to slice cleanly (just dip it in hot water and wipe it before each cut).
- Add a swirl of homemade whipped cream on top using a piping bag or zip-top bag with the corner snipped off.
- Finish it off with mini Oreos, a sprinkle of crushed cookies, or a drizzle of melted chocolate.
- If you’re serving it at a dinner party, plate each slice with a couple of fresh berries or a small mint leaf for a pop of color.
Presentation doesn’t have to be complicated — just a few thoughtful touches can make this cheesecake look bakery-level.
Tips and Tricks to Make This Recipe Even Better
This no bake Oreo cheesecake is already a crowd-pleaser, but here are a few ways to take it to the next level:
- Use full-fat cream cheese – It makes the texture richer and smoother. Low-fat versions can result in a softer, less stable cheesecake.
- Chill it overnight – While six hours is the minimum, overnight chilling ensures the perfect consistency for slicing.
- Don’t overmix the filling – Once you add the whipped cream, fold gently. Overmixing can cause it to lose its fluffiness.
- Try double-stuffed Oreos – For a more intense cookie-and-cream flavor, double-stuffed versions work beautifully in the crust and filling.
- Use stabilized whipped cream – If you’re making this for a party and want the whipped topping to hold up longer, you can stabilize it with a bit of gelatin or use whipped topping (like Cool Whip) as a shortcut.
Common Mistakes to Avoid
Even the easiest recipes can go sideways if you’re not careful. Here are a few mistakes to steer clear of:
- Not softening the cream cheese – Cold cream cheese won’t blend smoothly, and you’ll end up with lumps in the filling.
- Over-whipping the cream – This can turn your whipped cream into butter. Whip just until stiff peaks form.
- Using reduced-fat cream cheese – It doesn’t firm up as well, so your cheesecake may be too soft to slice cleanly.
- Skipping the chill time – The filling won’t set properly if you rush this step. Be patient — it’s worth it.
- Cutting the crust too thick – A thick crust can overpower the delicate cheesecake. About ¼ inch is the sweet spot.
Avoiding these small errors makes a big difference in the final result.
How to Store It
Storing this cheesecake is just as simple as making it.
Refrigerator:
Wrap the cheesecake (still in the pan or placed in an airtight container) and store it in the refrigerator for up to 5 days. The flavor actually deepens after a day or two, so it’s great for making ahead.
Freezer:
This no bake cheesecake freezes beautifully. Wrap it tightly in plastic wrap and foil, or store slices in an airtight container. Freeze for up to 2 months. To serve, thaw in the refrigerator overnight.
Tip: If you plan to freeze it, don’t add the whipped cream and garnishes until you’re ready to serve.
FAQ
Can I use low-fat cream cheese in this recipe?
You can, but I don’t recommend it. Low-fat versions tend to make the filling softer and less creamy. For the best texture, stick with full-fat cream cheese.
Do I have to use a springform pan?
Not at all. A pie dish or even an 8×8-inch square dish works fine. Just note that removing slices cleanly might be a bit more challenging.
Can I make this cheesecake ahead of time?
Absolutely! This is a perfect make-ahead dessert. It actually tastes better the next day once it’s had time to fully set.
What kind of Oreos should I use?
I use regular Oreos, but you can absolutely experiment. Mint, peanut butter, or golden Oreos can give this cheesecake a fun twist.
Can I make this cheesecake gluten-free?
Yes! Simply use gluten-free chocolate sandwich cookies for the crust and filling. Everything else is naturally gluten-free.

No Bake Oreo Cheesecake
- Total Time: 6 hours 25 minutes
- Yield: 10–12 1x
- Diet: Vegetarian
Description
If you’re craving something rich, creamy, and no-fuss, this no bake Oreo cheesecake is the dessert of your dreams. With a buttery Oreo crust and a silky filling packed with cookie crumbles, this treat is both indulgent and incredibly easy to make. There’s no baking involved, which makes it perfect for hot days, holiday prep, or anytime you need a dessert that delivers big flavor with minimal effort. It sets beautifully in the fridge and slices like a dream. Topped with whipped cream and extra cookies, it’s a guaranteed crowd-pleaser — and it’s just as fun to make as it is to eat.
Ingredients
- 24–26 Oreo cookies (regular, with filling)
- 6 tablespoons unsalted butter, melted
- 16 oz full-fat cream cheese, softened
- ¾ cup powdered sugar
- 1 teaspoon vanilla extract
- 1¼ cups heavy whipping cream
- 10 Oreo cookies, crushed (for filling)
- Optional toppings: whipped cream, mini Oreos, crushed cookies, chocolate shavings
Instructions
- Line a 9-inch springform pan with parchment paper.
- Pulse Oreos in a food processor until fine. Add melted butter and blend until combined.
- Press crust mixture into the pan and chill while you prepare the filling.
- Whip heavy cream until stiff peaks form. Set aside.
- In another bowl, beat cream cheese until smooth. Add powdered sugar and vanilla and mix well.
- Fold whipped cream into the cream cheese mixture. Then fold in crushed Oreos.
- Pour filling over crust, smooth the top, and cover.
- Chill for at least 6 hours or overnight.
- Top with whipped cream and crushed cookies before serving.
Notes
- Always use softened cream cheese for a smooth texture.
- Chill overnight for the best firmness and flavor.
- Use a warm knife to slice cleanly.
- Prep Time: 25 minutes
- Cook Time: 0 minutes
- Category: Dessert
- Method: No Bake
- Cuisine: American
Nutrition
- Serving Size: 10–12
- Calories: 480
- Sugar: 26g
- Sodium: 300mg
- Fat: 35g
- Saturated Fat: 19g
- Unsaturated Fat: 14g
- Trans Fat: 0.5g
- Carbohydrates: 38g
- Fiber: 1g
- Protein: 5g
- Cholesterol: 90mg