I still remember the first time I made these No-Bake Avalanche Cookies. It was a lazy Saturday afternoon, the kind where I wanted a little sweet indulgence without the fuss of turning on the oven. My kitchen smelled faintly of cocoa from a previous baking session, and I had a cup of coffee in hand, scrolling through recipe ideas. When I stumbled upon the “avalanche cookie” concept, I was intrigued—not just because of the dramatic name, but because the idea of a cookie that piled up chocolate, oats, and nuts into a snowy, gooey treat without any baking seemed like magic.
The first batch was a hit almost instantly. My kids, who are usually picky about textures, couldn’t resist the mix of chewy chocolate, crunchy nuts, and soft oats. My husband, ever the chocolate enthusiast, came back for seconds before I even had a chance to plate them. The beauty of this recipe is that it doesn’t demand hours of your time or meticulous technique—it’s playful, indulgent, and utterly satisfying. Once you make it, you’ll find yourself keeping a batch handy for those moments when you need comfort in a bite.
Why I Love This Recipe

What makes these cookies so special isn’t just that they’re no-bake (though that’s a huge bonus). It’s the layering of textures and flavors that gives them their avalanche-like personality. There’s the chewy richness from oats, the deep chocolate flavor that melts on your tongue, the crunch of nuts, and the slight sweetness from shredded coconut or other mix-ins. Every bite feels like a tiny adventure.
I also love that this recipe is extremely forgiving. Unlike delicate cakes or soufflés, you don’t have to worry about exact measurements down to the gram or timing everything perfectly. Even if your chocolate is a little too hot or you overmix the oats, the cookies still come out delicious. And because they set in the refrigerator rather than the oven, there’s no worrying about burnt bottoms or dry textures.
Another reason I adore this recipe is the joy it brings to kids and adults alike. They’re perfect for school lunches, after-school snacks, or a sweet treat with your afternoon tea. And the best part? You can get creative with mix-ins. Pecans, walnuts, chocolate chips, dried fruits, or even a sprinkle of sea salt on top—they all enhance the experience in unique ways. It’s the type of recipe that feels homemade, heartwarming, and a little bit decadent.
Ingredients for No-Bake Avalanche Cookies
Before you dive in, let’s talk ingredients. The beauty of this recipe is its simplicity. You don’t need exotic pantry items—just a handful of staples that probably already live in your kitchen.
You’ll need:
- Rolled oats – These are the foundation of your cookie. They provide structure, chewiness, and a wholesome texture. Quick oats can work too, but rolled oats give the best bite.
- Unsweetened cocoa powder – For that deep chocolate flavor. I like to use Dutch-processed cocoa because it gives a richer, slightly smoother taste.
- Nut butter – Peanut butter is my go-to, but almond or cashew butter works beautifully too. This not only binds everything together but also adds a creamy, nutty undertone.
- Honey or maple syrup – Acts as a natural sweetener and helps everything stick together. I often adjust the sweetness depending on how rich my cocoa is or how sweet I want my cookies.
- Vanilla extract – A splash enhances the chocolate flavor and adds warmth. Don’t skip this—it’s subtle but essential.
- Nuts – Chopped walnuts, pecans, or almonds add crunch and complexity. You can toast them lightly for extra flavor.
- Shredded coconut – Optional, but it adds a snowy, avalanche-like effect on top. It also balances the richness of chocolate with a hint of tropical sweetness.
- Mini chocolate chips or chunks – Optional, but if you want the ultimate chocolate explosion, this is a must.
These ingredients combine to create a cookie that’s chewy, chocolatey, nutty, and slightly sweet, all without turning on the oven. They’re perfect for any time you need a quick dessert fix.
How Much Time Will You Need?
The timing for these cookies is wonderfully forgiving. If you’re well-prepared:
- Prep time: 15–20 minutes to gather, chop, and mix ingredients.
- Set time: About 1 hour in the refrigerator so the cookies firm up properly.
- Total time: Approximately 1 hour and 20 minutes from start to finish.
The set time is crucial because it allows the nut butter and honey mixture to solidify slightly, holding the oats, nuts, and chocolate together. You could technically eat them sooner if you’re impatient, but they’re much easier to handle once chilled.
How to Make No-Bake Avalanche Cookies

Step – 1: In a medium saucepan, combine your nut butter and honey (or maple syrup) over low heat. Stir gently until melted and smooth. The aroma is heavenly, and it’s a perfect moment to sneak a little taste—just a tiny one!
Step – 2: Remove the saucepan from heat and stir in cocoa powder and vanilla extract. This is where your kitchen fills with that rich chocolatey scent that makes you want to lick the spoon.
Step – 3: In a large mixing bowl, combine the rolled oats, chopped nuts, shredded coconut, and any additional mix-ins like chocolate chips. Pour the chocolate mixture over the oats and stir thoroughly. Make sure every oat is coated in that luscious chocolate.
Step – 4: Using a spoon or cookie scoop, drop portions of the mixture onto a parchment-lined baking sheet. Press slightly to flatten, but don’t worry about making them perfect—they’re supposed to look rustic, like a mini avalanche.
Step – 5: Refrigerate the cookies for at least an hour. If you can wait longer, even better—the flavors meld together beautifully as they chill. Once firm, they’re ready to enjoy.
Step – 6: Optional finishing touch: sprinkle a little extra shredded coconut or a few chocolate chips on top before serving for a prettier presentation.
Substitutions
One of the reasons I love no-bake cookies is how adaptable they are.
- Nut butter substitutes: Peanut butter is classic, but almond, cashew, or even sunflower seed butter works. Each gives a slightly different flavor and texture, so feel free to experiment.
- Sweeteners: If you prefer less sugar, try agave syrup, brown rice syrup, or even a sugar-free maple syrup. They may slightly alter the texture, but the cookies will still set beautifully.
- Mix-ins: The avalanche effect comes from the combination of textures, so don’t be afraid to add dried fruits like cranberries, apricots, or raisins. You can even throw in a handful of crushed pretzels for a salty-sweet twist.
The beauty of substitutions is that you can make these cookies your own, depending on your taste and pantry staples.
Best Side Dish of No-Bake Avalanche Cookies
While these cookies are fantastic on their own, pairing them with other treats can elevate your dessert table:
- A scoop of vanilla ice cream – the chocolate and oats pair beautifully with creamy ice cream.
- Fresh berries – strawberries, raspberries, or blueberries add brightness and balance the sweetness.
- A cup of hot cocoa or coffee – perfect for dunking and warming you up on a chilly afternoon.
These pairings make the experience more indulgent and memorable, especially if you’re serving friends or family.
Serving and Presentation Tips
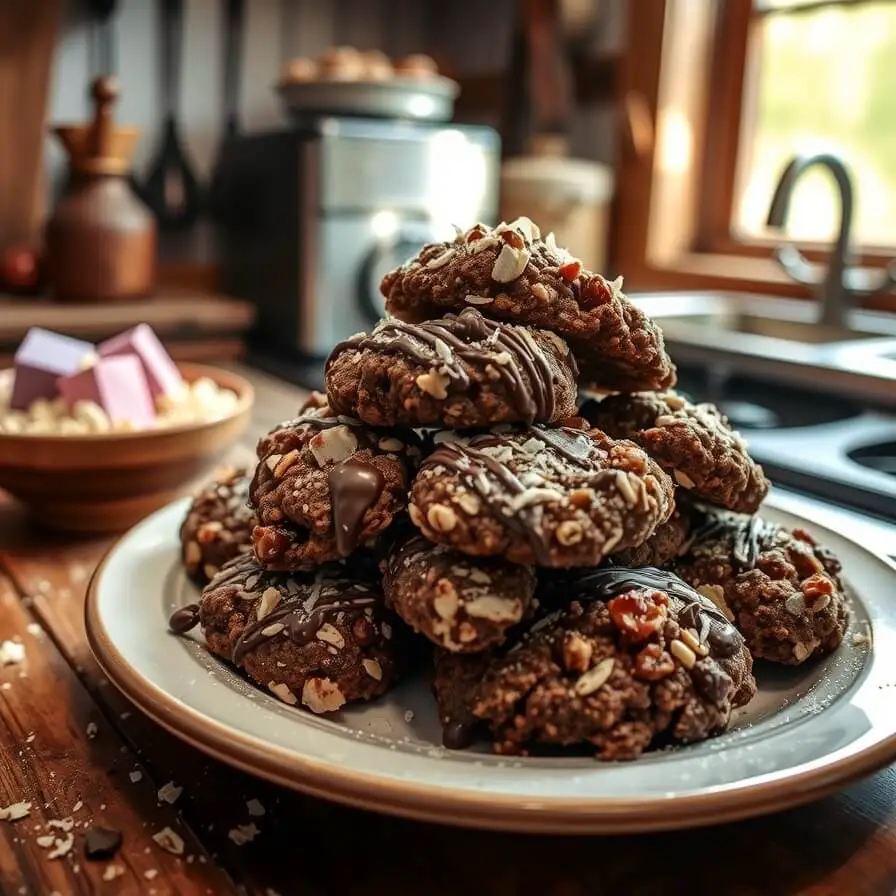
There’s something undeniably satisfying about presenting cookies that look like they just tumbled down a snowy hill. For these No-Bake Avalanche Cookies, presentation is part of the experience. I like to line a simple platter with parchment paper or a clean linen napkin, then arrange the cookies in a slightly staggered pile—like a little chocolatey mountain.
A small sprinkle of shredded coconut on top gives the illusion of snow dusting the peaks. If I’m serving them to kids or at a casual gathering, I sometimes drizzle a tiny bit of melted chocolate in thin lines over the top—it’s simple but adds an extra wow factor. Another tip is to pair the cookies with complementary colors on the plate: a handful of fresh berries or a few mint leaves make the dark chocolate pop visually.
When serving for a cozy afternoon treat, I like to present them alongside a mug of warm cocoa or coffee. The contrast of warm drink and chilled cookie is surprisingly delightful. For parties or gift-giving, placing a few cookies in a small clear cellophane bag tied with twine or ribbon makes them feel extra special—like a homemade treasure.
Tips and Tricks to Make This Recipe Even Better
While this recipe is already forgiving and delicious, I’ve discovered a few tweaks that make it even better:
- Toast your nuts lightly before adding them. This brings out their flavor and adds a deeper crunch to every bite.
- Adjust sweetness based on your cocoa. If you’re using a particularly bitter cocoa, add a touch more honey or maple syrup. If you love intense chocolate, use slightly less sweetener to let the cocoa shine.
- Chill longer for firmer cookies. One hour is the minimum, but 2–3 hours or overnight in the fridge makes them easier to handle and less sticky.
- Layer flavors: Consider adding a pinch of sea salt or a few mini chocolate chips on top just before chilling. That little extra layer of flavor elevates the cookies immensely.
- Mix-ins matter: Play with textures—try puffed rice for crunch, or dried cherries for a tart surprise. Each addition changes the experience without complicating the recipe.
These small adjustments allow you to customize the cookies to your taste and impress anyone you share them with.
Common Mistakes to Avoid
Even a simple recipe can have a few pitfalls if you’re not careful. Here are the mistakes I see most often with No-Bake Avalanche Cookies:
- Skipping the chill time: If you try to eat them right away, they may fall apart because the mixture hasn’t set properly. Patience is key here.
- Overheating the chocolate mixture: Keep the heat low when melting nut butter and honey. Too hot and it can scorch or separate, affecting texture.
- Using the wrong oats: Quick oats or instant oats work in a pinch, but rolled oats give the best texture. Steel-cut oats won’t soften enough and can be unpleasantly chewy.
- Too many liquid add-ins: Adding extra milk or syrup beyond the recipe can make the mixture too soft to hold its shape. Stick to the suggested measurements unless you’re experimenting carefully.
- Skipping the parchment paper: These cookies stick easily, so always use parchment or a silicone mat for easy removal.
Avoiding these common mistakes ensures your cookies are as perfect as they are delicious.
How to Store It
These cookies are wonderfully stable, thanks to their no-bake nature and chilled setting. Here’s how I store them:
- Room temperature: Up to two days in an airtight container. Perfect if you plan to eat them quickly.
- Refrigerator: Up to a week. Keep them in a sealed container to maintain their chewy texture. I often layer them with parchment paper to prevent sticking.
- Freezer: Up to a month. Individually wrap cookies or layer them with parchment paper in a freezer-safe container. Thaw at room temperature for 15–20 minutes before enjoying—just enough to soften without losing shape.
Proper storage ensures you can enjoy these cookies whenever the craving strikes, and they remain just as delightful as when first made.
FAQ
Can I make these cookies vegan?
Absolutely! Use a plant-based nut butter like almond or cashew, and replace honey with maple syrup or agave nectar. The texture and flavor are just as satisfying.
Can I use chocolate chips instead of cocoa powder?
Yes, but you’ll need to melt them first along with the nut butter and honey. This creates a slightly different consistency but still works beautifully.
Do these cookies need to be refrigerated before serving?
Yes, at least one hour to set. They hold better and are easier to handle once chilled.
Can I make these ahead of time for a party?
Definitely! They can be made a day or two in advance and stored in the refrigerator. They’re great for stress-free entertaining.
Can I add dried fruits or other mix-ins?
Yes! Cranberries, raisins, chopped dried apricots, or even puffed rice work wonderfully. Mix-ins enhance texture and flavor, making the cookies unique every time.

No-Bake Avalanche Cookies Recipe
- Total Time: 15 minutes
- Yield: 18–20 1x
- Diet: Vegetarian
Description
These No-Bake Avalanche Cookies are my go-to treat for a quick chocolate fix that doesn’t require turning on the oven. Chewy oats, rich chocolate, crunchy nuts, and a hint of sweetness come together in a rustic, snow-dusted cookie that delights both kids and adults. Perfect for a cozy afternoon snack, dessert, or party treat, these cookies are easy to make, adaptable with mix-ins, and stored effortlessly in the fridge or freezer. They’re indulgent without being fussy, and every bite delivers the comforting, chocolatey satisfaction you crave.
Ingredients
- 2 cups rolled oats
- 1 cup nut butter (peanut, almond, or cashew)
- 1/2 cup honey or maple syrup
- 1/3 cup unsweetened cocoa powder
- 1 tsp vanilla extract
- 1/2 cup chopped nuts (walnuts, pecans, or almonds)
- 1/3 cup shredded coconut (optional)
- 1/4 cup mini chocolate chips (optional)
Instructions
- In a medium saucepan over low heat, melt nut butter and honey together until smooth.
- Remove from heat, stir in cocoa powder and vanilla extract until fully combined.
- In a large mixing bowl, combine oats, nuts, coconut, and optional mix-ins. Pour the chocolate mixture over the oats, stirring until all ingredients are coated.
- Drop spoonfuls of the mixture onto a parchment-lined baking sheet, gently pressing each cookie slightly to shape.
- Refrigerate for at least 1 hour, or until firm.
- Optionally, sprinkle extra shredded coconut or chocolate chips on top before serving.
Notes
- Toast nuts lightly for extra flavor.
- Adjust sweetness to taste.
- Store in the refrigerator or freezer for longer shelf life.
- Prep Time: 15 minutes
- Cook Time: 0 minutes (no baking required)
- Category: Dessert/Snack
- Method: No-Bake
- Cuisine: American
Nutrition
- Serving Size: 18–20
- Calories: 180
- Sugar: 12g
- Sodium: 25mg
- Fat: 10g
- Saturated Fat: 3g
- Unsaturated Fat: 7g
- Trans Fat: 0g
- Carbohydrates: 20g
- Fiber: 3g
- Protein: 5g
- Cholesterol: 0mg