There’s something heartwarming about a dessert that brings back childhood memories. Lunch Lady Brownies are exactly that kind of treat—a blast from the past that still manages to feel indulgent, fudgy, and just the right amount of nostalgic.
This recipe was inspired by those simple school cafeteria days when a soft, chewy brownie square wrapped in wax paper made lunch period the highlight of the day. These brownies were always more than just dessert—they were a moment of joy, a little hug in the middle of a chaotic day.
What makes this version special is its ability to taste exactly as you remember—or maybe even better. Let’s take a walk down memory lane and see why these brownies are making a serious comeback.
Why I Love This Recipe?

If you’ve never had a Lunch Lady Brownie, prepare to be hooked.
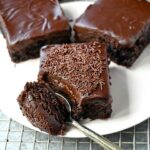
This isn’t just any brownie recipe. It’s rich, incredibly moist, and the frosting? Oh, the frosting is a glossy, melt-in-your-mouth layer of chocolate perfection. It’s sweet, but not overpowering, and it sets just firm enough to give you that perfect bite.
Unlike cakey brownies or dense, underbaked ones, Lunch Lady Brownies strike the perfect balance. They hold together without being dry, and they melt in your mouth without being mushy. The ingredients are basic pantry staples, but somehow they come together to create something utterly irresistible.
What makes these brownies extra special is how easily they come together in a single bowl. No fancy equipment needed—just you, a whisk, and a craving. This is the kind of dessert you make for a last-minute gathering, or simply to treat yourself after a long week.
It’s a foolproof, no-fuss recipe that brings comfort, joy, and just a little bit of school-lunch nostalgia into your kitchen.
Ingredients for Lunch Lady Brownies
To make the best version of these brownies, you don’t need anything fancy—just classic ingredients that come together in the most magical way.
Here’s what you’ll need:
For the brownies:
- Unsalted butter: This adds richness and a dense, moist texture. Melted butter works best for this recipe.
- Unsweetened cocoa powder: Use a high-quality cocoa powder for that deep chocolate flavor.
- All-purpose flour: Keeps the texture light without being too fluffy.
- Granulated sugar: Gives it that classic sweet base.
- Eggs: Eggs bind everything together and add moisture.
- Vanilla extract: Adds warmth and depth to the flavor.
For the frosting:
- Butter: For a creamy, smooth base.
- Milk: Helps thin out the frosting just enough.
- Powdered sugar: Gives that velvety texture without grittiness.
- Cocoa powder: For that glossy, rich chocolate finish.
- Vanilla extract: Just a splash brings out the chocolate flavor even more.
Each ingredient here plays its part in creating the ultimate brownie experience. They’re simple, but when combined, the result is anything but ordinary.
How Much Time Will You Need?
This recipe is surprisingly quick and easy. Here’s a breakdown:
- Prep Time: 10 minutes
- Bake Time: 20–25 minutes
- Frosting Time: 5 minutes
- Cooling Time: 30 minutes (for frosting to set properly)
So in under an hour, you could be biting into the most decadent, gooey brownie you’ve ever made at home.
How to Make This Lunch Lady Brownies

Step – 1: Preheat and Prepare
Preheat your oven to 350°F (175°C). Line a 9×13 inch baking pan with parchment paper or lightly grease it with butter or nonstick spray. This will make removing the brownies clean and easy.
Step – 2: Melt the Butter and Mix in Cocoa
In a large mixing bowl, melt the butter either in the microwave or on the stovetop. Once melted, whisk in the unsweetened cocoa powder until it’s fully combined and smooth. This forms the chocolaty base of your brownie batter.
Step – 3: Add Sugar and Vanilla
Next, stir in the granulated sugar and vanilla extract. Mix until smooth and slightly glossy. The sugar dissolves into the warm butter and cocoa, creating a syrupy base.
Step – 4: Add Eggs
Beat in the eggs, one at a time, mixing thoroughly after each addition. This will help create that shiny top you love on brownies. The eggs also emulsify the mixture and help it bake evenly.
Step – 5: Fold in the Flour
Sift in the all-purpose flour and fold gently until there are no dry pockets. Don’t overmix here—just enough to bring everything together into a cohesive batter.
Step – 6: Pour and Bake
Pour the batter into your prepared baking pan and smooth out the top. Bake for 20–25 minutes, or until a toothpick inserted in the center comes out with a few moist crumbs (not wet batter). Don’t overbake—these are meant to be fudgy.
Step – 7: Make the Frosting
While the brownies are baking or cooling, start your frosting. Melt the butter in a saucepan or microwave-safe bowl, then whisk in cocoa powder. Once smooth, stir in the milk and vanilla. Gradually whisk in powdered sugar until you have a thick, spreadable frosting.
Step – 8: Frost While Warm
As soon as the brownies come out of the oven and have cooled for 5–10 minutes (but are still warm), spread the frosting evenly over the top. The warmth will help the frosting melt slightly into the top layer—just like those classic cafeteria brownies.
Step – 9: Cool and Cut
Let the brownies cool completely so the frosting sets up properly. Once cool, cut into even squares using a sharp knife. Clean the knife between cuts for perfect edges.
Substitutions
There are always ways to customize this recipe to suit your pantry or dietary needs.
If you’re out of butter, you can substitute it with margarine or even coconut oil (though it will change the flavor slightly). For a healthier twist, try half butter and half unsweetened applesauce.
Instead of all-purpose flour, a 1:1 gluten-free flour blend can work well. Just make sure it includes xanthan gum for texture.
If you’re looking to cut sugar, consider replacing part of the granulated sugar with coconut sugar or a sugar substitute like erythritol. Keep in mind it may affect moisture slightly.
Dairy-free? Use plant-based milk and vegan butter for the frosting. The texture will still be luscious, just a tad different in taste.
Best Side Dish of Lunch Lady Brownies
To turn your brownie moment into a full-on treat, try pairing them with:
- Vanilla Bean Ice Cream: The creamy, cold contrast is absolute heaven.
- Fresh Strawberries: Adds a tart, juicy bite that balances the richness.
- Whipped Cream with a Hint of Cinnamon: Light, fluffy, and just enough spice to elevate the experience.
Serving and Presentation Tips
There’s something to be said about the art of presentation, even for a simple dessert like Lunch Lady Brownies. When it comes to serving, it’s all about making the moment feel extra special without overcomplicating things.
One of the easiest ways to elevate the presentation of your brownies is by cutting them into perfect squares or rectangles. For a more refined look, use a sharp serrated knife to ensure clean cuts, and wipe the knife between each slice. This helps prevent the frosting from smudging and creates smooth, clean edges that are a treat to look at.
If you want to add a little extra flair, try dusting your brownies with a light coating of powdered sugar just before serving. A few chocolate shavings or a drizzle of caramel sauce also add visual appeal and a rich flavor.
For a fun twist, serve them with a side of whipped cream or vanilla ice cream. The contrast of the warm brownies with the cool creaminess creates an indulgent contrast that’s sure to impress.
Tips and Tricks to Make This Recipe Better
Like any great recipe, there’s always room to elevate it just a bit further. Here are some tricks to enhance your Lunch Lady Brownies:
- Add a Dash of Espresso Powder: If you want to amplify the chocolate flavor, add a teaspoon of espresso powder to the brownie batter. The coffee enhances the richness without making the brownies taste like coffee.
- Use High-Quality Cocoa Powder: The quality of your cocoa powder will directly affect the depth of flavor in your brownies. Opt for a high-quality, Dutch-processed cocoa powder for a smoother, more intense chocolate taste.
- Chill the Brownies: For an extra-fudgy texture, refrigerate the brownies for 30 minutes after frosting them. This helps set the frosting and makes the brownies even more decadent when eaten chilled.
- Try Different Frostings: While the classic chocolate frosting is hard to beat, you can experiment with other options. A peanut butter frosting or a cream cheese frosting can add a fun twist to the flavor profile.
- Incorporate Mix-ins: If you like texture in your brownies, feel free to fold in chocolate chips, crushed nuts (like walnuts or pecans), or even swirls of caramel sauce into the batter before baking.
Common Mistakes to Avoid
Even the simplest recipes can have their pitfalls if you’re not careful. Here are some common mistakes to watch out for when making Lunch Lady Brownies:
- Overbaking: One of the most common mistakes is overbaking the brownies. While you may be tempted to leave them in a little longer to ensure they’re “fully cooked,” this can result in dry, crumbly brownies. Remember, they continue to cook in the pan after you remove them from the oven, so underbake just slightly for a perfect fudgy texture.
- Not Cooling Before Frosting: While the brownies should be slightly warm when you apply the frosting, they shouldn’t be piping hot. If you frost them while they’re too warm, the frosting might melt right off, leaving you with a mess. Let them cool for 5–10 minutes before frosting.
- Using Low-Quality Ingredients: Brownies are a simple dessert, but that doesn’t mean you should skimp on ingredients. Always use good-quality butter, cocoa powder, and vanilla extract. These ingredients are the backbone of the flavor.
- Skipping the Frosting: Some might think the frosting is optional, but trust me—it’s not. The frosting is what gives these brownies their signature richness. Skipping it means you’ll miss out on the essential part of the recipe.
- Not Testing for Doneness: Using a toothpick to test for doneness is key. Make sure it comes out with just a few moist crumbs, not wet batter. If you don’t test, you might end up with brownies that are either too gooey or too dry.
How to Store It
Storing your Lunch Lady Brownies properly ensures they stay fresh and fudgy for as long as possible. Here’s how to do it:
- Room Temperature: Store your brownies in an airtight container at room temperature for up to 3 days. This keeps them moist and fresh without the need for refrigeration.
- Refrigeration: If you need to store them for a longer period, you can refrigerate them for up to 5 days. Just be sure to let them come to room temperature before serving, as cold brownies can lose some of their flavor and texture.
- Freezing: Brownies freeze incredibly well! Simply wrap them in plastic wrap and then place them in an airtight container or freezer bag. They will stay good for up to 3 months. When ready to enjoy, allow them to thaw at room temperature or microwave for a few seconds to warm them up.
FAQ
1. Can I make these brownies ahead of time?
Yes, you can make these brownies a day or two ahead of time. In fact, they get even better after they’ve had time to set. Just store them in an airtight container to keep them fresh.
2. Can I freeze these brownies?
Absolutely! Brownies freeze well, and they maintain their texture and flavor when properly stored. Wrap them tightly in plastic wrap and place them in a freezer-safe bag or container.
3. How do I know when the brownies are done?
You can check the brownies by inserting a toothpick into the center. If it comes out with a few moist crumbs (not wet batter), they’re done. For fudgy brownies, err on the side of underbaking.
4. Can I make these brownies without frosting?
While the frosting is a key part of the recipe, you can skip it if you prefer. The brownies themselves are rich enough to stand on their own, but I highly recommend keeping it for the full experience.
5. Can I use a different kind of chocolate in these brownies?
Yes, you can use a variety of chocolates. Dark chocolate, semi-sweet chocolate, or even milk chocolate can be used in place of cocoa powder for a slightly different flavor. Just make sure to adjust the sugar content accordingly.
Lunch Lady Brownies
- Total Time: 45 minutes
- Yield: 12–16 brownies 1x
- Diet: Vegetarian
Description
These Lunch Lady Brownies are an irresistible dessert, reminiscent of school cafeteria treats but elevated with a fudgy, rich texture and a glossy, decadent frosting. Made with simple ingredients, this recipe brings comfort and nostalgia with every bite.
Ingredients
- 1 cup unsalted butter, melted
- 1/2 cup unsweetened cocoa powder
- 2 cups granulated sugar
- 2 large eggs
- 1 teaspoon vanilla extract
- 1 1/2 cups all-purpose flour
- 1/4 teaspoon salt
For the frosting:
-
1/4 cup unsalted butter, melted
-
1/4 cup unsweetened cocoa powder
-
2 tablespoons milk
-
2 cups powdered sugar
-
1 teaspoon vanilla extract
Instructions
- Preheat the oven to 350°F (175°C). Line a 9×13 inch baking pan with parchment paper.
- Melt the butter and whisk in cocoa powder, sugar, eggs, and vanilla.
- Fold in the flour and salt, then pour the batter into the prepared pan.
- Bake for 20–25 minutes, or until a toothpick inserted comes out with a few moist crumbs.
- For the frosting, melt butter, then whisk in cocoa powder, milk, powdered sugar, and vanilla.
- Frost the warm brownies with the chocolate frosting and allow to cool.
Notes
For an extra touch, add chocolate chips or nuts to the batter.
These brownies are best served at room temperature, but can also be enjoyed chilled for a fudgy texture.
- Prep Time: 10 minutes
- Cook Time: 25 minutes
- Category: Dessert
- Method: Baking
- Cuisine: American
Nutrition
- Serving Size: 1 brownie
- Calories: 320