The first time I made a Jellycat cake, it wasn’t because of a birthday or a special occasion. It was one of those quiet weekends when the kitchen feels like the safest place to land, and my niece had left her beloved Jellycat bunny on the counter like a silent request. That soft, floppy toy with its stitched smile became the inspiration for a cake that felt just as gentle and comforting.
This isn’t a fussy, bakery-style showpiece that demands perfection. A Jellycat cake is about warmth, softness, and charm. It’s meant to look a little whimsical, a little handmade, and very loved. I wanted a cake that tasted as good as it looked, something tender and vanilla-scented, wrapped in creamy frosting that feels like a hug.
I’ve made this cake for kids who gasp when they see it and for adults who suddenly feel ten years younger. It’s one of those recipes that invites people into the kitchen, sparks conversation, and usually ends with someone sneaking an extra slice. I’ll walk you through it the same way I’d explain it to a friend standing next to me at the counter, flour on our hands, wondering if we really need another spoonful of frosting.
This recipe is detailed, but not complicated. If you can bake a simple cake and spread frosting with love, you can make this Jellycat cake.
Why I Love This Recipe
What makes this Jellycat cake special isn’t just the way it looks. It’s the feeling behind it. This cake is playful without being childish, impressive without being intimidating. It’s designed to bring joy the moment it hits the table.

I love that this recipe gives you flexibility. You can shape it as a bunny, a bear, or even a simple round cake with Jellycat-inspired features. The base cake is soft, moist, and sturdy enough to carve lightly, which is important when you’re creating character shapes. At the same time, it’s tender enough that every bite melts in your mouth.
Another reason this recipe stands out is the frosting. It’s not overly sweet, which matters because decorative cakes often lean too sugary. This one balances creamy richness with a light vanilla flavor that complements the cake instead of overpowering it.
People make this recipe when they want to create a memory, not just a dessert. It’s perfect for birthdays, baby showers, or cozy family gatherings. It encourages creativity, invites small hands to help, and reminds us that baking doesn’t have to be perfect to be meaningful. Every time I make it, someone tells me it’s “too cute to cut,” and then moments later, they’re asking for seconds.
Ingredients for Jellycat Cake
The ingredients for this Jellycat cake are simple and familiar, which is part of its charm. You don’t need anything fancy or hard to find, just good-quality basics treated with care.
You’ll start with all-purpose flour, which gives the cake enough structure to hold its shape while staying soft. I always spoon and level my flour instead of scooping directly from the bag, because too much flour can make the cake dense.
Butter is essential here, and I strongly recommend using unsalted butter at room temperature. It creams beautifully with sugar and creates that tender crumb we’re after. Sugar brings sweetness and helps with browning, while eggs add richness and stability.
Milk keeps the batter smooth and moist, and a splash of vanilla extract gives the cake that classic, comforting aroma. Baking powder is what lifts the cake, so make sure yours is fresh.
For the frosting, cream cheese or butter-based frosting works beautifully. I usually go with a soft vanilla buttercream because it’s easy to color and spread. A little powdered sugar, butter, vanilla, and milk come together into a frosting that’s fluffy and forgiving.
You’ll also need food coloring for the Jellycat-inspired details, plus simple decorations like chocolate chips or fondant for the eyes and nose. Nothing here is complicated, and that’s exactly the point.
How Much Time Will You Need
This Jellycat cake isn’t a rushed recipe, but it doesn’t demand an entire day either. I like to think of it as a relaxed afternoon project.
You’ll need about 20 minutes to prepare the batter and get it into the oven. Baking time usually falls around 30 to 35 minutes, depending on your oven and the pan shape you choose. Cooling is important, so plan at least 45 minutes to an hour before frosting.
Decorating is where the magic happens, and that can take anywhere from 30 minutes to an hour. If you enjoy the process and take your time, it becomes part of the fun. All in, you’re looking at roughly two and a half to three hours from start to finish, with plenty of pauses built in.
How to Make This Jellycat Cake
Making this cake is a gentle, step-by-step process. Don’t rush it. Let each stage do its job.
Step – 1: Prepare your pans and oven
Start by preheating your oven to 350°F. Grease your cake pans thoroughly and line the bottoms with parchment paper. This step matters, especially if you plan to shape the cake later.

Step – 2: Cream the butter and sugar
In a large bowl, beat the butter until it’s smooth and creamy. Add the sugar gradually and continue beating until the mixture looks pale and fluffy. This usually takes about three to four minutes and sets the foundation for a light cake.
Step – 3: Add the eggs and vanilla
Add the eggs one at a time, mixing well after each addition. Stir in the vanilla extract. The batter should look smooth and slightly glossy at this stage.
Step – 4: Mix the dry ingredients
In a separate bowl, whisk together the flour and baking powder. This ensures even distribution and prevents clumps.
Step – 5: Combine wet and dry ingredients
Add the dry ingredients to the butter mixture in stages, alternating with the milk. Start and end with the dry ingredients. Mix gently until just combined. Overmixing can make the cake tough.
Step – 6: Bake the cake
Pour the batter evenly into your prepared pans. Smooth the tops and bake until a toothpick inserted into the center comes out clean. Let the cakes cool in the pans for about 10 minutes before turning them out onto a wire rack.
Step – 7: Frost and decorate
Once completely cool, frost the cake with a crumb coat first. Chill briefly, then add the final layer of frosting. Shape and decorate your Jellycat-inspired details with care and creativity.
Substitutions
One of the things I appreciate about this recipe is how adaptable it is. If you’re missing an ingredient or want to adjust flavors, there’s room to play.
If you don’t have whole milk, you can use half-and-half or even a plant-based milk like almond or oat milk. Just make sure it’s unsweetened so it doesn’t affect the flavor.
Butter can be replaced with a good-quality dairy-free alternative if needed. The texture will be slightly different, but still delicious.
For the frosting, cream cheese frosting can replace buttercream if you prefer a tangier finish. You can also reduce the sugar slightly if you like a less sweet cake.
Flavor-wise, a hint of almond extract or lemon zest can add a subtle twist without changing the soul of the cake. These small adjustments let you make the recipe your own while keeping its comforting core intact.
Best Side Dish of Jellycat Cake
A Jellycat cake shines on its own, but pairing it with the right side can make the moment even better.
Fresh berries are a beautiful contrast, adding brightness and a little tartness.
A scoop of vanilla ice cream turns the cake into a full dessert experience, especially for kids.
Lightly sweetened whipped cream offers a soft, cloud-like companion that complements the cake’s texture perfectly.
Serving and Presentation Tips
This is the part where the Jellycat cake really comes to life. When it’s time to serve it, I always slow down a little, because presentation matters more than people think. This cake isn’t just dessert, it’s a moment.
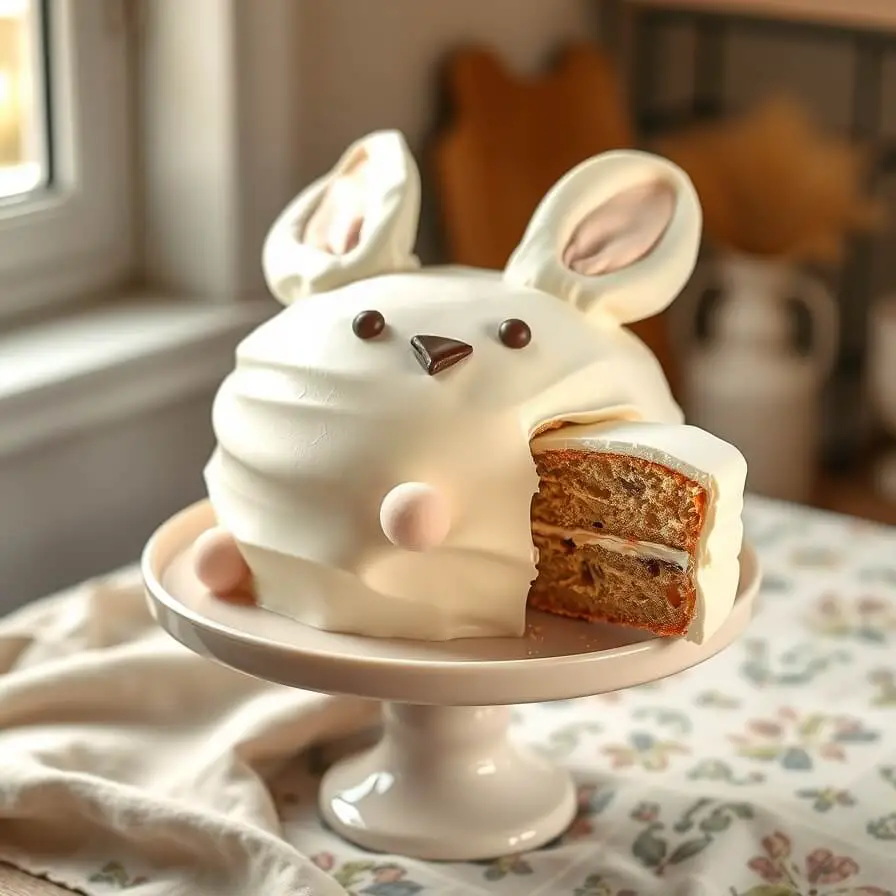
I like to place the cake on a simple white or pastel-colored cake stand so the details stand out. If you’ve shaped it like a Jellycat bunny or bear, make sure the face is angled slightly toward the front so guests can see it clearly before it’s cut. That pause, when everyone leans in and smiles, is one of my favorite parts.
Soft lighting helps too. Natural daylight makes the frosting colors look gentle and plush, which fits the Jellycat vibe perfectly. If it’s an evening event, warm lights instead of harsh overhead ones make a big difference.
When slicing, use a clean, sharp knife and wipe it between cuts. This keeps the slices neat and preserves the design for as long as possible. I usually serve slightly smaller slices at first. The cake is rich, and people almost always come back for more once they’ve tasted it.
Tips and Tricks to Make This Recipe Better
There’s something comforting about knowing a few quiet tricks that make a recipe shine. These are the things I’ve learned after making this cake more than once.
One of the best things you can do is let all your ingredients come to room temperature before you start. Cold butter or eggs don’t blend as smoothly, and that affects the texture of the cake.
When it comes to frosting, patience is everything. A thin crumb coat followed by a short chill in the fridge makes the final layer so much easier to apply. It also gives you that soft, plush finish that suits a Jellycat-inspired cake.
If you’re coloring frosting, start with the tiniest amount of food coloring and build slowly. Jellycat colors are usually muted and gentle, not bold or neon. Soft pastels feel more authentic and charming.
Another tip is to bake the cake a day ahead if you can. Wrapped well, the cake actually becomes more moist overnight, and decorating the next day feels calmer and more enjoyable.
Common Mistakes to Avoid
Even a forgiving cake like this has a few traps that are easy to fall into if you’re not paying attention.
One common mistake is overbaking. Because the cake needs to be sturdy enough for decorating, it’s tempting to leave it in the oven a bit longer. Try not to. As soon as a toothpick comes out clean, it’s done. Overbaking dries it out.
Another issue is frosting a warm cake. I know it’s tempting to rush, but warm cake will melt your frosting and ruin the texture. Let it cool completely, even if that means stepping away for a while.
Using frosting that’s too stiff can also make decorating harder. If your frosting feels difficult to spread, add a teaspoon of milk and beat it again. You want it soft, smooth, and easy to work with.
Finally, don’t aim for perfection. Jellycat cakes are meant to feel handmade and cozy. A slightly crooked ear or uneven smile just adds to the charm.
How to Store It
Storing this cake properly keeps it tasting fresh and looking lovely.
If the cake is unfrosted, you can wrap it tightly in plastic wrap and store it at room temperature for up to two days. Once frosted, it’s best kept in the refrigerator, especially if you’re using buttercream or cream cheese frosting.
Place the cake in an airtight container or cover it loosely with plastic wrap, making sure the wrap doesn’t touch the decorations. Before serving leftovers, let the cake sit at room temperature for about 20 minutes. This softens the frosting and brings back the cake’s tender texture.
If you need to store slices, wrap them individually. They’ll keep well in the fridge for up to three days.
FAQ
Can I make this Jellycat cake in advance?
Yes, and I often do. You can bake the cake layers a day ahead and frost them the next day. It actually improves the texture.
What flavor works best for kids?
Classic vanilla is always a hit. It’s familiar, gentle, and pairs beautifully with frosting and decorations.
Can I use boxed cake mix instead of homemade?
You can, but the homemade version gives a softer crumb and better flavor. If you’re short on time, a good-quality mix will still work.
How do I keep the decorations from sliding?
Chill the cake briefly after placing decorations. This helps everything set and stay in place.
Can this cake be made without special tools?
Absolutely. A basic mixer, spatula, and knife are enough. The charm comes from care, not equipment.

Jellycat Cake Recipe
- Total Time: 2 hours 30 minutes
- Yield: 10 1x
- Diet: Vegetarian
Description
This Jellycat cake is a soft, tender vanilla cake inspired by the plush charm of beloved Jellycat toys. It’s comforting, whimsical, and designed to bring smiles to the table. The cake itself is moist and lightly sweet, making it perfect for carving gentle shapes and holding creamy frosting. Whether you’re making it for a child’s birthday, a baby shower, or simply to create a cozy moment at home, this recipe balances simplicity with heart. It’s not about perfection, but about warmth, creativity, and sharing something handmade with people you love.
Ingredients
- All-purpose flour
- Unsalted butter
- Granulated sugar
- Eggs
- Whole milk
- Baking powder
- Vanilla extract
- Powdered sugar
- Food coloring
Instructions
- Preheat the oven and prepare cake pans with butter and parchment.
- Cream butter and sugar until light and fluffy, then add eggs and vanilla.
- Mix dry ingredients separately and combine with wet ingredients, alternating with milk.
- Bake until a toothpick comes out clean and cool completely before frosting.
- Frost gently, decorate with Jellycat-inspired details, and chill briefly to set.
Notes
- For best results, use room-temperature ingredients and avoid overmixing the batter. Soft, pastel frosting colors work best for a Jellycat look.
- Prep Time: 20 minutes
- Cook Time: 35 minutes
- Category: Dessert
- Method: Baking
- Cuisine: American
Nutrition
- Serving Size: 10
- Calories: 420
- Sugar: 32g
- Sodium: 210mg
- Fat: 22g
- Saturated Fat: 13g
- Unsaturated Fat: 8g
- Trans Fat: 0g
- Carbohydrates: 52g
- Fiber: 1g
- Protein: 6g
- Cholesterol: 95mg