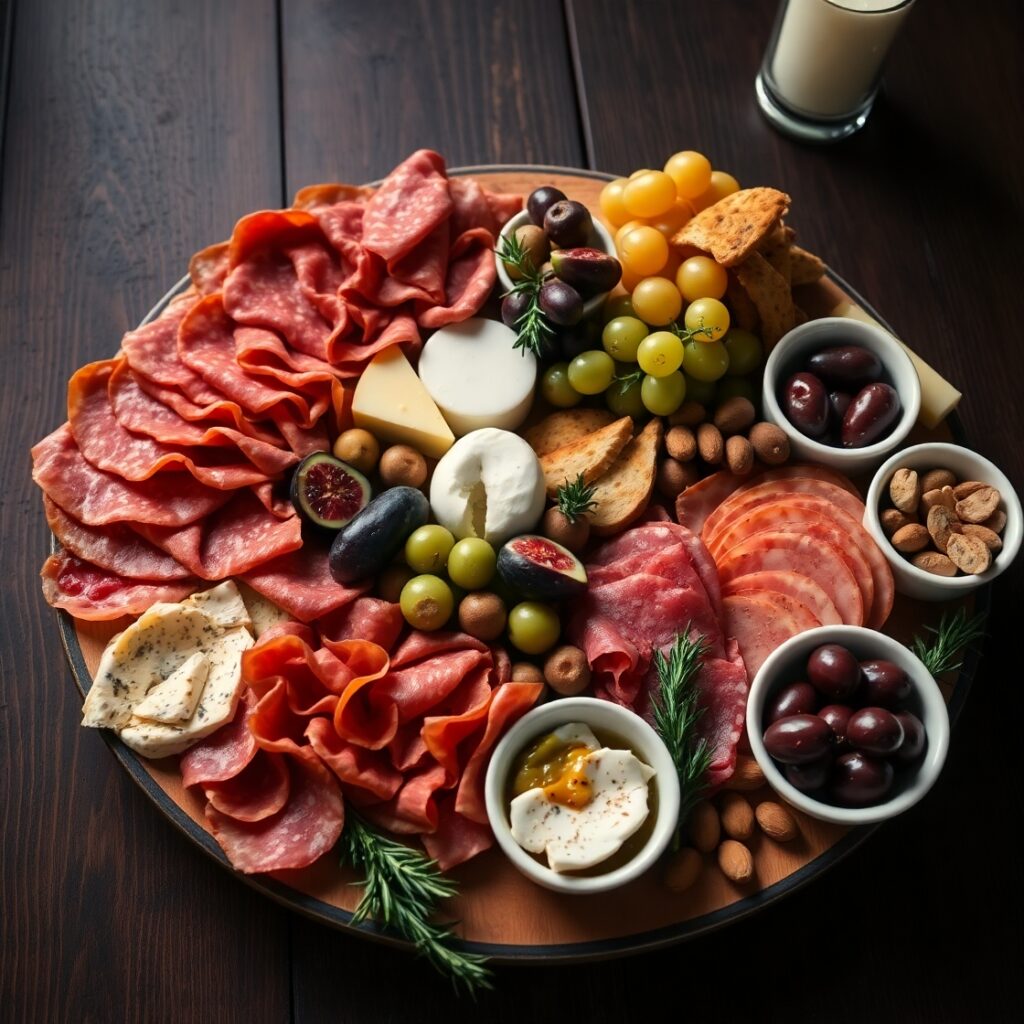
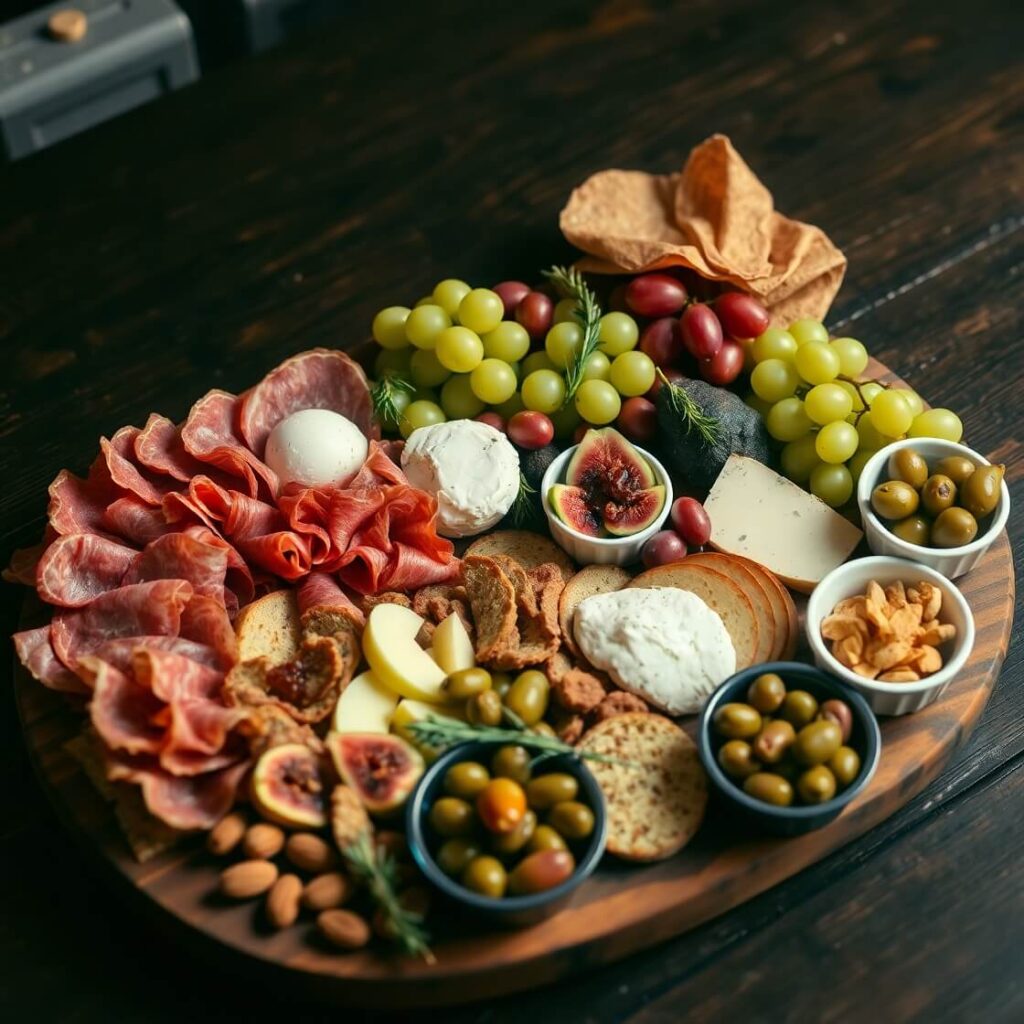
Imagine this: a warm summer evening, a bottle of good red wine uncorked, and a rustic wooden board overflowing with flavorful meats, aged cheeses, briny olives, and warm, crusty bread. That’s exactly why the Italian Charcuterie Board has become my go-to for gatherings, celebrations, and even lazy Sundays.
It’s more than just a platter of food—it’s a celebration of Italian culinary heritage, a grazing experience that brings people together and sparks conversation. I created this recipe not only because it’s beautiful and satisfying, but also because it offers the perfect blend of ease, elegance, and indulgence. Whether you’re hosting a dinner party, planning a romantic date night, or just indulging yourself, this board invites you to slow down and savor every bite.
So if you’re looking for a no-cook, full-flavor spread that feels both impressive and effortless—keep reading.
Why I Love This Recipe

There’s a reason Italian charcuterie boards never go out of style.
First, it’s the versatility. You can scale it up or down, make it budget-friendly or luxurious, and tailor every component to your tastes. It’s a choose-your-own-adventure approach to dining—every bite is different.
Second, it’s visually stunning. A well-composed charcuterie board is a feast for the eyes: vibrant colors, various textures, rustic appeal. It feels like edible art.
But most importantly, it’s the simplicity. You don’t need to cook a thing. Just curate quality ingredients, arrange them thoughtfully, and let them shine. This is what makes it special—bringing people together over a communal, low-effort, high-impact meal.
And then there’s the wow factor. Guests always light up when they see it. It’s comforting, familiar, and at the same time, utterly indulgent.
Ingredients for Italian Charcuterie Board
Before you start, let’s talk ingredients—the soul of this entire experience.
You don’t need a massive grocery list, but every item should be high quality and thoughtfully chosen. Think of it as building blocks of flavor—each one bringing its own taste, texture, and color to the board.
Here’s what you’ll want to include:
Cured Meats
Start with 3–4 types. Choose a mix of textures and flavors:
- Prosciutto – Thin, salty, melt-in-your-mouth perfection.
- Salami (like Genoa or Soppressata) – Peppery, chewy, and rich.
- Capocollo or Bresaola – Earthy, savory, and a little spicy.
- Speck – A smoked, aged ham with an intense flavor.
Cheeses
Aim for variety in texture and milk type:
- Aged Parmigiano-Reggiano – Nutty and crumbly.
- Fresh Mozzarella or Burrata – Creamy, soft, and mild.
- Pecorino Romano – A hard sheep’s milk cheese with a salty punch.
- Gorgonzola Dolce – A softer, milder blue cheese with creamy depth.
Breads and Crackers
Go for neutral bases that complement—not overpower—the toppings:
- Sliced ciabatta – Toasted or fresh.
- Grissini (thin breadsticks) – Add texture and visual height.
- Crostini or rustic Italian crackers – For easy cheese-and-meat stacking.
Fresh Fruits
Fresh fruit brings color and sweetness:
- Figs (when in season) – Nothing beats the fresh, honeyed taste of ripe figs.
- Red grapes or green grapes – Sweet, juicy palate cleansers.
- Pear or apple slices – Slightly crisp with subtle sweetness.
Dried Fruits & Nuts
They add chewy, crunchy contrast:
- Dried apricots or figs
- Marcona almonds or toasted walnuts
- Pistachios in the shell – Fun and interactive.
Pickled & Briny Accents
These cut through richness:
- Castelvetrano olives – Buttery and vibrant.
- Marinated artichoke hearts
- Cornichons or pickled onions
- Sun-dried tomatoes
Spreads & Condiments
A swipe of something creamy or tangy ties it all together:
- Whole grain mustard
- Fig jam or honey
- Pesto or olive tapenade
Garnishes
Not required, but a nice touch:
- Fresh rosemary sprigs or basil
- Edible flowers (for special occasions)
How Much Time Will You Need
Here’s the beauty of this recipe—it’s incredibly quick to assemble.
- Prep time: 15 to 20 minutes
- No cook time: None
- Total time: Under 30 minutes
You’ll spend most of the time slicing, arranging, and nibbling along the way. If you prep ahead by slicing meats and cheeses or pre-toasting crostini, the final assembly takes even less time.
How to Make This Italian Charcuterie Board
Let’s walk through how to build the perfect board. No cooking required—just creativity and some good vibes.
Step – 1: Choose the Right Board
Start with a large wooden board, slate tray, or even a baking sheet. You want enough space to layer and cluster without overcrowding.
Step – 2: Place Your Anchor Items
Add small bowls first—these will hold olives, nuts, jams, or tapenades. Scatter them across the board to anchor your layout and create visual balance.
Step – 3: Layer the Cheeses
Next, place your cheeses. Keep them separate and space them out so guests can easily grab different kinds. Crumble hard cheeses like Parmigiano, slice wedges from soft ones, and leave small knives with creamy cheeses.
Step – 4: Fold and Fan the Meats
Arrange meats in fanned layers or folded into rosettes or ribbons for texture. Tuck them near the cheeses they complement best. Alternate colors and types for visual appeal.
Step – 5: Add Crackers and Bread
Layer crackers and breadsticks around the edges or fan them out from bowls. This keeps them crisp and adds height to the display.
Step – 6: Fill in with Fruits and Nuts
Nestle grapes, apple slices, and dried fruit into the gaps. Sprinkle in nuts where space is tight. These are great for creating movement and color flow.
Step – 7: Add Spreads and Garnishes
Spoon jams, mustard, or pesto into your bowls. Drizzle honey across a cheese wedge. Tuck in sprigs of rosemary or scatter edible flowers if desired.
Step – 8: Final Touches
Stand back and check for bare spots. Fill them with olives, herbs, or small bread pieces. Keep the board full but not overcrowded—every item should be easy to grab.
Serve immediately or chill until ready (cover loosely with plastic wrap if needed).
Substitutions
Want to put your own spin on this board? You absolutely can.
Here’s how to tailor it to your tastes or pantry:
- Meat-Free Option: Swap cured meats for grilled vegetables like eggplant, roasted peppers, and zucchini ribbons.
- Cheese Substitutes: Try Taleggio for a creamy option or Asiago instead of Pecorino for a milder bite.
- Fruit Swap: No figs? Use fresh cherries or strawberries for sweetness.
- Nut-Free: Replace with seeded crackers, pumpkin seeds, or roasted chickpeas.
- Low Sodium: Skip heavily salted meats like prosciutto and opt for fresh mozzarella or goat cheese.
The goal is balance—mix flavors, textures, and colors. Italian tradition is all about using what you have and making it shine.
Best Side Dish of Italian Charcuterie Board
A well-made charcuterie board is almost a meal on its own—but pairing it with the right side dishes takes it to the next level.
Here are three excellent pairings:
1. Caprese Salad
Fresh tomatoes, mozzarella, and basil with a drizzle of balsamic glaze. It’s refreshing and complements the richness of the board.
2. Roasted Garlic and Herb Dip with Vegetables
A creamy, garlicky dip with crudité like carrots, cucumbers, and radishes adds brightness and crunch.
3. Italian White Bean Salad
A zesty mix of cannellini beans, red onion, lemon juice, and parsley. It’s light, satisfying, and a perfect palate cleanser.
Serving and Presentation Tips
Let’s be honest—half the charm of an Italian charcuterie board is how beautifully it’s presented.
You don’t need to be a food stylist to make this board shine. A few thoughtful choices can elevate the whole look and experience.
Start by using a rustic wooden board, marble slab, or even a large cutting board. Don’t feel limited to round or rectangular—an asymmetrical board adds interest. Use small bowls or ramekins for olives, jams, and dips to break up the layout and guide the eye.
Think in clusters, not rows. Group ingredients loosely but intentionally. Alternate colors—don’t put all the beige items together. Instead, place salami beside green olives, or figs next to a wedge of Gorgonzola.
For height and visual texture, try folding prosciutto into ruffles or rolling slices into rosettes. Stack crackers like dominoes. Fan out apple slices or grapes across corners.
And don’t forget the final touches: drizzle honey over a cheese wedge, tuck in fresh rosemary sprigs, and scatter pomegranate seeds or edible flowers for a pop of color.
A charcuterie board isn’t just food—it’s a statement. Make yours one worth remembering.
Tips and Tricks to Make This Recipe Even Better
Want to go from “nice” to “jaw-dropping”? Here’s how to make your Italian charcuterie board unforgettable.
- Balance your flavors: Think salty (prosciutto), sweet (fig jam), sour (pickles), creamy (burrata), and crunchy (nuts). The more variety, the more satisfying each bite becomes.
- Think seasonally: Fresh figs and berries in the summer, roasted squash and dried cherries in fall. Your board can reflect the time of year.
- Warm your bread: Slightly warm ciabatta or crostini before serving—it brings out the aroma and elevates the whole experience.
- Label the cheeses: Especially helpful for guests who aren’t familiar with Italian cheeses. You can use little paper flags or chalkboard labels.
- Keep things bite-sized: Pre-slice hard cheeses or meats so guests aren’t fumbling with knives. Make it easy to pick up and pop in your mouth.
- Chill bowls, not cheese: Serve cheeses at room temperature for the best flavor. If needed, prep ahead and take them out 30–45 minutes before serving.
Common Mistakes to Avoid
Even though a charcuterie board is simple, a few missteps can hold it back. Here’s what to watch out for:
- Overcrowding: Leave a little breathing room. If it’s too packed, guests won’t know where to start.
- Lack of texture and flavor variety: Only meats and cheeses? You’ll lose interest fast. Include spreads, fruits, crunch, and acid.
- Serving everything cold: Room temperature cheese tastes vastly better than fridge-cold cheese. Don’t skip this step.
- Skipping fresh ingredients: A few fresh herbs or fruits make a huge difference in flavor and presentation.
- Forgetting serving utensils: Toothpicks, spreaders, small forks—these make sharing easy and hygienic.
How to Store It
You’ve built the perfect board. What if you have leftovers?
- Wrap cheeses separately in parchment or wax paper, then place them in airtight containers in the fridge. Avoid plastic wrap—it makes cheese sweat and alters flavor.
- Cured meats can go back into their original packaging if resealable. Otherwise, wrap tightly in plastic wrap or store in airtight containers.
- Fruits and bread are best enjoyed fresh. If needed, store grapes in the fridge and toasted crostini in a ziplock at room temp.
- Condiments and nuts can stay sealed in jars or containers and used again.
Pro tip: Turn leftovers into a gourmet sandwich the next day. A little cheese, salami, fig jam, and arugula on crusty bread? Heaven.
FAQ
Can I make this charcuterie board ahead of time?
Yes. Assemble up to 2 hours in advance and store covered in the fridge. Let it sit out 30 minutes before serving so cheeses soften.
What kind of wine goes best with an Italian charcuterie board?
A medium-bodied red like Chianti or Barbera is a great pairing. Prosecco or Pinot Grigio also works well with salty meats and creamy cheeses.
Is this board gluten-free?
It can be! Just swap the bread and crackers for gluten-free options like rice crackers or seed crisps.
How many people does this serve?
A medium-sized board with 3 meats, 3 cheeses, and sides serves 4–6 people as an appetizer. Double the ingredients for a party-sized spread.
Can I make a vegetarian version?
Absolutely. Replace meats with grilled vegetables, marinated mushrooms, and extra cheeses. Add hummus or ricotta as a creamy component.

Italian Charcuterie Board
- Total Time: 20 minutes
- Yield: 4–6 1x
- Diet: Vegetarian
Description
A rustic, no-cook spread of Italian cured meats, cheeses, fruits, and artisan bites, this board is perfect for gatherings, parties, or an elegant night in. Rich in textures and flavors—salty, sweet, tangy, creamy—every item complements the next. It’s not just about food; it’s about creating a full-sensory experience. And with no actual cooking required, it’s one of the easiest yet most impressive appetizers you can serve.
Ingredients
- Prosciutto
- Genoa salami
- Capocollo
- Parmigiano-Reggiano
- Mozzarella or burrata
- Pecorino Romano
- Gorgonzola Dolce
- Fresh figs or grapes
- Apple or pear slices
- Marcona almonds or walnuts
- Castelvetrano olives
- Pickled onions or artichokes
- Fig jam or honey
- Whole grain mustard
- Crostini, ciabatta, or grissini
- Fresh rosemary or basil
Instructions
- Choose a large wooden or slate board.
- Place small bowls for olives, jams, and pickles around the board.
- Add cheeses, spacing them around the board. Slice hard cheeses, leave soft ones whole with a knife.
- Fold or roll cured meats and tuck them between cheeses.
- Fan out crackers and toasted bread around the edges.
- Add fresh fruits, dried fruits, and nuts to fill in gaps.
- Spoon spreads and drizzle honey over cheeses if desired.
- Garnish with herbs and edible flowers. Serve at room temperature.
Notes
- Always bring cheeses to room temperature for optimal flavor.
- Toast your bread slightly for added texture.
- Swap ingredients based on seasonality and taste.
- Prep Time: 20 minutes
- Cook Time: 0 minutes
- Category: Appetizer / Party
- Method: No-cook
- Cuisine: Italian
Nutrition
- Serving Size: 4–6
- Calories: 410
- Sugar: 7g
- Sodium: 880mg
- Fat: 29g
- Saturated Fat: 11g
- Unsaturated Fat: 15g
- Trans Fat: 0g
- Carbohydrates: 19g
- Fiber: 2g
- Protein: 17g
- Cholesterol: 55mg