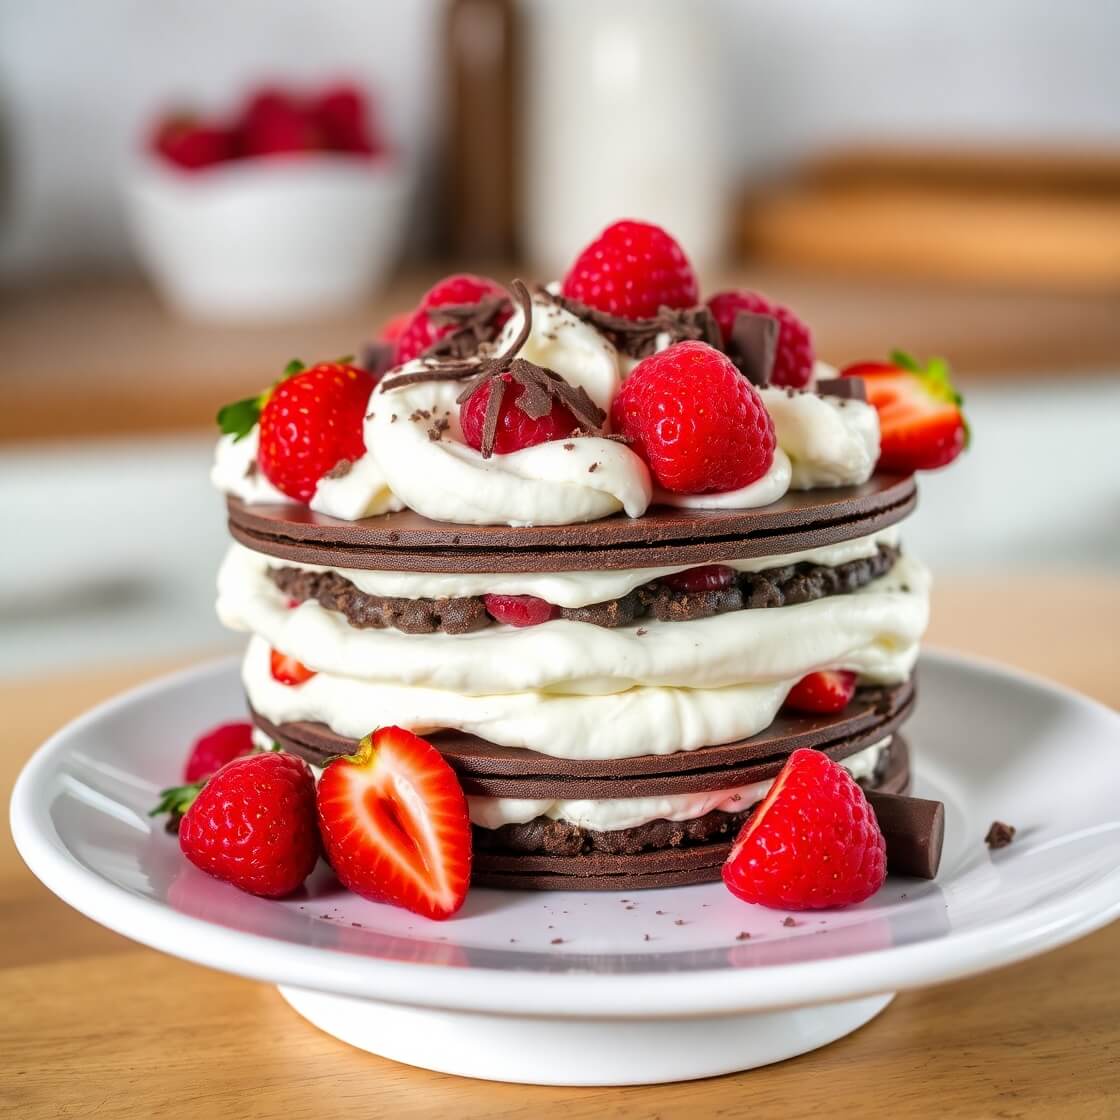
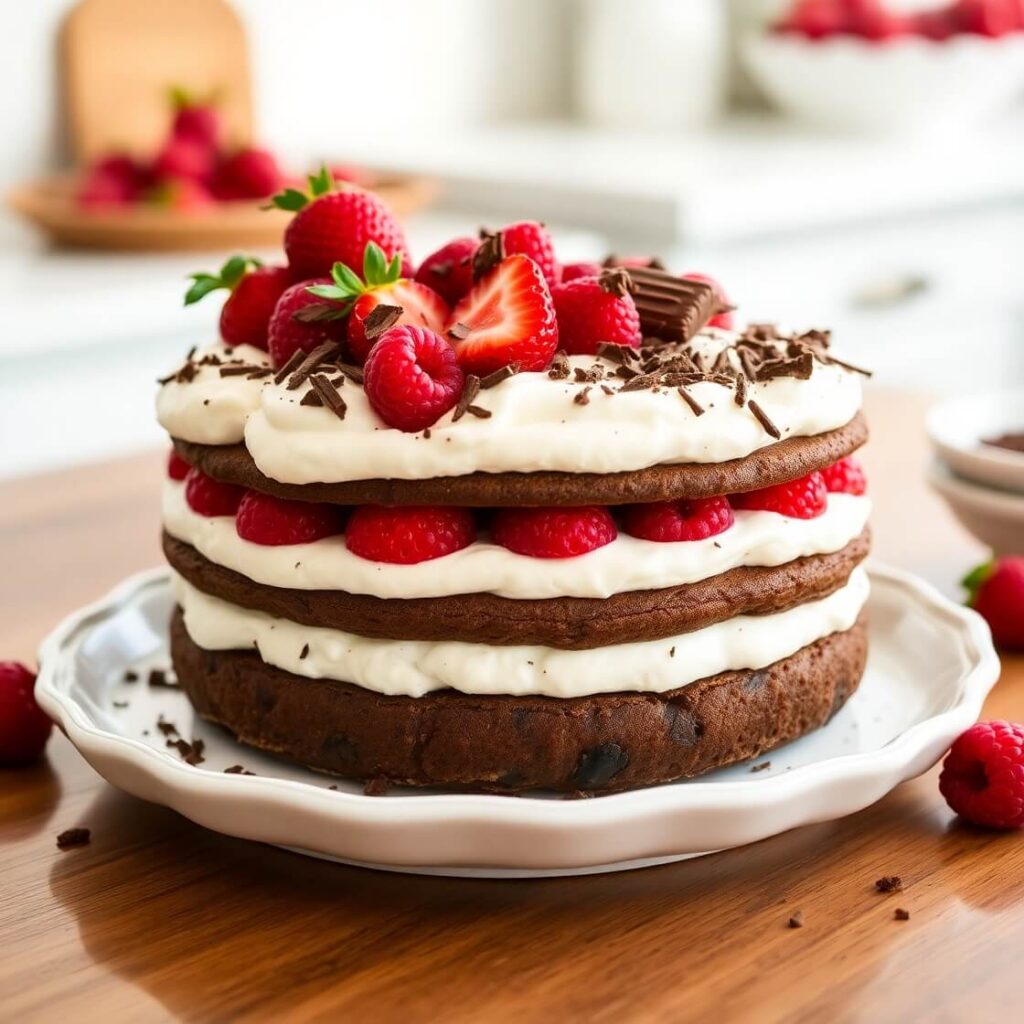
There’s something undeniably nostalgic about an icebox cake. Maybe it’s the way the layers come together so effortlessly or how every bite feels like a little taste of childhood summers. I still remember the first time I made one—on a hot July afternoon when turning on the oven was out of the question. I needed a dessert that was cool, creamy, and satisfying, and that’s when I discovered the magic of the humble icebox cake.
This cake isn’t fancy or fussy. It’s what you make when you want something sweet but don’t want to spend hours baking. With just a few ingredients and a little patience, you end up with a chilled dessert that’s perfect for summer gatherings, family dinners, or a quiet treat after a long day.
If you’ve never tried making one, let me tell you—this is your sign. This recipe is beginner-friendly, freezer-friendly, and crowd-approved. Keep reading, because this no-bake delight might just become your new go-to dessert.
Why I Love This Recipe

Here’s the thing: I’ve made a lot of desserts over the years, but nothing compares to the simplicity and charm of an icebox cake. It’s one of those old-school recipes that has stood the test of time—and for good reason.
The real magic happens in the fridge. What starts as layers of crisp cookies and whipped cream transforms into a soft, cake-like texture overnight. It’s as if the ingredients hug each other and turn into something completely new. No oven, no mixers (unless you want to whip your own cream), and no complicated steps.
Another reason I love this recipe? It’s endlessly customizable. You can swap out the cookies, flavor the cream, add fruit, drizzle sauces—the possibilities are truly endless. And whether you’re hosting a party or just want something sweet at home, this cake never disappoints.
It’s also the kind of dessert that invites creativity. I’ve made versions with chocolate graham crackers, gingersnaps, Biscoff, even Oreos. It’s a brilliant way to use what you already have in your pantry and still come out with a showstopping dessert.
Ingredients for Icebox Cake
This cake is as flexible as it is easy. You don’t need a long list of fancy ingredients. In fact, the base version only requires three components: cookies, whipped cream, and a little time in the fridge. That’s it.
But here’s a closer look at what you’ll need—and why each one matters:
- Heavy whipping cream – This is the heart of the cake. When whipped, it becomes the luscious “frosting” and filling that holds everything together. You’ll want it cold for easy whipping.
- Powdered sugar – A little sweetness goes a long way. I prefer powdered over granulated because it blends smoothly into the cream without a gritty texture.
- Vanilla extract – Don’t skip this. Even a teaspoon of vanilla can enhance the flavor of the cream and give it that signature icebox taste.
- Chocolate wafer cookies (or graham crackers) – These are the “cake” layers. I personally love using Nabisco Famous Chocolate Wafers, but they can be hard to find. Graham crackers work beautifully too, especially the honey or chocolate varieties.
Optional (but delightful) extras:
- Fresh berries – Strawberries, raspberries, blueberries… they all add a bright, juicy touch between layers or on top.
- Chocolate shavings or cocoa powder – For garnish and that bakery-style finish.
- Espresso powder – For a mocha twist.
No matter what variation you choose, just remember the rule: simple ingredients, big impact.
How Much Time Will You Need
This recipe is all about patience—not active time. The actual prep takes around 20 to 30 minutes, depending on how many layers and extras you’re using.
Here’s the breakdown:
- Prep Time: 20 minutes
- Chilling Time: 6 to 8 hours minimum (overnight is best)
So while it’s not instant gratification, it’s absolutely worth the wait. Make it the night before, and let your fridge do the work while you sleep.
How to Make This Icebox Cake

This is where the fun begins. You don’t need a stand mixer or baking skills—just a little layering love.
Step – 1: Make the whipped cream
In a large mixing bowl, pour in the cold heavy cream. Add powdered sugar (about ¼ cup per pint of cream) and a splash of vanilla extract. Use a hand mixer or stand mixer to whip it until stiff peaks form. Be patient—this usually takes a few minutes. You want the cream to hold its shape but not be over-whipped.
Step – 2: Choose your dish
A loaf pan, square dish (8×8 or 9×9), or a round springform pan all work great. You can even use a trifle bowl for a more dramatic presentation. Line with parchment if you want easy removal later.
Step – 3: Layer the cookies
Start with a single layer of cookies or graham crackers at the bottom. Break them if needed to fit snugly. This is your base.
Step – 4: Add the whipped cream
Spread a generous layer of whipped cream over the cookies. You want a nice thick coat, about ½ inch. Don’t skimp—this is what softens the cookies and creates that dreamy cake texture.
Step – 5: Repeat
Continue layering cookies and cream until you reach the top of your dish. The final layer should be whipped cream.
Step – 6: Chill overnight
Cover the dish with plastic wrap and place it in the fridge for at least 6 hours, ideally overnight. This is when the magic happens. The cookies soak up the cream and become cake-like.
Step – 7: Decorate and serve
Just before serving, garnish with fresh berries, chocolate curls, a dusting of cocoa, or anything you like. Slice and serve cold.
Substitutions
What if you don’t have chocolate wafers? Or want to switch it up? You totally can.
Cookies:
- Graham crackers – Classic and easy to find. Honey, cinnamon, or chocolate all work.
- Oreos – For a cookies and cream vibe. Use without the filling for less sweetness.
- Biscoff cookies – Adds a caramel, spiced note. Perfect for fall.
- Ladyfingers – For a tiramisu-style twist.
Cream:
- Cool Whip – If you’re short on time, it’s a decent substitute. Just know it’s a bit sweeter.
- Mascarpone + whipped cream – For a richer, more decadent version.
Flavorings:
- Add espresso powder or cocoa to the whipped cream for depth.
- Fold in lemon zest for brightness.
- Add peanut butter to the cream for a salty-sweet finish.
This recipe is truly a canvas. Use what you love and what you have.
Best Side Dish of Icebox Cake
While this dessert can easily stand on its own, pairing it with something light or refreshing elevates the experience. Here are three side ideas that complement icebox cake beautifully:
- Mint Iced Tea – Cool and herbal, it balances the sweetness perfectly.
- Lemon Sorbet – Tart, tangy, and refreshing—a great contrast.
- Fruit Salad with Honey-Lime Dressing – Adds color and freshness to the plate.
Serving and Presentation Tips
There’s something so satisfying about unveiling a perfectly chilled icebox cake. Whether you’re serving it at a summer cookout or after a cozy family meal, presentation makes all the difference.
Here’s the trick: Let the cake chill completely before slicing. This allows the layers to set and gives you those beautiful, clean cuts.
If you used a loaf or square dish, you can serve it in neat squares or long, elegant slices. I love using a hot knife—just dip it in hot water, wipe dry, and slice. It glides right through like butter.
For extra flair, top with:
- Fresh berries – Strawberries, blueberries, and raspberries add color and brightness.
- Shaved chocolate – Use a vegetable peeler and a bar of chocolate.
- Edible flowers – They’re stunning for garden parties or brunch tables.
If you’re making this for a crowd, try building it in a clear glass trifle bowl or small mason jars. That way everyone gets their own mini masterpiece.
Tips and Tricks to Make This Recipe Better
I’ve made this cake more times than I can count, and over the years, I’ve picked up a few secrets that really elevate it.
Use cold equipment. When whipping cream, start with a cold bowl and cold beaters. It speeds up the process and gives you fluffier, more stable peaks.
Don’t skimp on chilling time. This recipe is about patience. The longer it chills (overnight is ideal), the better the texture and flavor. Those layers need time to soften and meld.
Balance the sweetness. Taste your whipped cream before layering. If it’s too sweet, the whole cake can feel heavy. If you’re using very sweet cookies, consider cutting the sugar back slightly.
Thin, even layers. Aim for an even spread of whipped cream between cookie layers. This ensures a uniform, cake-like bite.
Add texture. Want a little crunch? Sprinkle chopped nuts, toasted coconut, or crushed cookies between layers. It adds a fun surprise.
Double the batch for a crowd. This cake disappears fast. I always make two versions if I’m hosting—it’s that popular.
Common Mistakes to Avoid
Even though this cake is simple, a few small missteps can make a big difference. Here’s what to look out for:
Using warm cream. Room-temperature cream won’t whip properly. Make sure it’s cold straight from the fridge.
Under-whipping or over-whipping. You want stiff peaks—not soft, not broken. If you overdo it, the cream will turn grainy or even separate.
Not letting it chill long enough. If you try to serve it too early, the cookies will still be crunchy and the layers won’t hold.
Overloading the layers. Too much whipped cream can make it messy and hard to slice. Keep it generous but balanced.
Skipping the garnish. It may seem optional, but a few toppings really make the cake pop visually. Even just a dusting of cocoa or a handful of berries makes a big difference.
How to Store It
This cake actually gets better with time, which makes it a dream for meal prep or parties. But there are a few tips to keep it at its best:
In the fridge:
Store it tightly covered with plastic wrap or in an airtight container for up to 4 days. The texture will stay soft and creamy, and the flavor deepens.
In the freezer:
Yes, you can freeze it! Just wrap it well (plastic wrap followed by foil) and freeze for up to 1 month. Thaw in the fridge overnight before serving. The texture will be slightly firmer, but still delicious.
Avoid storing with wet or fresh fruit toppings, as they can weep moisture. Add those just before serving.
FAQ
Can I make this icebox cake ahead of time?
Absolutely. This is one of those desserts that needs to be made ahead. It’s best when chilled for at least 6–8 hours, but overnight is even better.
Can I use store-bought whipped topping like Cool Whip?
Yes, you can. While I prefer freshly whipped cream for flavor and texture, Cool Whip works in a pinch and holds its shape well.
What’s the best type of cookie for this recipe?
I love chocolate wafers or graham crackers. But you can experiment with Oreos (without the filling), digestive biscuits, or even shortbread.
Can I make this recipe vegan or dairy-free?
Yes! Use coconut cream or a dairy-free whipping cream alternative. Make sure your cookies are also dairy-free.
Can I add fruit between the layers?
Definitely. Sliced strawberries, bananas, or blueberries work well. Just be sure to pat them dry first so they don’t release too much moisture.

Icebox Cake
- Total Time: 8 hours (including chilling)
- Yield: 8 1x
- Diet: Vegetarian
Description
A classic no-bake dessert layered with whipped cream and crisp cookies that transform into a dreamy, cake-like treat after a night in the fridge. Perfect for summer, holidays, or any time you want a quick and easy sweet that wows. Customizable, make-ahead friendly, and loved by all ages, this icebox cake is about to become a staple in your kitchen. It’s creamy, light, and just sweet enough to keep you coming back for seconds. Or thirds.
Ingredients
- 2 cups heavy whipping cream
- ¼ cup powdered sugar
- 1 tsp vanilla extract
- 1 package chocolate wafer cookies (or graham crackers)
- Optional toppings: berries, shaved chocolate, cocoa powder
Instructions
- Chill your mixing bowl and beaters for 10 minutes.
- Whip heavy cream with powdered sugar and vanilla until stiff peaks form.
- In a loaf or square dish, start with a layer of cookies on the bottom.
- Spread a generous layer of whipped cream on top of the cookies.
- Continue layering cookies and cream until you reach the top, ending with cream.
- Cover and refrigerate overnight or for at least 6 hours.
- Garnish with toppings just before serving.
- Slice with a warm knife and serve cold.
Notes
- Use graham crackers, Biscoff, or Oreos as a substitute for wafers.
- For extra flavor, add espresso powder or lemon zest to the whipped cream.
- Best served after a full night of chilling.
- Prep Time: 20 minutes
- Cook Time: 0 minutes
- Category: Dessert
- Method: No-Bake
- Cuisine: American
Nutrition
- Serving Size: 8
- Calories: 320
- Sugar: 12g
- Sodium: 180mg
- Fat: 22g
- Saturated Fat: 13g
- Unsaturated Fat: 8g
- Trans Fat: 0g
- Carbohydrates: 26g
- Fiber: 1g
- Protein: 3g
- Cholesterol: 75mg