There’s something about a plate of warm, cheesy nachos that feels like comfort food at its finest. For me, nachos aren’t just a snack—they’re a full experience. I still remember the first time I made nachos at home. It was a Friday night, I wanted something fun yet easy to prepare, and I didn’t feel like ordering takeout. So, I looked into my pantry, pulled out some tortilla chips, cheese, beans, and a few fresh toppings, and the result was magic.
Nachos have this wonderful way of bringing people together—whether it’s movie night with the family, game day with friends, or even a casual dinner where everyone just wants to eat something satisfying. They’re versatile, customizable, and oh-so-delicious. That’s why I knew I had to share my go-to homemade nachos recipe. Once you try making them at home, you’ll realize they’re not just better than the restaurant version—they’re also easier than you think.
Why I Love This Recipe

The beauty of nachos lies in their simplicity, but also in how creative you can get with them. I love this recipe because it starts with the basics—crispy tortilla chips, gooey melted cheese, and a few flavorful toppings. But from there, you can build it up into a meal that fits exactly what you’re craving.
What makes these nachos so special is the balance between flavors and textures. The crunch of the chips, the creaminess of melted cheese, the heartiness of beans or seasoned meat, and the freshness of toppings like tomatoes, jalapeños, and cilantro—it all comes together in the most satisfying bite.
Another reason I adore homemade nachos is that they’re perfect for all occasions. If you’re short on time, you can whip up a simple version in under 15 minutes. If you’re in the mood to experiment, you can load them up with homemade guacamole, slow-cooked shredded chicken, or roasted vegetables. The possibilities are endless, and every batch feels like a brand-new recipe.
Plus, nachos are crowd-pleasers. Whether you’re feeding kids, adults, vegetarians, or meat lovers, everyone will find something they love about them. That’s why they’ve become my go-to whenever I need a quick meal that still feels indulgent.
Ingredients for Homemade Nachos
When it comes to making the perfect nachos, the ingredients really matter. You don’t need anything fancy, but choosing fresh, good-quality ingredients will make all the difference.
Here’s what you’ll need to get started:
- Tortilla Chips – Always use sturdy chips that can hold up under toppings without getting soggy. Thin chips tend to break easily, so go for thicker, restaurant-style ones.
- Cheese – The star of nachos. I like to use a mix of cheddar and Monterey Jack for both flavor and meltability. You can also use mozzarella, pepper jack, or even a Mexican cheese blend.
- Protein (optional) – Ground beef, shredded chicken, pulled pork, or even black beans if you prefer a vegetarian version. Seasoning the protein well makes a huge difference.
- Beans – Black beans or pinto beans add heartiness and extra protein. Canned beans work great—just rinse them well before using.
- Vegetables – Think fresh diced tomatoes, red onions, jalapeños, or even bell peppers. They add color, freshness, and crunch.
- Spices and Seasonings – Cumin, chili powder, garlic powder, and paprika bring out a rich, Tex-Mex flavor in the meat and beans.
- Toppings – Fresh cilantro, sour cream, guacamole, and salsa are the finishing touches that make nachos truly irresistible.
The beauty of nachos is that you can use what you have on hand. If you only have cheese and chips, you can still make a basic version. But adding layers of beans, vegetables, and fresh toppings takes it to the next level.
How Much Time Will You Need
The best thing about nachos is how quick they are to make. You can prepare a simple batch in as little as 15–20 minutes.
- Prep Time: About 10 minutes for chopping veggies and cooking protein (if you’re using it).
- Cook Time: 10 minutes in the oven to melt the cheese and warm everything through.
So, in less than 30 minutes, you’ll have a delicious, crowd-pleasing dish ready to serve.
How to Make This Homemade Nachos
Making nachos is all about layering and baking just enough to get everything warm and melty. Here’s a detailed step-by-step guide:
Step – 1: Preheat the oven
Set your oven to 375°F (190°C). This temperature is perfect—it’s hot enough to melt the cheese and warm everything through, but not so hot that it burns the chips.
Step – 2: Prepare your protein (if using)
If you’re adding meat, cook it first. For ground beef, heat a skillet with a little oil, add the beef, and cook until browned. Season with chili powder, cumin, garlic powder, salt, and pepper. If you’re using shredded chicken, toss it with a bit of taco seasoning or spices to give it flavor.
Step – 3: Prepare the beans and vegetables
Rinse canned beans and drain them well. Chop fresh vegetables like tomatoes, onions, and jalapeños. Set aside.
Step – 4: Layer the chips
Line a large baking sheet or ovenproof dish with parchment paper. Spread out a layer of tortilla chips, making sure they’re spread evenly and not piled too high in one spot.
Step – 5: Add cheese and toppings
Sprinkle a generous layer of shredded cheese over the chips. Add beans, seasoned meat (if using), and half of the chopped vegetables. Top with another light layer of cheese to help everything stick together.
Step – 6: Bake
Place the tray in the oven for about 8–10 minutes, or until the cheese is fully melted and bubbly. Keep an eye on them—nachos can go from perfect to burnt quickly.
Step – 7: Add fresh toppings
Once out of the oven, immediately top with the remaining fresh ingredients—diced tomatoes, onions, cilantro, and jalapeños. Finish with dollops of sour cream, guacamole, and salsa if desired.
Step – 8: Serve hot
Nachos taste best when served right away, while the cheese is still melty and the chips are crispy.
Substitutions
One of the best things about nachos is how adaptable they are. If you don’t have a certain ingredient, you can easily swap it for something else.
- Chips – If you’re avoiding store-bought chips, you can bake your own by cutting corn tortillas into triangles, brushing them with a little oil, and baking until crisp.
- Cheese – Not a fan of cheddar? Try mozzarella for a stretchier melt or pepper jack for a spicier kick. If you’re lactose intolerant, there are great dairy-free cheeses available that melt beautifully.
- Protein – Instead of beef or chicken, you can use shrimp, turkey, or even a plant-based meat substitute. For a lighter version, skip the meat and use extra beans or roasted veggies.
- Beans – Black beans are traditional, but pinto beans, refried beans, or even chickpeas work well.
- Toppings – If you don’t have guacamole, sliced avocado works too. No fresh tomatoes? A jar of salsa will do the trick.
Customizing nachos to fit your pantry, diet, or mood is what makes them so enjoyable.
Best Side Dish of Homemade Nachos
Nachos can absolutely stand alone, but pairing them with the right sides makes the experience even better. Here are three side dishes that work beautifully:
- Mexican Street Corn (Elote) – Sweet corn grilled and coated with a creamy, cheesy, and spicy sauce pairs wonderfully with nachos.
- Fresh Pico de Gallo – A light and refreshing tomato salsa that adds brightness and balances out the richness of the cheese.
- Cilantro Lime Rice – A fluffy, flavorful side that turns nachos into a more filling meal.
Serving and Presentation Tips
Homemade nachos are not only about flavor—they’re also about creating a dish that looks as inviting as it tastes. When I serve nachos, I like to make them feel like a centerpiece rather than just a pile of chips and cheese.
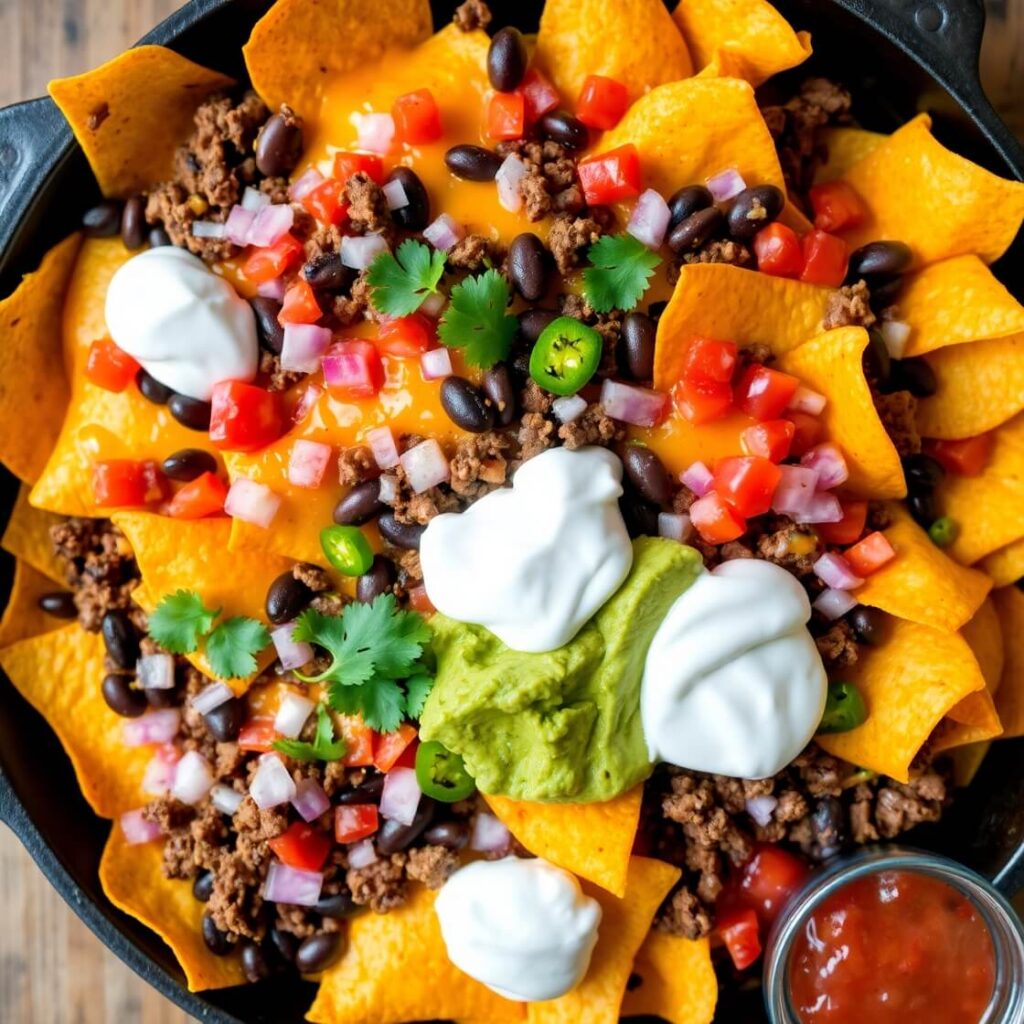
One of my favorite tricks is to use a large cast-iron skillet or a wide baking tray lined with parchment paper. This way, the nachos hold their shape, and everyone can reach in for a bite. I also layer my toppings thoughtfully. Instead of dumping everything on top, I bake the chips with cheese and beans, then add the fresh, colorful toppings right before serving. This gives a beautiful contrast between the melted cheese and the bright freshness of tomatoes, jalapeños, and cilantro.
I also love to serve nachos with small bowls of sour cream, salsa, and guacamole on the side. It allows everyone to customize their bites without making the chips soggy too quickly. A sprinkle of fresh lime juice at the very end is another simple touch that makes the nachos taste even brighter and more appetizing.
Tips and Tricks to Make This Recipe Better

Nachos are simple, but a few small adjustments can make them truly unforgettable. Here are some tricks I’ve learned over time:
- Layer smartly – Don’t just pile everything on top of the chips. Create layers of chips, cheese, and toppings so every bite has a good balance of flavors.
- Use freshly shredded cheese – Pre-shredded cheese often has additives that prevent it from melting smoothly. Grating cheese at home gives you the perfect melt.
- Avoid soggy nachos – Keep wet toppings (like salsa, guacamole, or sour cream) on the side until just before serving. This keeps the chips crispy.
- Toast your chips – A quick bake in the oven before adding toppings helps chips stay sturdy and crunchy.
- Go for contrast – Combine warm, melty ingredients with fresh, cool toppings for a better flavor experience.
These small tips turn a simple plate of nachos into something that tastes restaurant-worthy.
Common Mistakes to Avoid
Even though nachos are easy to make, there are a few pitfalls to watch out for. Here’s what I always keep in mind:
- Overloading the chips – Too many toppings can make nachos soggy and messy. Balance is key.
- Uneven layering – Nobody likes biting into a bare chip. Spread your toppings evenly so each layer gets love.
- Using thin chips – Regular thin chips can’t hold up under melted cheese and beans. Choose sturdy tortilla chips to avoid breaking.
- Adding toppings too early – Fresh ingredients like avocado, tomatoes, and sour cream should only be added after baking, not before.
- Skipping seasoning – Nachos without well-seasoned beans or protein can taste flat. Always season your layers.
Avoiding these mistakes ensures that every tray of nachos comes out perfectly.
How to Store It
If you end up with leftovers (which doesn’t happen often in my house), storing nachos properly makes a big difference. The key is to separate the chips from the toppings whenever possible.
- Refrigeration – Store leftover nachos in an airtight container in the fridge for up to 2 days. Keep wet toppings like salsa, sour cream, and guacamole in separate containers.
- Reheating – To reheat, spread the nachos out on a baking sheet and warm them in the oven at 350°F (175°C) for 8–10 minutes. This helps bring back the crispiness that microwaving can’t.
- Freezing – Nachos don’t freeze well because the chips lose their crunch, so I don’t recommend freezing them.
If you know you’ll have leftovers, bake smaller portions and keep extra toppings on the side to refresh the nachos later.
FAQ
Can I make nachos in the microwave?
Yes, you can. Microwave nachos are quick and convenient, but the chips won’t be as crispy as oven-baked ones.
What’s the best cheese for nachos?
A mix of cheddar and Monterey Jack works wonderfully. Cheddar adds flavor while Jack melts smoothly.
Can I make nachos ahead of time?
It’s best to bake nachos right before serving. You can, however, prep the toppings and protein ahead of time for quick assembly.
Are nachos gluten-free?
Most tortilla chips are naturally gluten-free, but always check the label. Use gluten-free toppings to keep the recipe fully gluten-free.
Can I make vegan nachos?
Yes! Use dairy-free cheese, plant-based protein, and top with guacamole, beans, and veggies. They’re just as delicious.

Homemade Nachos
- Total Time: 20 minutes
- Yield: 4 1x
- Diet: Gluten Free
Description
Homemade nachos are the ultimate comfort food—crispy tortilla chips piled high with melted cheese, beans, and your favorite toppings. They’re quick, easy, and endlessly customizable, making them perfect for game nights, parties, or even a fun family dinner. What I love most is how versatile they are—add seasoned beef or shredded chicken for a hearty meal, or keep them vegetarian with beans and fresh veggies. The mix of crunchy chips, creamy cheese, and refreshing toppings like salsa and guacamole creates a balance that everyone enjoys. Once you try this recipe, you’ll see why nachos are a timeless classic that never disappoints.
Ingredients
- Tortilla chips (thick, sturdy variety)
- 2 cups shredded cheddar cheese
- 1 cup Monterey Jack cheese
- 1 can black beans, rinsed and drained
- 1 lb ground beef or shredded chicken (optional)
- 1 small red onion, diced
- 1–2 fresh jalapeños, sliced
- 1 large tomato, diced
- Fresh cilantro, chopped
- Sour cream, guacamole, and salsa (for serving)
Instructions
- Preheat oven to 375°F (190°C).
- Cook protein if using (season with chili powder, cumin, garlic powder, salt, and pepper).
- Spread chips evenly on a lined baking tray.
- Add half of the cheese, then layer beans, protein, and some veggies.
- Sprinkle the remaining cheese on top.
- Bake for 8–10 minutes until cheese is melted and bubbly.
- Remove from oven and top with fresh vegetables, cilantro, and optional toppings like sour cream, guacamole, or salsa.
Notes
- Toast chips before layering to keep them extra crispy.
- Shred your own cheese for the best melt.
- Add toppings just before serving to avoid sogginess.
- Prep Time: 10 minutes
- Cook Time: 10 minutes
- Category: Appetizer / Snack
- Method: Baking
- Cuisine: Mexican-inspired
Nutrition
- Serving Size: 4
- Calories: 430
- Sugar: 3g
- Sodium: 610mg
- Fat: 23g
- Saturated Fat: 10g
- Unsaturated Fat: 11g
- Trans Fat: 0g
- Carbohydrates: 39g
- Fiber: 6g
- Protein: 18g
- Cholesterol: 45mg