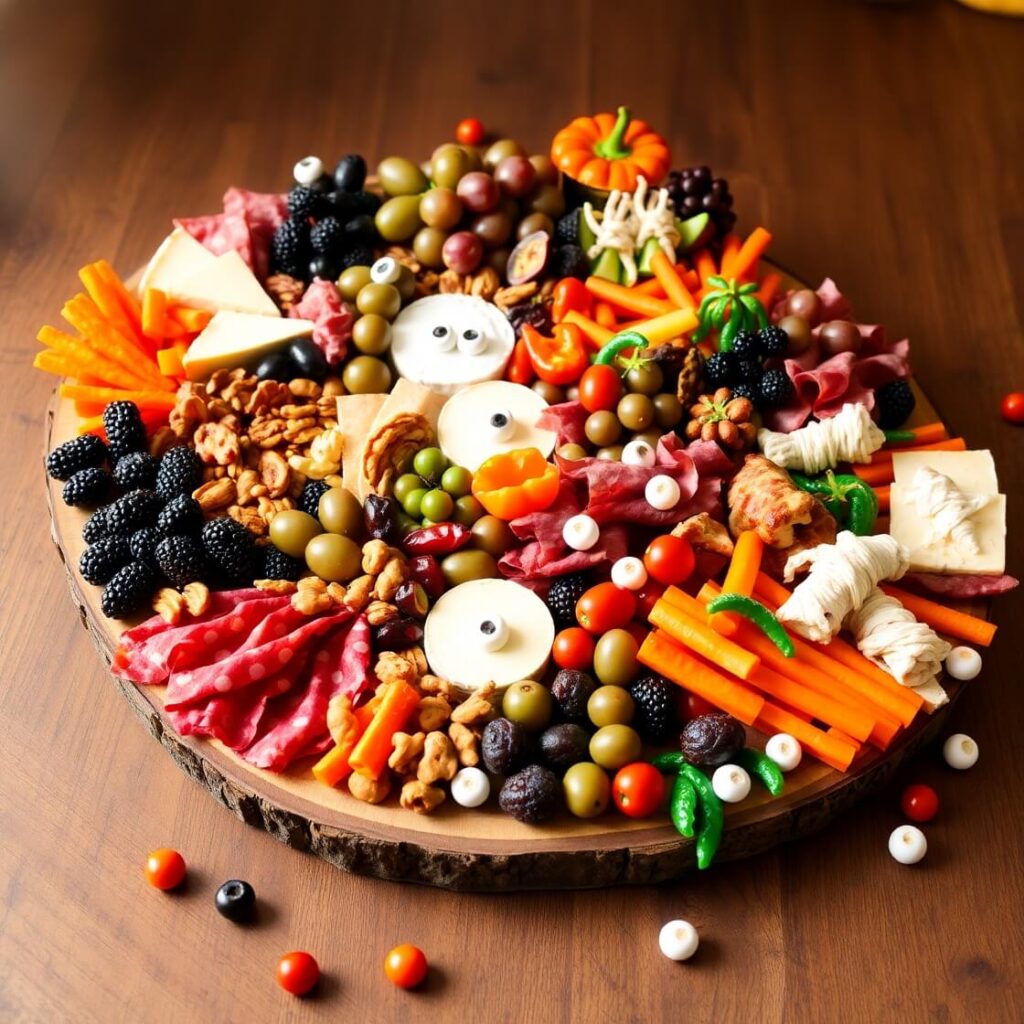
I created this Halloween Charcuterie Board recipe because I wanted to bring a fun, spooky twist to one of my favorite entertaining staples. Charcuterie boards are such a versatile way to share delicious bites with friends and family, and adding a Halloween theme makes it perfect for gatherings during the fall season. Whether you’re hosting a party or just want a festive snack spread to enjoy, this board combines seasonal flavors and creepy-cute visuals that everyone will love. If you’re looking for an easy way to impress your guests with minimal cooking but maximum impact, keep reading—this board will become your go-to for Halloween celebrations.
Why I Love This Recipe

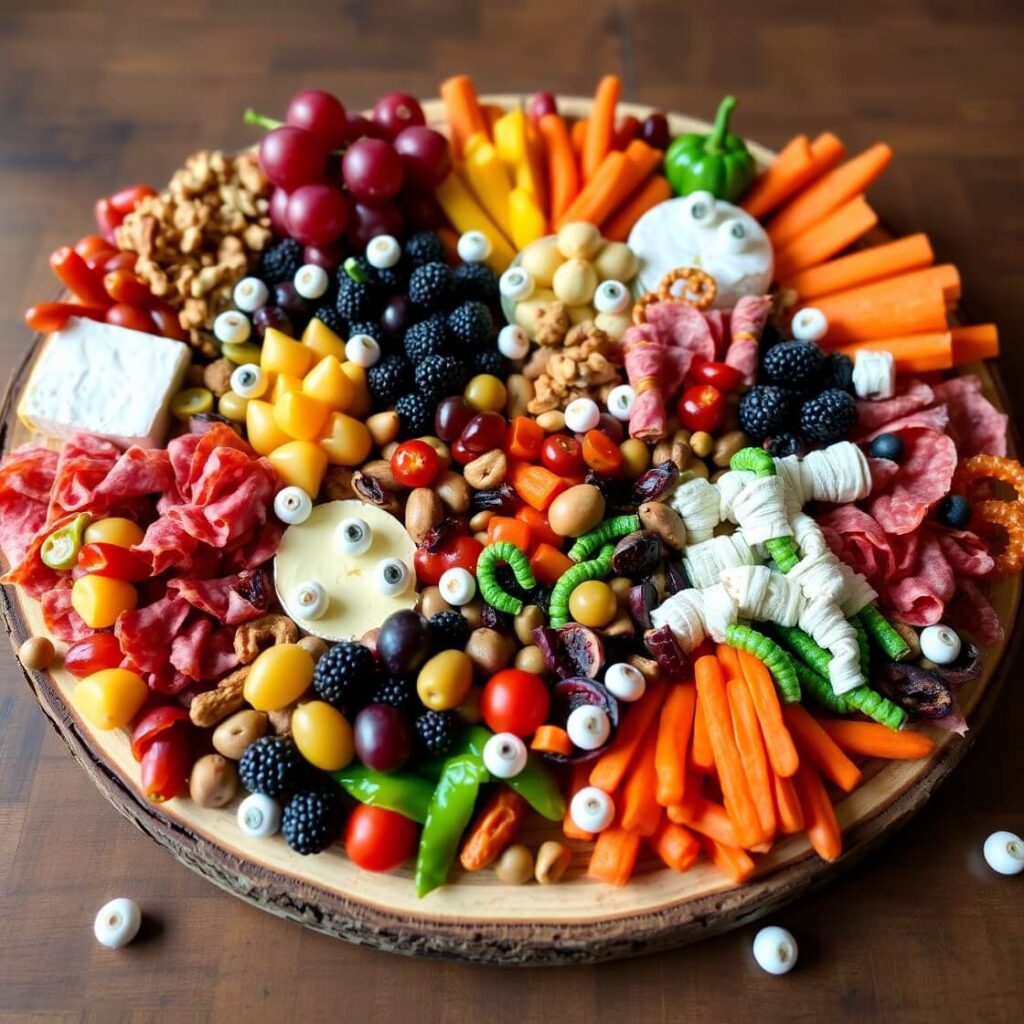
There’s something magical about a charcuterie board—it’s like a blank canvas waiting to be filled with colors, textures, and flavors. What makes this Halloween Charcuterie Board special is how it balances the eerie fun of Halloween with real food that tastes amazing. Instead of just a typical spooky decoration, every item on the board is carefully chosen to delight the taste buds and bring the Halloween spirit alive.
People make this recipe because it’s so adaptable. You can customize it for kids or adults, make it sweet, savory, or a bit of both. It’s also a no-fuss way to entertain because you don’t have to cook much, and assembling the board is almost like an art project. The variety of cheeses, meats, fruits, and candies means there’s something for everyone, and the Halloween-themed touches, like “mummy” wrapped sausages or spider web cheeses, make it festive without being overwhelming.
Plus, the visual appeal makes it a conversation starter. I love how people gather around it, picking at different bites, and sharing laughs about the spooky decorations. It turns a simple snack into an experience, which is why it’s such a hit at parties.
Ingredients for Halloween Charcuterie Board
To create a Halloween Charcuterie Board that’s both delicious and festive, you’ll want to gather a mix of savory, sweet, and crunchy ingredients. The key is variety, so the board looks abundant and inviting. Here’s what you’ll need:
- A selection of cheeses — Think creamy brie, sharp cheddar, and some fun shaped cheese like babybels or cheese sticks you can decorate.
- Assorted cured meats — Slices of salami, pepperoni, and prosciutto work wonderfully.
- Fresh fruits — Grapes, blackberries, and slices of apple or pear bring freshness and color.
- Dried fruits and nuts — Apricots, figs, almonds, and walnuts add texture and natural sweetness.
- Halloween-themed treats — Candy eyeballs, gummy worms, and chocolate bats are fun to scatter around.
- Crackers and bread — A mix of crackers, breadsticks, and sliced baguette offer perfect bases.
- Dips and spreads — Consider a pumpkin hummus or a spicy pepper jelly to add depth.
- Vegetables — Mini bell peppers, cherry tomatoes, and baby carrots give crunch and bright color.
- Fun decorations — Use olives stuffed with cream cheese to mimic eyeballs, pretzel sticks wrapped with cheese strips for “mummies,” and thinly sliced cucumbers arranged like spider webs.
Having all these components ensures your board is not only a feast for the eyes but also satisfies different cravings — from salty and savory to sweet and crunchy.
How Much Time Will You Need
Assembling this Halloween Charcuterie Board is quicker than you might expect. Overall, you’ll spend about 20 to 30 minutes prepping and arranging everything.
Most ingredients are ready to eat, so there’s minimal cooking involved—mostly just slicing cheese, chopping fruit, and wrapping some treats to get that spooky look. The fun part is in the presentation and creative touches, so you can take a little extra time if you want to perfect the look.
If you decide to make any homemade dips or roast nuts for extra flavor, add another 15-20 minutes. But the great thing is you can prepare parts ahead of time or buy ready-made items to save time.
How to Make This Halloween Charcuterie Board
Step – 1: Choose a large wooden board or platter as your base. The bigger, the better, because you want enough space for all your components without overcrowding.
Step – 2: Start by placing the cheeses on the board. Cut some into slices, leave others as whole wedges, and position them spaced out around the board to create focal points.
Step – 3: Arrange your cured meats next, folding or rolling slices to add dimension. Make little “mummy” wraps by draping thin strips of cheese or dough around mini sausages or pepperoni sticks.
Step – 4: Add clusters of fresh fruits like grapes or blackberries in small piles near the cheeses and meats for contrast.
Step – 5: Scatter dried fruits and nuts around the board to fill empty spaces and add texture.
Step – 6: Place crackers and breadsticks on one or two sides, stacking them neatly or fanning them out for easy grabbing.
Step – 7: Add small bowls of dips or spreads—pumpkin hummus or spicy pepper jelly work great. Position these strategically for balance.
Step – 8: Use your Halloween-themed decorations now. Stick pretzel “bones” in cheese blocks, position candy eyeballs on olives, arrange gummy worms creeping through fruit clusters, and create spider webs by slicing thin cucumber rounds and placing them carefully.
Step – 9: Finally, add some fresh vegetables like baby carrots or mini bell peppers in bright spots to bring more color and crunch.
Step – 10: Step back and see if any gaps need filling. Use extra nuts, candies, or herbs like rosemary sprigs for an added festive touch.
Substitutions
If you want to put your own spin on the Halloween Charcuterie Board or accommodate dietary needs, substitutions can elevate the recipe.
For cheeses, you can swap dairy with plant-based vegan cheeses or nut-based cheeses if someone is dairy-free.
Instead of traditional cured meats, try smoked turkey slices or grilled vegetables for a vegetarian option.
If fresh fruit isn’t available, dried fruit or fruit preserves add sweetness and color.
For dips, a black bean dip or guacamole with a dash of smoked paprika works well.
Instead of store-bought crackers, try homemade roasted chickpeas or seasoned kale chips for crunch.
Lastly, if you want to avoid candy, decorate with Halloween-themed veggies like baby pumpkins or roasted beet “spiders.”
These swaps not only cater to preferences but can make your board more unique and tailored.
Best Side Dishes of Halloween Charcuterie Board
To complement your Halloween Charcuterie Board and round out the eating experience, consider these side dishes:
- Butternut Squash Soup: Warm and creamy, this seasonal soup pairs beautifully with the coolness of the board and adds comfort.
- Roasted Pumpkin Salad: Toss roasted pumpkin chunks with arugula, cranberries, and a tangy vinaigrette for a fresh contrast.
- Spiced Apple Cider: A warm or chilled spiced cider drink helps cleanse the palate and enhances the autumn vibes.
These sides add variety, making your Halloween gathering even more memorable.
Serving and Presentation Tips
When it comes to serving your Halloween Charcuterie Board, presentation truly elevates the entire experience. The key is to embrace the spooky theme without overwhelming the natural beauty of the ingredients. Use a rustic wooden board or a dark-colored platter to give that mysterious, autumnal vibe. Placing small decorative elements like miniature pumpkins, black candles, or faux spider webs around (not on) the board sets the atmosphere for your party.
Arrange items thoughtfully, grouping similar colors and textures together while leaving small gaps to avoid a cluttered look. Use small bowls or ramekins for dips and spreads so they don’t spill, and add height by stacking crackers or rolling meats. Garnish with fresh herbs like rosemary or thyme, which not only add aroma but also a touch of greenery. For an extra spooky touch, serve with themed napkins or Halloween-inspired toothpicks. This attention to detail makes your board feel festive and inviting.
Tips and Tricks to Make This Recipe Even Better
To take your Halloween Charcuterie Board from great to unforgettable, here are some tips I’ve learned from experience:
- Prep in Advance: Slice cheeses, cut fruits, and prepare dips a day ahead to save time. Just cover and refrigerate, then assemble right before serving for freshness.
- Balance Flavors and Textures: Make sure to include creamy, crunchy, sweet, and savory elements. This keeps each bite exciting and satisfying.
- Use Seasonal Ingredients: Incorporate fall flavors like pumpkin seeds, roasted squash, or cranberry chutney to boost the Halloween mood.
- Add Unexpected Twists: Try smoked cheeses or spicy sausages to surprise your guests’ palates.
- Keep It Simple but Creative: You don’t need elaborate decorations. Sometimes just a few themed elements, like olive “eyeballs” or pretzel “bones,” make all the difference.
- Provide Variety for Different Diets: Include gluten-free crackers or vegan cheese options so everyone feels included.
Common Mistakes to Avoid
Even though this recipe is forgiving, there are some pitfalls to watch out for:
- Overcrowding the Board: Too many items packed closely together can make it hard to pick pieces and spoil the aesthetic. Leave some breathing room.
- Ignoring Texture Variety: Only having soft cheeses or just crackers can make the board one-dimensional and less enjoyable.
- Using Too Many Sugary Treats: While Halloween candy adds fun, balance it so the board doesn’t become overwhelmingly sweet.
- Not Labeling Allergens: If you’re serving guests with allergies, it’s thoughtful to label nuts or gluten-containing items clearly.
- Waiting Too Long to Assemble: Fresh fruits and veggies can wilt if left out too long before serving. Assemble shortly before guests arrive.
How to Store It
If you have leftovers (which is often the case!), storing your Halloween Charcuterie Board properly keeps everything tasting fresh for the next day.
- Cheeses and Meats: Wrap tightly in parchment or wax paper, then place in an airtight container in the fridge.
- Fruits and Vegetables: Store separately in sealed containers to maintain crispness.
- Crackers and Nuts: Keep in airtight containers at room temperature to avoid sogginess.
Avoid mixing wet ingredients with dry ones during storage to prevent sogginess. When ready to serve again, let cheeses sit at room temperature for about 30 minutes for best flavor.
Frequently Asked Questions
Can I make this Halloween Charcuterie Board vegan?
Absolutely! Use plant-based cheeses and vegan meat alternatives, add plenty of fresh fruits, nuts, and veggies, and choose vegan-friendly dips. There are many creative ways to keep it festive and animal-free.
How far ahead can I prepare the board?
You can prep ingredients up to a day in advance. Keep everything refrigerated separately, then assemble just before serving to keep it fresh and visually appealing.
What’s the best way to keep crackers from getting soggy?
Serve crackers separately or place them on a different section of the board, away from moist fruits and dips. Store leftover crackers in airtight containers.
Can I use store-bought Halloween candies?
Yes! Candy adds a playful touch. Just be mindful not to overload the board with too many sweets, so the flavors remain balanced.
What drinks pair well with this charcuterie board?
Try crisp white wines, sparkling cider, or even themed cocktails like a black vodka soda. For non-alcoholic options, spiced apple cider or pumpkin spice lattes are perfect.
Halloween Charcuterie Board
- Total Time: 20-35 minutes
- Yield: 6-8 1x
- Diet: Vegetarian
Description
This Halloween Charcuterie Board is a festive, flavorful spread perfect for spooky gatherings or cozy fall nights. Combining a colorful mix of cheeses, cured meats, fresh and dried fruits, nuts, crunchy crackers, and Halloween-themed treats, this board brings together taste and creativity effortlessly. The spooky decorations like olive “eyeballs” and pretzel “bones” add a playful touch that delights guests of all ages. Whether you’re hosting a party or looking for a quick yet impressive snack, this recipe offers versatility, ease, and a crowd-pleasing presentation. Ready in about 30 minutes, it’s a fantastic way to celebrate the season with minimal fuss and maximum fun.
Ingredients
- Assorted cheeses (brie, cheddar, babybel)
- Cured meats (salami, prosciutto, pepperoni)
- Fresh fruits (grapes, blackberries, apple slices)
- Dried fruits (apricots, figs)
- Nuts (almonds, walnuts)
- Crackers and breadsticks
- Halloween-themed candies (candy eyeballs, gummy worms)
- Fresh vegetables (mini bell peppers, cherry tomatoes, baby carrots)
- Dips/spreads (pumpkin hummus, spicy pepper jelly)
- Olives stuffed with cream cheese
- Pretzel sticks
- Fresh herbs (rosemary, thyme)
Instructions
- Choose a large serving board.
- Arrange cheeses in spaced clusters, some sliced, some whole.
- Fold and place cured meats, creating fun shapes like “mummies.”
- Add fresh fruit clusters near cheeses and meats.
- Scatter dried fruits and nuts in gaps.
- Place crackers and breadsticks on the sides.
- Add small bowls with dips and spreads.
- Decorate with Halloween-themed candies and creative touches (olive “eyeballs,” pretzel “bones”).
- Garnish with fresh herbs and fresh vegetables for color and texture.
- Adjust and fill any empty spaces for balance.
Notes
- Prepare ingredients a day ahead if needed.
- Customize the board with your favorite seasonal ingredients or dietary substitutions.
- Keep crackers separate until serving to prevent sogginess.
- Let cheeses warm to room temperature before serving for the best flavor.
- Prep Time: 20 minutes
- Cook Time: None (optional 15 minutes for homemade dips)
- Category: Appetizer / Snack
- Method: No-cook assembly
- Cuisine: American / Seasonal
Nutrition
- Serving Size: 6-8
- Calories: 320
- Sugar: 8g
- Sodium: 450mg
- Fat: 20g
- Saturated Fat: 8g
- Unsaturated Fat: 10g
- Trans Fat: 0g
- Carbohydrates: 18g
- Fiber: 3g
- Protein: 12g
- Cholesterol: 35mg