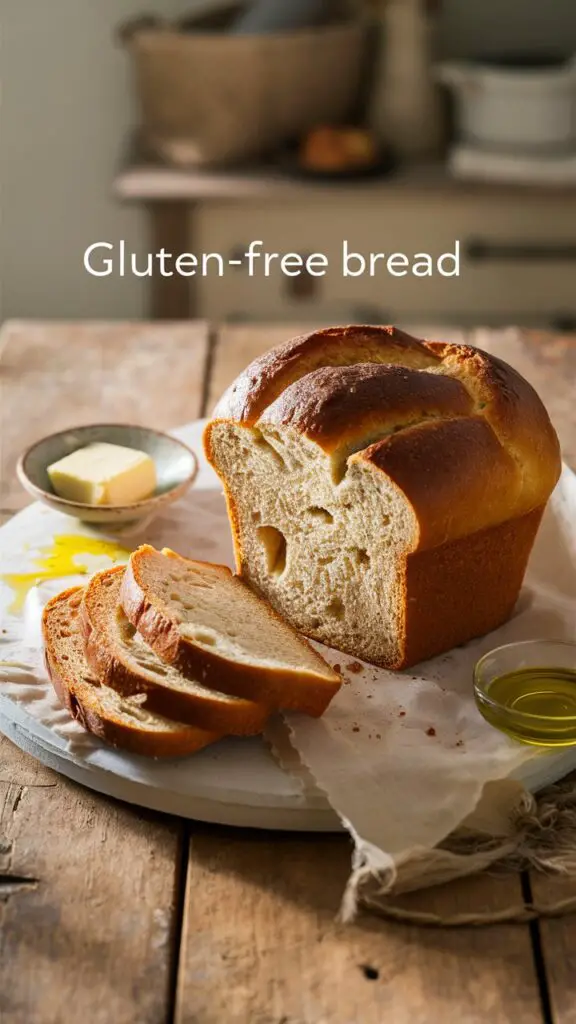
Bread is a staple in most households, but for those with gluten sensitivities or allergies, finding a delicious and satisfying alternative can be a real challenge. That’s why I set out to create this gluten-free bread recipe. I wanted to craft something that wasn’t just an alternative but a bread that everyone could enjoy, regardless of dietary restrictions. After many attempts, I finally perfected a recipe that yields a soft, flavorful loaf that mirrors traditional bread in texture and taste.
Gluten-free bread often gets a bad rap for being too dense, crumbly, or bland. But this recipe breaks all those stereotypes! Whether you’re gluten intolerant, have celiac disease, or simply want to try something different, this gluten-free bread will change the way you think about gluten-free baking. Keep reading to learn how to make this incredibly satisfying loaf from scratch.
Why I Love This Recipe

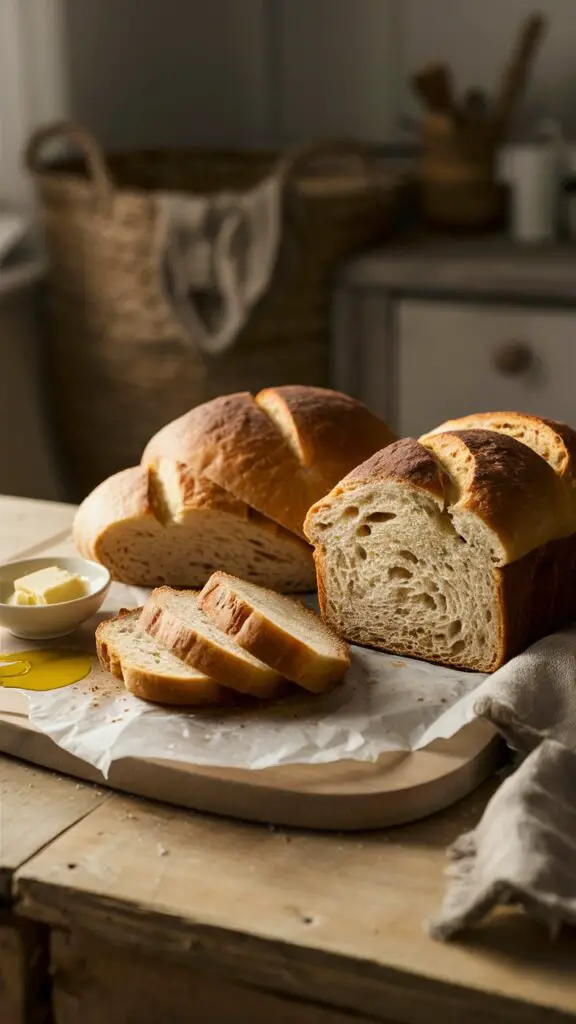
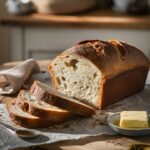
This gluten-free bread recipe isn’t just a great option for those avoiding gluten; it’s simply a fantastic bread. The texture is soft yet hearty, and it has a beautiful golden crust. The bread rises perfectly, creating an airy interior that makes every slice delightful. I love this recipe because it’s not just about filling a dietary need—it’s about creating something you can genuinely enjoy, whether or not you’re gluten-sensitive.
The secret to this recipe lies in the blend of gluten-free flours and the careful balance of ingredients that mimic the structure of traditional wheat-based bread. With a touch of honey and olive oil, it stays moist and flavorful. Plus, it’s super easy to make. Whether you’re a seasoned baker or a complete beginner, you can make this gluten-free bread without any complicated steps. This recipe is all about results, and it’s a guaranteed crowd-pleaser.
Ingredients for Gluten-Free Bread
To make this gluten-free bread, you’ll need a few specialty ingredients, but don’t let that intimidate you. These ingredients are easy to find in most grocery stores or health food stores. Here’s what you’ll need:
- Gluten-Free Flour Blend – A mix of rice flour, potato starch, and tapioca flour. This creates a light texture while still providing structure to the bread.
- Yeast – Active dry yeast is what helps the bread rise, giving it that perfect fluffy texture.
- Honey – Just a small amount adds a subtle sweetness and helps the yeast activate.
- Olive Oil – This adds moisture and flavor to the bread.
- Apple Cider Vinegar – Helps activate the baking soda and gives the bread a slight tang.
- Salt – For flavor.
- Warm Water – This helps activate the yeast and hydrate the flour blend.
These ingredients are what make this gluten-free bread so flavorful and easy to prepare. The flour blend provides the structure, while the yeast ensures a nice rise, giving you that traditional bread texture.
How Much Time Will You Need?
Making gluten-free bread requires a bit of patience, but it’s worth the wait. Here’s the breakdown:
- Preparation Time: 15 minutes
- Resting Time: 1 hour (for the dough to rise)
- Baking Time: 35-40 minutes
So, all in all, you’re looking at about an hour and a half from start to finish. This includes some waiting time while the dough rises, which is an essential step in getting the right texture. But the actual hands-on time is minimal, making this recipe perfect for anyone, whether you’re new to baking or an experienced pro.
How to Make This Gluten-Free Bread
Step 1: Prepare the yeast mixture
In a small bowl, combine the warm water with honey. Stir until the honey is dissolved. Sprinkle the yeast over the water and let it sit for about 5-10 minutes, or until it becomes frothy. This step ensures that the yeast is active and ready to help the dough rise.
Step 2: Mix dry ingredients
In a separate bowl, whisk together the gluten-free flour blend, salt, and baking powder. These dry ingredients need to be mixed thoroughly to ensure that the yeast will work evenly throughout the dough.
Step 3: Combine the wet and dry ingredients
Once the yeast mixture is ready, add it to the dry ingredients. Pour in the olive oil and apple cider vinegar as well. Mix everything together until a dough forms. The dough will be stickier than traditional wheat dough, which is normal for gluten-free bread.
Step 4: Knead the dough
Transfer the dough onto a floured surface (using gluten-free flour) and knead it gently for about 2-3 minutes. While gluten-free dough doesn’t need to be kneaded as much as traditional dough, it’s important to ensure that everything is well-combined and smooth.
Step 5: Let the dough rise
Place the dough in a greased bowl and cover it with a clean kitchen towel. Let it rise in a warm place for about 1 hour or until it has doubled in size. The dough should feel airy and light once it’s done rising.
Step 6: Shape the dough
After the dough has risen, gently punch it down to release any air bubbles. Shape it into a loaf by folding the edges in and rolling it tightly. Place it into a greased loaf pan and cover it again with a towel. Let it rise for another 30 minutes.
Step 7: Bake the bread
Preheat your oven to 375°F (190°C). Once the dough has finished its second rise, place it in the oven and bake for 35-40 minutes, or until the top is golden brown and a toothpick inserted into the center comes out clean.
Step 8: Cool and slice
Once the bread is baked, remove it from the oven and allow it to cool in the pan for about 10 minutes. Then, transfer it to a wire rack to cool completely before slicing.
Substitutions
While this recipe is already gluten-free, there are several substitutions you can make to customize the bread further.
- Flour Blend: If you don’t have a pre-made gluten-free flour blend, you can create your own by combining rice flour, potato starch, and tapioca flour in a 2:1:1 ratio.
- Sweetener: If you want to make the bread a bit sweeter, you can substitute honey with maple syrup or agave nectar.
- Olive Oil: If you prefer a neutral flavor, you can substitute the olive oil with vegetable oil or coconut oil.
These substitutions allow you to make adjustments based on what you have at home or personal preferences, while still achieving great results with your gluten-free bread.
Best Side Dishes for Gluten-Free Bread
While gluten-free bread is delicious on its own, it pairs wonderfully with a variety of side dishes. Here are three great options to serve alongside:
- Soup: A bowl of hearty vegetable soup or creamy tomato soup pairs perfectly with a warm slice of gluten-free bread.
- Salad: A fresh green salad with a light vinaigrette dressing complements the bread’s texture and enhances the overall meal.
- Roasted Vegetables: Roasted root vegetables such as carrots, potatoes, and beets make for a wholesome and satisfying side to this bread.
These side dishes will elevate your gluten-free bread experience, making it a complete and delicious meal.
Serving and Presentation Tips
Once your gluten-free bread is out of the oven, it’s time to think about how to present it. Presentation plays a big role in making your meal feel even more special. Here are a few tips to serve your gluten-free bread beautifully:
- Slice and Serve Fresh: Slice your bread just before serving. This ensures it’s warm and soft, with the perfect crumb texture. You can serve it as thick slices for a heartier bite or thin slices for a lighter touch, depending on the meal you’re serving.
- Use a Bread Basket: For a more rustic presentation, place your sliced bread in a woven bread basket. Line the basket with a clean cloth napkin to keep the bread warm.
- Add Butter or Toppings: Serve with a small dish of butter (or dairy-free butter for a vegan option) or a topping like olive oil, balsamic vinegar, or even a sweet jam. This adds extra flavor and gives guests a chance to personalize their bread experience.
- Pair with Complementary Dishes: As mentioned earlier, gluten-free bread pairs wonderfully with soups, salads, and roasted vegetables. Try to serve it with dishes that complement its texture and flavor.
The goal is to make the bread look inviting and delicious, so take your time with the presentation. A simple touch of garnish like fresh herbs or a drizzle of olive oil can elevate the dish even further.
Tips and Tricks to Make This Recipe Better
When it comes to perfecting your gluten-free bread, a few additional tips and tricks can take it from good to great:
- Use Room Temperature Ingredients: Ensure your water, oil, and honey are at room temperature before using them. This helps the yeast activate properly and allows the dough to rise more effectively.
- Don’t Skip the Resting Time: Gluten-free dough requires time to rise properly. Make sure you give the dough enough time to double in size during the first rise and let it rest before baking to get the best texture.
- Add Herbs for Extra Flavor: To infuse more flavor into your bread, try adding some fresh or dried herbs like rosemary, thyme, or oregano to the dough. This gives the bread a delightful aroma and a savory touch.
- Avoid Overworking the Dough: Gluten-free dough doesn’t need as much kneading as regular dough, so avoid overworking it. Too much handling can make the bread dense, so a gentle touch is all you need.
- Let the Bread Cool Completely: As tempting as it may be to slice into your fresh-out-of-the-oven bread, it’s important to let it cool completely on a wire rack before cutting. This allows the texture to set and prevents the bread from becoming gummy.
These small adjustments will help ensure that your gluten-free bread is as perfect as possible every time you bake it.
Common Mistakes to Avoid
Even with the best intentions, some mistakes can lead to disappointing results. Here’s what to avoid when making gluten-free bread:
- Not Proofing the Yeast: If your yeast doesn’t activate properly, the dough won’t rise. Always proof the yeast in warm water with a bit of sugar or honey before mixing it with the dry ingredients. If it doesn’t foam up after 10 minutes, the yeast is likely dead, and you’ll need to start over with fresh yeast.
- Using the Wrong Flour: Not all gluten-free flours are created equal. Make sure you use a gluten-free flour blend designed for baking bread. Substituting flour types can lead to a dense loaf that doesn’t rise well.
- Skipping the Rise Time: Giving the dough time to rise is essential for the proper texture. Don’t rush this process—allow the dough to rise until it has doubled in size before baking.
- Over-Baking: Baking for too long can lead to dry, hard bread. Keep an eye on your bread during the last few minutes of baking and check for doneness by inserting a toothpick. When it comes out clean, it’s done.
- Cutting into the Bread Too Soon: Cutting into hot bread can result in a gummy texture. Let the bread cool on a wire rack for at least 10 minutes before slicing. Patience pays off here!
Avoiding these common pitfalls will ensure that your gluten-free bread turns out perfectly every time.
How to Store It
Gluten-free bread doesn’t last as long as regular bread, but with proper storage, you can keep it fresh for a few days. Here are some tips:
- Store in an Airtight Container: Once the bread has completely cooled, store it in an airtight container to keep it fresh. It will last about 2-3 days at room temperature. Be sure to wrap it tightly to prevent it from drying out.
- Freezing for Longer Storage: If you want to keep the bread longer, you can freeze it. Slice the bread first, then wrap the slices individually in plastic wrap and place them in a freezer-safe bag. When you’re ready to eat, simply thaw the slices at room temperature or toast them for a crispy treat.
- Reheat for Freshness: To refresh leftover bread, you can reheat it in the oven at 350°F for about 10 minutes. This will restore its soft texture and make it taste freshly baked.
These storage methods will help you enjoy your gluten-free bread over several days or even weeks if you freeze it.
FAQ
Can I use a bread machine for this recipe?
Yes, you can! If you have a bread machine that accommodates gluten-free bread, you can follow the same steps for mixing and rising. Just be sure to select the gluten-free bread setting on your machine.
Can I make this bread without yeast?
Unfortunately, yeast is necessary for this recipe to rise and provide the bread with its texture. If you need to avoid yeast, you can try making a soda bread instead, though the texture will be quite different.
Can I substitute the honey for another sweetener?
Yes, you can use maple syrup, agave nectar, or coconut sugar if you prefer. Just keep in mind that different sweeteners can slightly alter the flavor of the bread.
What’s the best way to use leftover gluten-free bread?
Leftover gluten-free bread is perfect for making croutons, bread crumbs, or even gluten-free French toast. You can also use it in sandwiches or to make bread pudding.
Why does my gluten-free bread look too dense?
If your bread turned out dense, it could be due to overworking the dough, not letting it rise long enough, or using the wrong type of flour. Make sure to follow the instructions carefully for the best results.
Gluten-Free Bread Recipe
- Total Time: 1 hour 30 minutes
- Yield: 1 loaf 1x
- Diet: Gluten Free
Description
This gluten-free bread is soft, flavorful, and perfect for those avoiding gluten. It rises beautifully and has a golden crust with a light, airy interior. Enjoy it fresh out of the oven or as part of your favorite meal.
Ingredients
Instructions
-
In a small bowl, dissolve honey in warm water, then sprinkle the yeast over it. Let sit for 10 minutes until frothy.
-
In a large bowl, whisk together the gluten-free flour, salt, and baking powder.
-
Add the yeast mixture, olive oil, and vinegar to the dry ingredients. Stir until a dough forms.
-
Transfer the dough to a floured surface and knead gently for 2-3 minutes.
-
Place the dough in a greased bowl, cover, and let rise for 1 hour.
-
Punch down the dough, shape it into a loaf, and place it in a greased loaf pan. Let rise for another 30 minutes.
-
Preheat the oven to 375°F (190°C). Bake the bread for 35-40 minutes, or until golden brown and cooked through.
-
Let the bread cool for 10 minutes before slicing.
Notes
- Be sure to use a gluten-free flour blend designed for bread baking for the best results.
- If you prefer a sweeter bread, you can add a tablespoon of sugar along with the yeast mixture.
- Let the bread cool completely before slicing to get the best texture.
- Prep Time: 15 minutes
- Cook Time: 35-40 minutes
- Category: Bread
- Method: Baking
- Cuisine: Gluten-Free
Nutrition
- Serving Size: 1 slice
- Calories: 150