Get ready to sweeten up your Easter celebrations with over 53+ mouth-watering ideas for treats! From colorful candies to creative desserts, there’s something here for everyone looking to add a little fun to their holiday festivities. Let’s jump right in and explore these delightful options that will surely impress your family and friends this Easter!
Coconut Macaroon Nests

Coconut macaroon nests are a delightful treat that brings a touch of whimsy to your Easter celebrations. These sweet, chewy nests are made from shredded coconut and are perfect for holding colorful chocolate eggs. They look charming on any dessert table and are sure to impress your guests.
Making these nests is simple and fun. The combination of coconut and chocolate creates a delicious flavor pairing that everyone will love. Plus, they are easy to customize with your favorite candy eggs, making them a hit with kids and adults alike.
To create these adorable nests, you’ll need just a few ingredients. The process involves mixing shredded coconut with sweetened condensed milk and a bit of vanilla. Once shaped into nests, they are baked until golden brown. After cooling, fill them with chocolate eggs for a festive touch.
Ingredients
- 3 cups shredded coconut
- 1 can (14 oz) sweetened condensed milk
- 1 teaspoon vanilla extract
- 2 large egg whites
- 1/4 teaspoon salt
- Chocolate eggs (for filling)
Instructions
- Preheat your oven to 325°F (160°C) and line a baking sheet with parchment paper.
- In a large bowl, combine shredded coconut, sweetened condensed milk, vanilla extract, egg whites, and salt. Mix until well combined.
- Using your hands, form small nests by shaping the mixture into a mound and creating a hollow center.
- Place the nests on the prepared baking sheet, leaving space between each one.
- Bake for 15-20 minutes or until the edges are golden brown. Remove from the oven and let cool completely.
- Once cool, fill each nest with chocolate eggs. Enjoy your festive coconut macaroon nests!
Pistachio and Raspberry Tart
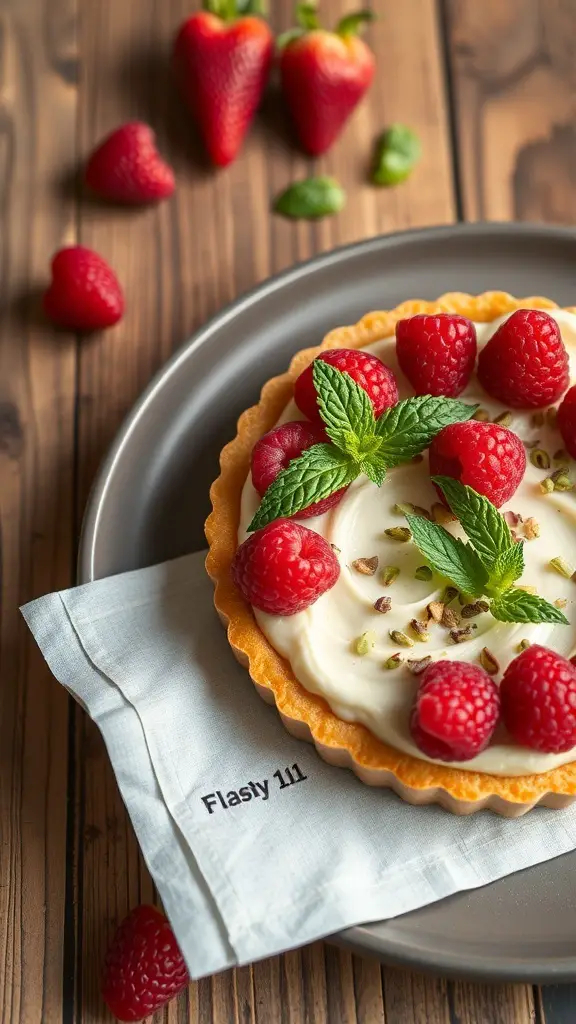
This Pistachio and Raspberry Tart is a delightful treat for any Easter celebration. The tart features a crisp pastry shell filled with a creamy pistachio mixture, topped with fresh raspberries and a sprinkle of chopped pistachios. The vibrant colors and flavors make it a stunning centerpiece for your dessert table.
The combination of nutty pistachios and tangy raspberries creates a perfect balance. The tart is not only visually appealing but also offers a refreshing taste that everyone will love. It’s a great way to impress your guests without spending hours in the kitchen.
Making this tart is easier than you might think! With a few simple ingredients, you can whip up a dessert that looks and tastes gourmet. Serve it chilled for a refreshing finish to your Easter meal.
Ingredients
- 1 pre-made tart shell
- 1 cup unsalted pistachios, shelled
- 1/2 cup granulated sugar
- 1 cup heavy cream
- 1 teaspoon vanilla extract
- 1 cup fresh raspberries
- 2 tablespoons chopped pistachios for garnish
Instructions
- Prepare the Filling: In a food processor, blend the pistachios and sugar until finely ground. Add the heavy cream and vanilla extract, and blend until smooth.
- Fill the Tart Shell: Pour the pistachio mixture into the pre-made tart shell, spreading it evenly.
- Chill: Place the tart in the refrigerator for at least 2 hours to set.
- Top with Raspberries: Before serving, arrange fresh raspberries on top of the tart and sprinkle with chopped pistachios.
- Serve: Slice and enjoy your delicious Pistachio and Raspberry Tart!
Chocolate Bunny Cupcakes

Chocolate Bunny Cupcakes are a delightful treat perfect for Easter celebrations. These cupcakes are not just tasty; they are also visually appealing. Topped with rich chocolate frosting, they feature adorable bunny ears made from white chocolate. The colorful sprinkles and candy eggs add a festive touch, making them a hit for both kids and adults.
Making these cupcakes is a fun activity. You can involve the family in decorating them, creating a joyful atmosphere in the kitchen. The combination of chocolate and sweet toppings makes these cupcakes a must-have for your Easter dessert table.
Ingredients
- 1 3/4 cups all-purpose flour
- 1 1/2 cups granulated sugar
- 3/4 cup unsweetened cocoa powder
- 1 1/2 teaspoons baking powder
- 1 1/2 teaspoons baking soda
- 1 teaspoon salt
- 2 large eggs
- 1 cup whole milk
- 1/2 cup vegetable oil
- 2 teaspoons vanilla extract
- 1 cup boiling water
- 1 cup chocolate frosting
- White chocolate for ears
- Pink candy melts for inner ears
- Assorted sprinkles and candy eggs
Instructions
- Preheat your oven to 350°F (175°C) and line a cupcake pan with liners.
- In a large bowl, mix flour, sugar, cocoa powder, baking powder, baking soda, and salt.
- Add eggs, milk, oil, and vanilla extract. Beat on medium speed for about 2 minutes.
- Stir in boiling water until well combined. The batter will be thin.
- Pour the batter into the cupcake liners, filling each about two-thirds full.
- Bake for 18-20 minutes or until a toothpick comes out clean. Let them cool completely.
- Once cooled, frost the cupcakes with chocolate frosting.
- For the bunny ears, melt white chocolate and pour it into ear-shaped molds. Let it set, then add melted pink candy melts for the inner ears.
- Place the ears on top of the frosted cupcakes and decorate with sprinkles and candy eggs.
Marshmallow Peep Treats
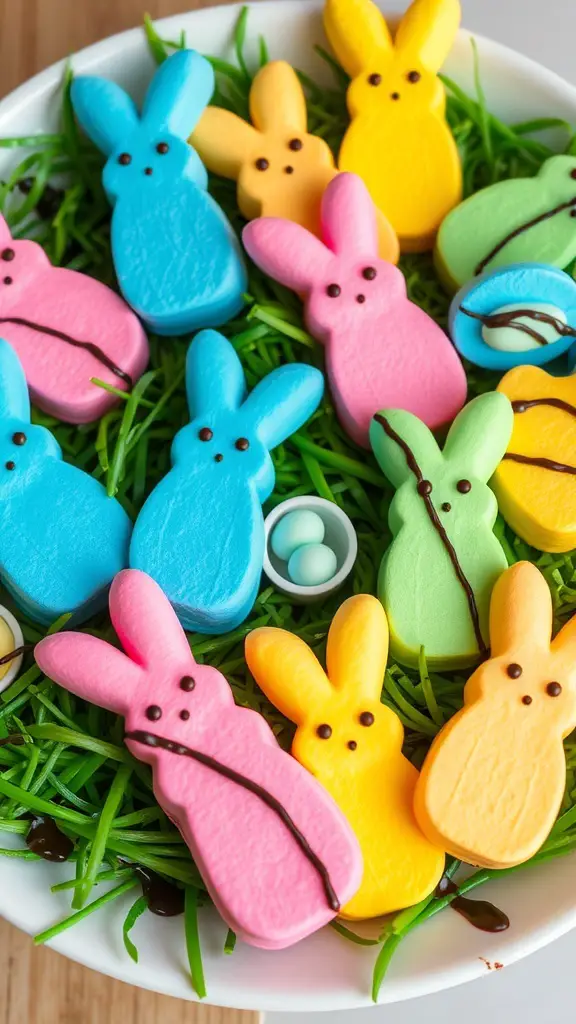
Marshmallow Peep treats are a fun and colorful addition to any Easter celebration. These adorable little bunnies come in various pastel colors, making them a delightful sight on any dessert table. They are soft, sweet, and perfect for kids and adults alike.
To make these treats, you can get creative with toppings and presentations. Consider using chocolate drizzle, sprinkles, or even edible glitter to add some flair. Placing them on a bed of green shredded coconut or grass candy can create a festive look that resembles an Easter basket.
Ingredients
- 1 package of Marshmallow Peeps (various colors)
- 1 cup of chocolate chips (milk or dark)
- 1 tablespoon of coconut oil
- Sprinkles or edible glitter (optional)
- Green shredded coconut or grass candy (for decoration)
Instructions
- Melt the Chocolate: In a microwave-safe bowl, combine the chocolate chips and coconut oil. Microwave in 30-second intervals, stirring in between, until smooth.
- Dip the Peeps: Hold each Peep by the ears and dip it into the melted chocolate, allowing any excess to drip off.
- Add Toppings: Place the dipped Peep on a parchment-lined baking sheet. While the chocolate is still wet, sprinkle with your choice of sprinkles or edible glitter.
- Chill: Refrigerate the dipped Peeps for about 15-20 minutes until the chocolate hardens.
- Serve: Arrange the Peeps on a platter with green shredded coconut or grass candy for a festive touch. Enjoy your sweet treats!
Carrot Cake Pops
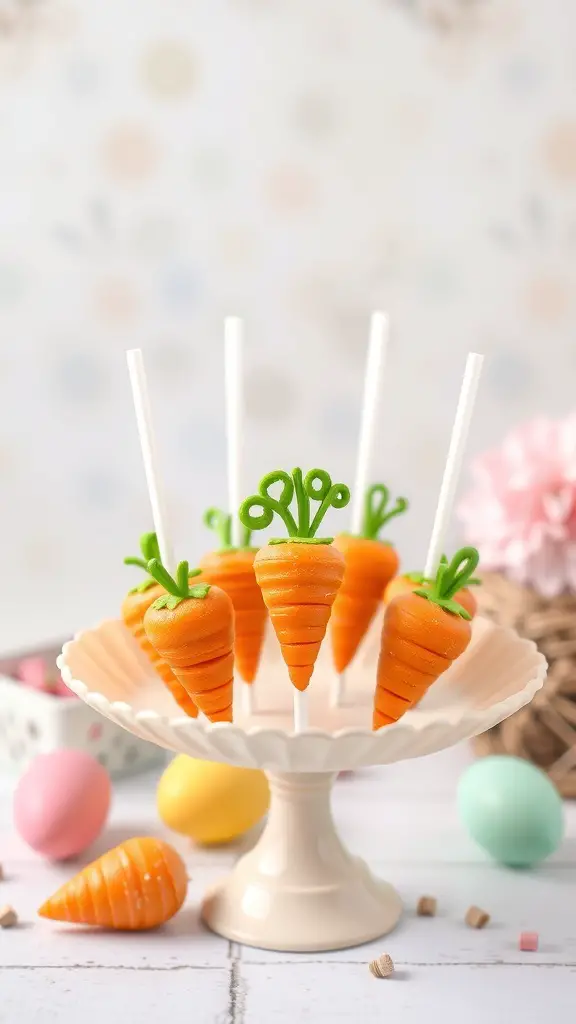
Carrot cake pops are a fun and festive treat perfect for Easter celebrations. These adorable little sweets resemble carrots, making them a delightful addition to your dessert table. The vibrant orange color and playful green tops are sure to catch everyone’s eye.
Making carrot cake pops is a simple process. Start with a moist carrot cake, crumble it, and mix it with cream cheese frosting. Then, shape the mixture into carrot forms and dip them in orange candy melts. Finally, add green candy for the tops. These pops are not only cute but also delicious!
Ingredients
- 1 box carrot cake mix
- 1 cup cream cheese frosting
- 1 cup orange candy melts
- 1/2 cup green candy (for tops)
- Pop sticks
Instructions
- Prepare the Cake: Bake the carrot cake according to the package instructions. Let it cool completely.
- Crumble the Cake: Once cooled, crumble the cake into a large bowl. Add the cream cheese frosting and mix until well combined.
- Shape the Pops: Take small portions of the mixture and shape them into carrot forms. Place them on a baking sheet lined with parchment paper.
- Chill: Refrigerate the shaped pops for about 30 minutes to firm them up.
- Melt the Candy: In a microwave-safe bowl, melt the orange candy melts according to the package instructions.
- Dip the Pops: Insert a pop stick into each carrot shape and dip them into the melted candy. Allow excess to drip off and place them back on the parchment paper.
- Add the Tops: While the candy is still wet, attach the green candy for the tops of the carrots.
- Let Set: Allow the pops to set completely before serving. Enjoy your cute and tasty carrot cake pops!
Bunny-Shaped Rice Krispie Treats
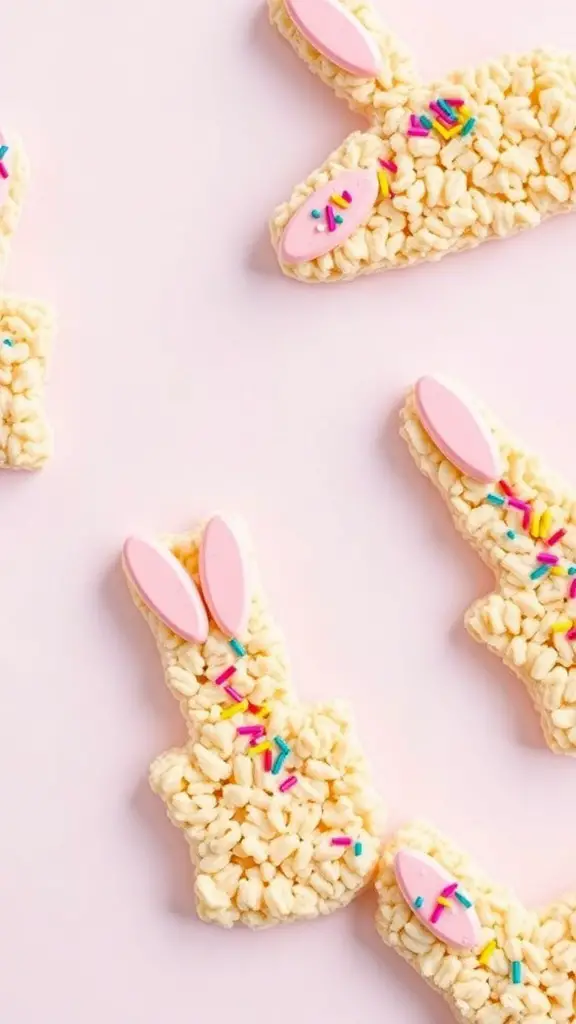
These Bunny-Shaped Rice Krispie Treats are a fun and festive treat perfect for Easter celebrations. They are easy to make and bring a smile to everyone’s face. The treats are shaped like adorable bunnies, making them a delightful addition to any Easter basket or dessert table.
To create these cute bunnies, you’ll need some simple ingredients. The combination of marshmallows and Rice Krispies forms the base, while colorful sprinkles and candy accents add a playful touch. These treats are not just tasty; they are also a great activity to do with kids, allowing them to get creative with decorating their bunnies!
Gather your friends and family, and let’s hop into making these delightful treats. They are sure to be a hit at any Easter gathering!
Lavender Lemonade Fudge
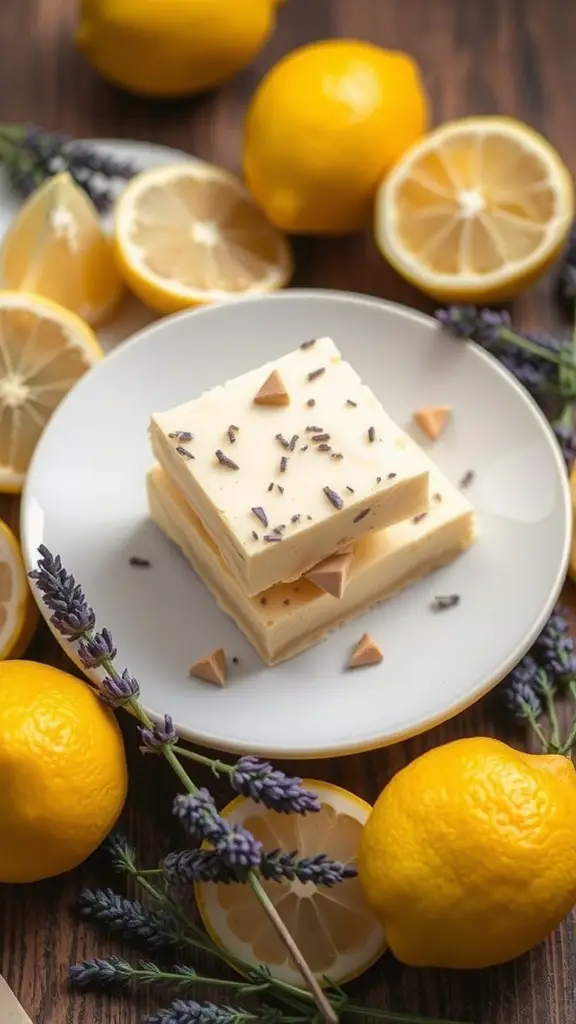
Lavender Lemonade Fudge is a delightful treat that combines the refreshing taste of lemonade with the soothing essence of lavender. This unique dessert is perfect for spring celebrations, especially Easter. The bright yellow of the lemons and the soft purple of the lavender create a beautiful presentation that will impress your guests.
The fudge is creamy and smooth, with a hint of tartness from the lemon. The lavender adds a floral note that makes this treat stand out. It’s a fun way to enjoy traditional flavors in a new form. Plus, it’s easy to make, making it a great choice for those who want to whip up something special without too much fuss.
Gather your ingredients and get ready to make this sweet treat. It’s sure to be a hit at your Easter gathering!
Ingredients
- 2 cups white chocolate chips
- 1 can sweetened condensed milk
- 1/4 cup lemon juice
- 1 tablespoon dried lavender
- 1 teaspoon lemon zest
- 1/4 teaspoon salt
Instructions
- Prepare the Pan: Line an 8×8 inch baking dish with parchment paper, leaving some overhang for easy removal.
- Melt the Chocolate: In a medium saucepan over low heat, combine the white chocolate chips and sweetened condensed milk. Stir until melted and smooth.
- Add Flavors: Remove from heat and stir in lemon juice, dried lavender, lemon zest, and salt. Mix well to combine all the flavors.
- Pour into Pan: Pour the fudge mixture into the prepared baking dish. Spread it evenly and smooth the top.
- Chill: Refrigerate for at least 2 hours or until set. Once firm, lift the fudge out of the pan using the parchment paper.
- Cut and Serve: Cut into squares and enjoy your Lavender Lemonade Fudge!
Easter Egg Sugar Cookies
Easter Egg Sugar Cookies are a delightful treat that adds a festive touch to your holiday celebrations. These cookies are not just tasty but also visually appealing, making them perfect for sharing with family and friends. The soft, buttery cookies are beautifully decorated with colorful icing, resembling Easter eggs. You can get creative with the designs, using various colors and patterns to make each cookie unique.
These cookies are easy to make and can be a fun activity for kids and adults alike. Gather your loved ones, roll out the dough, and let everyone decorate their own cookies. It’s a great way to bond and enjoy some quality time together.
Here’s a simple recipe to get you started on making these festive treats!
Ingredients
- 2 3/4 cups all-purpose flour
- 1 teaspoon baking soda
- 1/2 teaspoon baking powder
- 1 cup unsalted butter, softened
- 1 1/2 cups white sugar
- 1 egg
- 1 teaspoon vanilla extract
- 1/2 teaspoon almond extract
- 3 cups confectioners’ sugar
- 2 tablespoons milk
- 1 teaspoon vanilla extract (for icing)
- Food coloring (various colors)
Instructions
- Preheat the Oven: Start by preheating your oven to 375°F (190°C).
- Mix Dry Ingredients: In a bowl, stir together flour, baking soda, and baking powder. Set aside.
- Prepare the Dough: In a large bowl, cream together the softened butter and sugar until smooth. Beat in the egg, vanilla extract, and almond extract. Gradually blend in the dry ingredients.
- Shape the Cookies: Roll rounded teaspoonfuls of dough into balls, and place them onto ungreased cookie sheets. Flatten each ball slightly with the bottom of a glass.
- Bake: Bake for 8 to 10 minutes in the preheated oven, or until golden. Let cool on wire racks.
- Make the Icing: In a bowl, mix confectioners’ sugar, milk, and vanilla extract until smooth. Divide the icing into separate bowls and add food coloring to each bowl to create your desired colors.
- Decorate: Once the cookies are cool, use a piping bag or a knife to spread the icing on the cookies. Get creative with your designs!
Chocolate-Covered Strawberries

Chocolate-covered strawberries are a delightful treat that combines the sweetness of ripe strawberries with rich, smooth chocolate. These treats are perfect for Easter celebrations, adding a touch of elegance to your dessert table. The vibrant red of the strawberries contrasts beautifully with the dark chocolate, making them visually appealing as well.
Making chocolate-covered strawberries is simple and fun. You can customize them with toppings like sprinkles or crushed nuts. They are not only delicious but also a healthier option compared to many other sweets. Plus, they are easy to prepare, making them a great choice for both kids and adults.
Here’s a quick recipe to get you started:
Ingredients
- 1 pound fresh strawberries
- 8 ounces dark chocolate (or milk chocolate, if preferred)
- 1 tablespoon coconut oil (optional, for a smoother finish)
- Sprinkles or crushed nuts (optional, for decoration)
Instructions
- Wash and dry the strawberries thoroughly. Make sure they are completely dry to help the chocolate stick.
- In a microwave-safe bowl, combine the chocolate and coconut oil. Microwave in 30-second intervals, stirring in between, until melted and smooth.
- Dip each strawberry into the melted chocolate, covering about two-thirds of the berry. Allow any excess chocolate to drip off.
- Place the dipped strawberries on a baking sheet lined with parchment paper. If using sprinkles or nuts, add them immediately while the chocolate is still wet.
- Refrigerate the strawberries for about 30 minutes, or until the chocolate is set.
Enjoy your homemade chocolate-covered strawberries as a sweet treat this Easter!
Peanut Butter Chocolate Eggs

Peanut Butter Chocolate Eggs are a delightful treat that perfectly captures the spirit of Easter. These sweet, creamy bites are a fun twist on traditional chocolate eggs, making them a hit for both kids and adults. The combination of rich chocolate and smooth peanut butter creates a flavor that’s hard to resist.
In the image, you can see beautifully crafted chocolate eggs drizzled with a golden peanut butter topping, nestled in a bed of green grass and surrounded by cheerful daisies. This presentation not only looks festive but also invites everyone to take a bite. They are perfect for filling Easter baskets or serving at family gatherings.
Making these treats is simple and enjoyable. You can involve the kids in the process, letting them help with the chocolate coating or decorating. It’s a great way to create memories while whipping up something delicious!
Ingredients
- 1 cup creamy peanut butter
- 1/4 cup unsalted butter, softened
- 2 cups powdered sugar
- 1 teaspoon vanilla extract
- 2 cups milk chocolate chips
- 1/4 cup peanut butter (for drizzling)
Instructions
- Mix the Filling: In a bowl, combine peanut butter, softened butter, powdered sugar, and vanilla extract. Stir until smooth.
- Shape the Eggs: Scoop out a tablespoon of the mixture and shape it into an egg. Place on a baking sheet lined with parchment paper. Repeat until all the mixture is used.
- Chill: Refrigerate the shaped eggs for about 30 minutes to firm up.
- Melt the Chocolate: In a microwave-safe bowl, melt the chocolate chips in 30-second intervals, stirring until smooth.
- Coat the Eggs: Dip each egg into the melted chocolate, ensuring it’s fully coated. Place back on the parchment paper.
- Drizzle Peanut Butter: Melt the additional peanut butter and drizzle it over the chocolate-coated eggs for decoration.
- Set: Allow the chocolate to harden at room temperature or in the fridge before serving.
Easter Egg Brownies
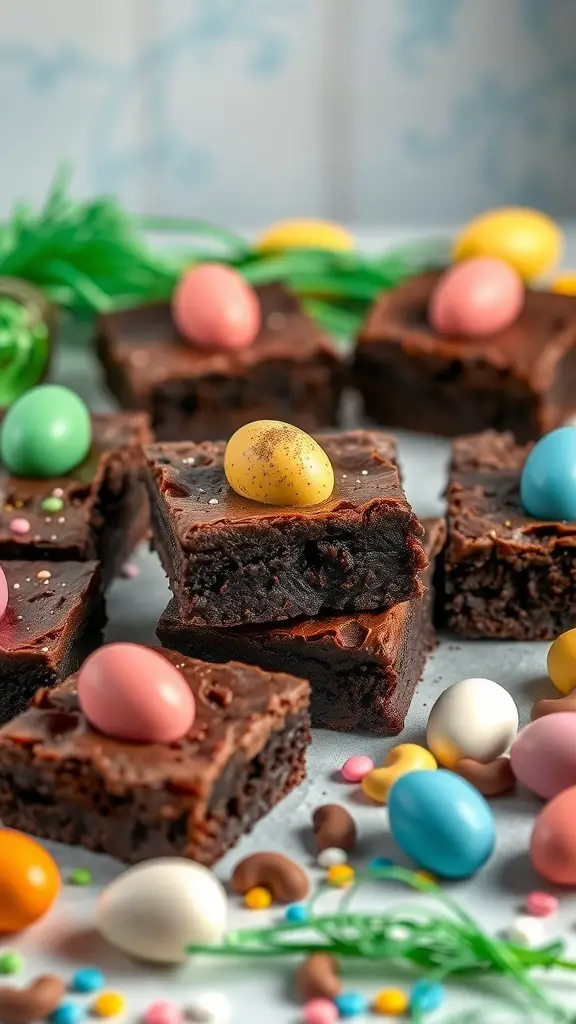
Easter Egg Brownies are a fun and festive treat perfect for celebrating the holiday. These brownies are rich and fudgy, topped with colorful candy eggs that bring a cheerful vibe to your dessert table. The combination of chocolate and pastel colors makes them visually appealing and delicious.
Making these brownies is simple and enjoyable. You can involve the whole family in decorating them with candy eggs and sprinkles. They make a great addition to any Easter gathering or can be enjoyed at home while watching your favorite holiday movies.
Ingredients
- 1 cup unsalted butter
- 2 cups granulated sugar
- 4 large eggs
- 1 teaspoon vanilla extract
- 1 cup all-purpose flour
- 1 cup unsweetened cocoa powder
- 1/2 teaspoon salt
- 1/2 teaspoon baking powder
- 1 cup assorted chocolate eggs (mini eggs, candy-coated eggs)
- Sprinkles (optional)
Instructions
- Preheat your oven to 350°F (175°C). Grease a 9×13-inch baking pan.
- In a large saucepan, melt the butter over low heat. Remove from heat and stir in the sugar, eggs, and vanilla until well combined.
- Add the flour, cocoa powder, salt, and baking powder. Mix until just combined, being careful not to overmix.
- Pour the batter into the prepared baking pan and spread it evenly. Bake for 25-30 minutes, or until a toothpick inserted in the center comes out with a few moist crumbs.
- Let the brownies cool completely in the pan. Once cooled, cut them into squares.
- Top each brownie with colorful candy eggs and sprinkles for a festive touch. Serve and enjoy!
Mini Cheesecakes with Fruit Toppings

Mini cheesecakes are a delightful treat that perfectly captures the spirit of Easter. These little desserts are not only cute but also incredibly tasty. Topped with fresh fruits like raspberries and blackberries, they bring a burst of color and flavor to your dessert table.
The creamy cheesecake filling sits on a crunchy crust, creating a wonderful texture contrast. The fruits add a refreshing touch, making these mini cheesecakes a hit for any gathering. They are easy to make and can be prepared ahead of time, which is always a bonus during busy holiday celebrations.
Whether you’re hosting a brunch or just looking for a sweet treat, these mini cheesecakes are sure to impress. They are a fun way to celebrate the season and enjoy some delicious flavors!
Ingredients
- 1 cup graham cracker crumbs
- 1/4 cup granulated sugar
- 1/2 cup unsalted butter, melted
- 16 oz cream cheese, softened
- 1 cup powdered sugar
- 1 teaspoon vanilla extract
- 2 large eggs
- Fresh raspberries and blackberries for topping
- Mint leaves for garnish
Instructions
- Preheat your oven to 325°F (160°C). Line a muffin tin with paper liners.
- In a bowl, mix graham cracker crumbs, sugar, and melted butter until combined. Press the mixture into the bottom of each muffin liner to form a crust.
- In another bowl, beat the cream cheese until smooth. Gradually add powdered sugar and vanilla, mixing well.
- Add the eggs one at a time, beating well after each addition until the mixture is creamy.
- Pour the cheesecake filling over the crusts in the muffin tin, filling each about 3/4 full.
- Bake for 20-25 minutes or until the centers are set. Let them cool completely before removing from the tin.
- Top each mini cheesecake with fresh raspberries, blackberries, and a mint leaf for garnish.
Honey Almond Biscotti
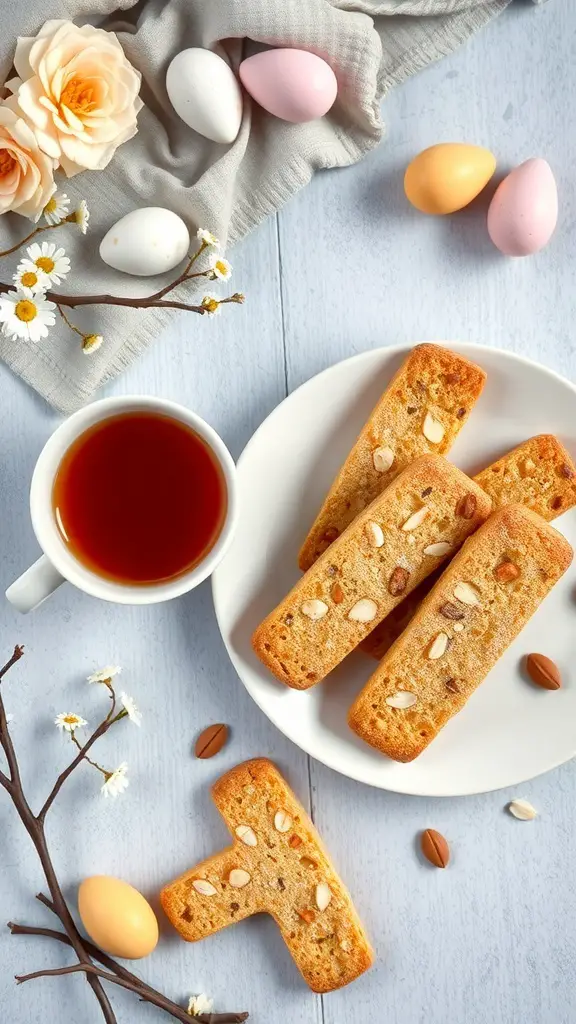
Honey almond biscotti are a delightful treat for Easter gatherings. These crunchy cookies are perfect for dipping in tea or coffee. The combination of honey and almonds gives them a sweet, nutty flavor that pairs well with the spring season.
The image shows a cozy setup with a plate of golden-brown biscotti, a cup of steaming tea, and colorful Easter eggs scattered around. The soft hues and floral accents create a warm, inviting atmosphere, making it clear that these biscotti are a perfect addition to any festive table.
Making honey almond biscotti is simple and fun. They can be enjoyed as a sweet snack or given as gifts to friends and family. Let’s get to the recipe!
Ingredients
- 2 cups all-purpose flour
- 1 cup sliced almonds
- 1/2 cup honey
- 1/2 cup granulated sugar
- 2 large eggs
- 1 teaspoon baking powder
- 1/2 teaspoon salt
- 1 teaspoon vanilla extract
Instructions
- Preheat the oven to 350°F (175°C). Line a baking sheet with parchment paper.
- In a bowl, mix flour, baking powder, and salt. In another bowl, whisk together eggs, honey, sugar, and vanilla until well combined.
- Gradually add the dry ingredients to the wet mixture, stirring until a dough forms. Fold in the sliced almonds.
- Divide the dough in half and shape each half into a log about 12 inches long. Place the logs on the prepared baking sheet.
- Bake for 25-30 minutes, or until golden. Remove from the oven and let cool for 10 minutes.
- Slice the logs diagonally into 1/2-inch thick pieces. Place the slices back on the baking sheet, cut side down.
- Bake for an additional 10-15 minutes until crisp. Let cool completely before serving.
Spring Flower Cupcakes

Spring Flower Cupcakes are a delightful treat that brings the essence of spring right to your table. These charming cupcakes are topped with colorful floral decorations, making them perfect for Easter celebrations or any spring gathering. The bright colors and playful designs not only look beautiful but also taste amazing!
To make these cupcakes, you can start with a simple vanilla cupcake base. Once baked, they are frosted with creamy buttercream and adorned with fondant flowers. The combination of flavors and textures will surely impress your family and friends.
Here’s how you can create your own Spring Flower Cupcakes:
Ingredients
- 1 ½ cups all-purpose flour
- 1 cup granulated sugar
- ½ cup unsalted butter, softened
- 2 large eggs
- 1 teaspoon vanilla extract
- ½ cup milk
- 2 teaspoons baking powder
- ¼ teaspoon salt
- Buttercream frosting (store-bought or homemade)
- Fondant flowers (various colors)
Instructions
- Preheat your oven to 350°F (175°C). Line a cupcake pan with paper liners.
- In a large bowl, cream together the softened butter and sugar until light and fluffy. Add in the eggs one at a time, mixing well after each addition. Stir in the vanilla extract.
- In another bowl, whisk together the flour, baking powder, and salt. Gradually add this dry mixture to the wet ingredients, alternating with the milk. Mix until just combined.
- Fill each cupcake liner about two-thirds full with the batter. Bake for 18-20 minutes or until a toothpick inserted in the center comes out clean.
- Once baked, let the cupcakes cool completely on a wire rack.
- Frost each cupcake with buttercream frosting. Decorate with fondant flowers to create a beautiful spring look.
These Spring Flower Cupcakes are not just a treat for the taste buds but also a feast for the eyes. Enjoy making them and sharing with loved ones this Easter!
Fruit and Yogurt Parfaits
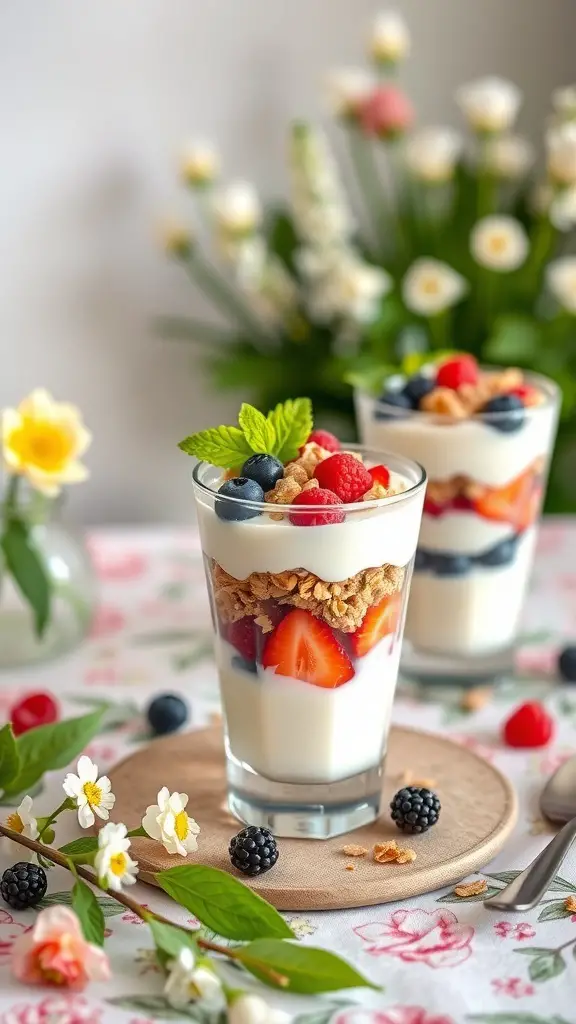
Fruit and yogurt parfaits are a delightful treat that brings together layers of creamy yogurt, fresh fruits, and crunchy granola. They are perfect for Easter celebrations, adding a colorful and healthy option to your dessert table. The vibrant colors of the fruits, like strawberries, blueberries, and raspberries, make these parfaits visually appealing and tasty.
These parfaits are not only easy to make but also customizable. You can use any fruits you like or have on hand. The combination of textures from the smooth yogurt, juicy fruits, and crispy granola creates a satisfying experience with every bite. Plus, they can be prepared in advance, making them a great choice for busy holiday mornings.
To make your parfaits even more festive, consider adding a sprig of mint on top for a pop of green. This simple addition enhances the presentation and adds a refreshing flavor. Serve them in clear glasses to showcase the beautiful layers, and watch as your guests enjoy this healthy yet indulgent dessert.
Ingredients
- 2 cups Greek yogurt
- 2 cups mixed fresh fruits (strawberries, blueberries, raspberries, blackberries)
- 1 cup granola
- Honey or maple syrup (optional, for drizzling)
- Fresh mint leaves (for garnish)
Instructions
- Prepare the Fruits: Wash and slice the strawberries. Keep the blueberries, raspberries, and blackberries whole.
- Layer the Ingredients: In clear glasses, start with a layer of Greek yogurt at the bottom. Add a layer of mixed fruits, followed by a layer of granola.
- Repeat Layers: Continue layering until the glasses are filled, finishing with a layer of yogurt on top.
- Garnish: Drizzle honey or maple syrup on top if desired. Add a sprig of mint for decoration.
- Serve: Enjoy immediately or refrigerate for a short time before serving.