If you’re looking for a meal that’s easy to customize, fun to serve, and absolutely crowd-pleasing, a DIY Taco Bar is the way to go. Whether you’re hosting a casual family dinner, a party with friends, or a game day gathering, this setup is as exciting as it is delicious.
I created this DIY Taco Bar recipe out of necessity during a last-minute weekend gathering. Everyone had different dietary needs, and I didn’t want to spend the entire night in the kitchen. It turned out to be the perfect solution—and now it’s my go-to when I need something impressive yet effortless.
There’s something about laying out all the toppings, meats, shells, and sauces and letting people build their own tacos just the way they like. It’s interactive, colorful, and delicious—and once you try it, you’ll wonder why you haven’t been doing it all along.
Why I Love This Recipe

Taco night is a beloved classic, but turning it into a full-on DIY Taco Bar takes things to the next level.
What makes this recipe truly special is its versatility. You can cater to every palate—meat lovers, vegetarians, spice seekers, and picky eaters. It’s perfect for large gatherings or even small family dinners when you want to offer variety without making five different meals.
The DIY Taco Bar isn’t just a recipe—it’s an experience. It encourages conversation and interaction, which makes any meal feel more memorable. Plus, most of the prep can be done ahead of time, meaning more time for you to relax and enjoy the moment.
The ingredients are easy to source, and the steps are simple—but the presentation and customization make it feel gourmet. This is the kind of dish that leaves guests asking for seconds and hosts feeling accomplished.
Ingredients for DIY Taco Bar
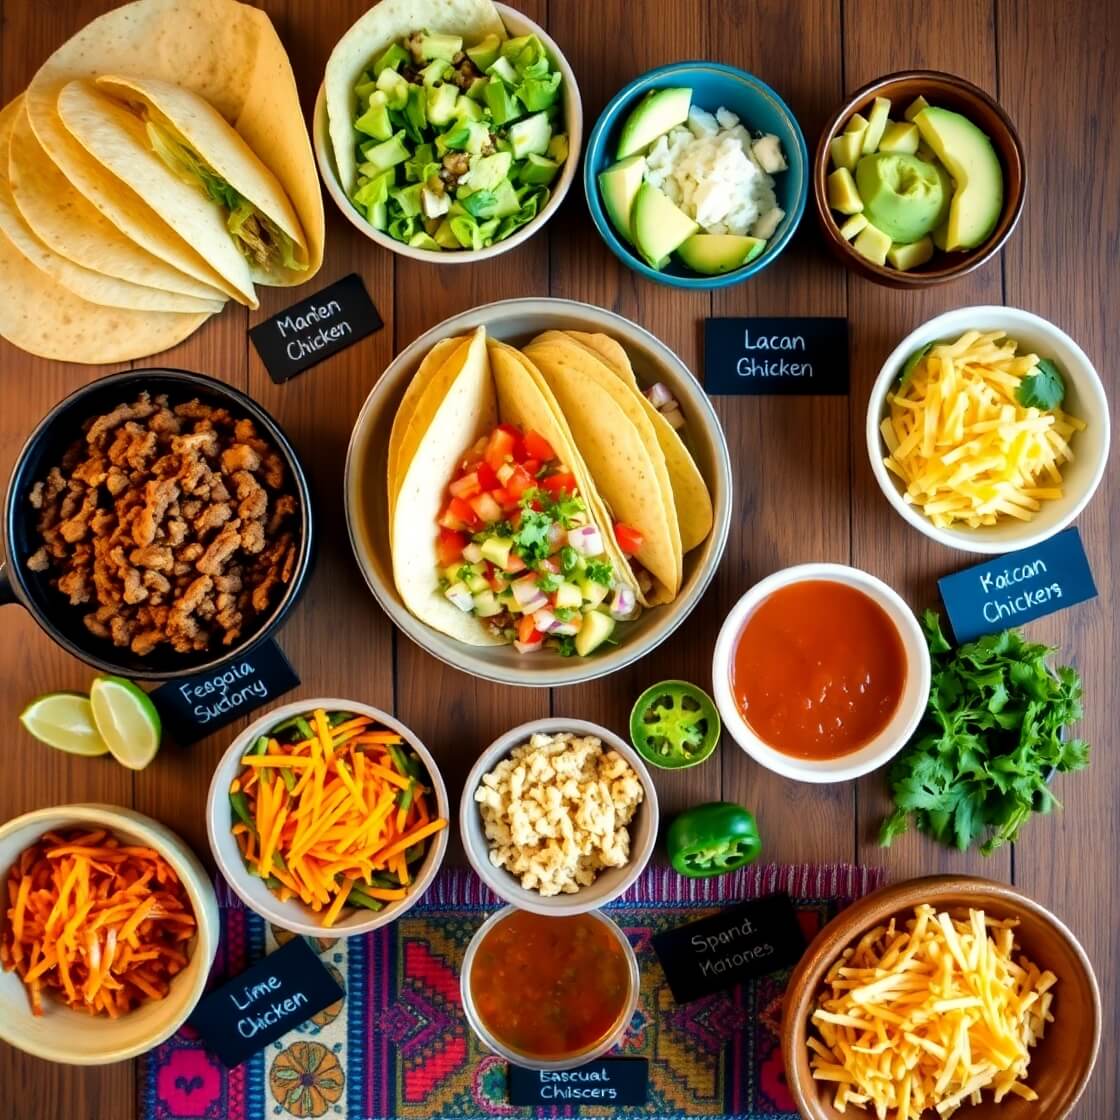
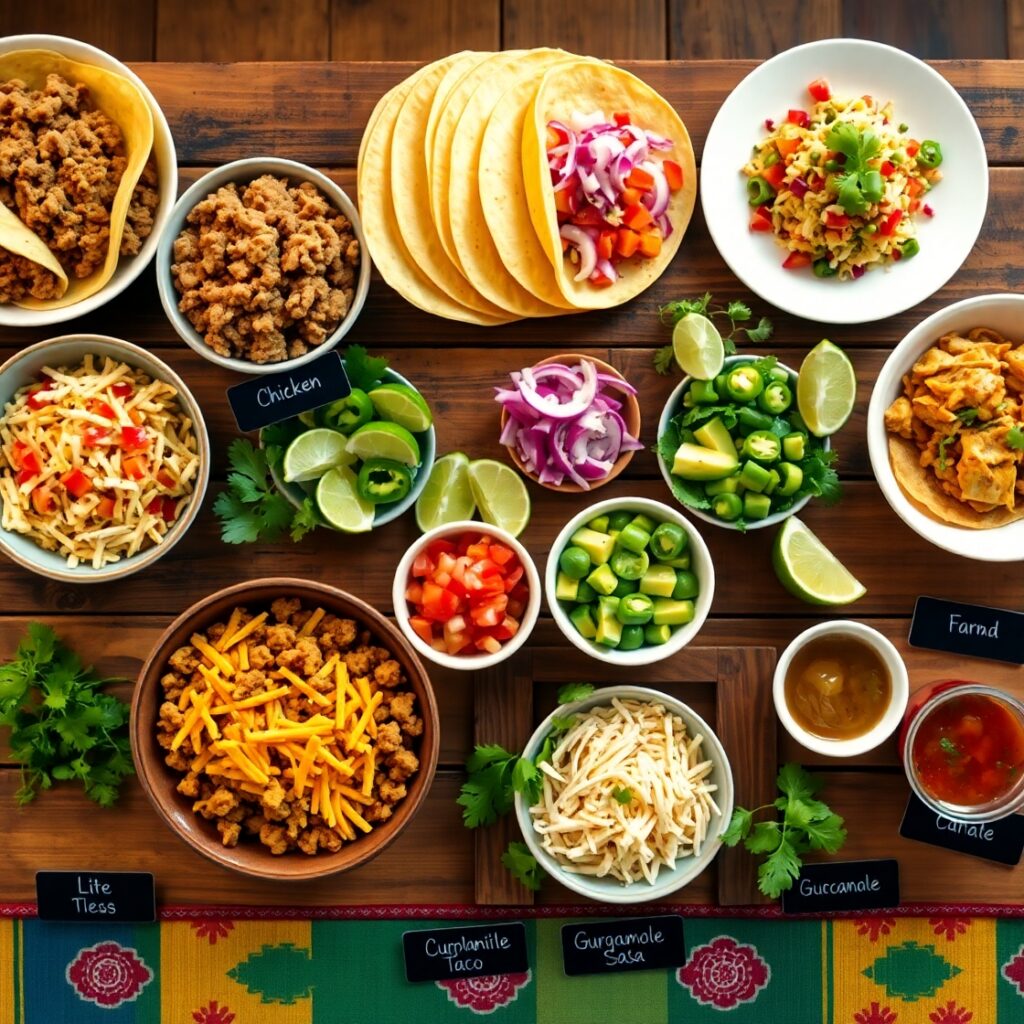
The beauty of a DIY Taco Bar lies in the options. Think of it as building blocks: proteins, bases, toppings, and extras. Let’s break it down.
The key to success? Variety and freshness.
You’ll want to include ingredients from several categories to ensure every guest finds something they love. Here’s a detailed breakdown to help you build the ultimate taco bar.
Proteins (choose 2-3 for variety):
- Ground beef, seasoned with taco spices
- Shredded chicken (slow cooked or rotisserie)
- Carnitas (slow-roasted pork)
- Grilled shrimp or fish
- Black beans or refried beans (for vegetarians)
- Grilled tofu (marinated in lime juice and spices)
Taco shells and bases:
- Small flour tortillas (soft)
- Corn tortillas (soft or crispy)
- Hard taco shells
- Lettuce leaves (for low-carb or gluten-free options)
- Cilantro-lime rice or Mexican rice (optional base)
Toppings (the more, the better):
- Shredded lettuce
- Diced tomatoes
- Sliced jalapeños
- Chopped red onion
- Grated cheese (cheddar, Monterey Jack, or cotija)
- Guacamole or avocado slices
- Sour cream or crema
- Fresh cilantro
- Lime wedges
- Salsa (mild, medium, and spicy)
- Pickled red onions
- Corn (grilled or canned)
Extras (to elevate the flavor):
- Hot sauce variety
- Queso or cheese sauce
- Chopped olives
- Chipotle mayo or sriracha aioli
Mix and match based on your crowd, dietary preferences, or what you have on hand. The goal is to provide enough variety to make every taco different and delicious.
How Much Time Will You Need
One of the best things about a DIY Taco Bar is how easy it is to prep in stages.
Total time: around 1 hour
- Prep time: 30–40 minutes (chopping toppings, cooking proteins)
- Setup time: 10 minutes (arranging the taco bar)
- Serving time: Instant gratification—people build their own!
You can do most of the chopping and even the protein prep a day in advance to make your setup stress-free.
How to Make This DIY Taco Bar
Here’s your step-by-step guide to building your taco bar from scratch. This guide ensures that everything is hot, fresh, and beautifully organized when it’s time to eat.
Step 1: Prepare Your Proteins
Cook each protein individually and keep them warm in separate containers or slow cookers.
- For ground beef: Brown the meat, drain fat, and stir in taco seasoning with a bit of water. Let it simmer for 10 minutes.
- For shredded chicken: Cook boneless thighs or breasts with taco seasoning in a slow cooker for 4-6 hours, then shred.
- For carnitas: Slow roast pork shoulder with cumin, garlic, lime, and orange juice. Shred and crisp in a hot pan.
- For beans: Heat black beans with garlic and spices, or use refried beans warmed with a little broth.
Step 2: Prep All the Toppings
Wash and chop all your toppings—lettuce, tomatoes, onions, cilantro, jalapeños, limes. Store each in individual bowls or containers until ready to serve.
Grate cheese ahead of time and refrigerate. Make your guacamole or salsa fresh for best flavor, or buy good-quality versions to save time.
Step 3: Warm the Shells and Bases
Wrap tortillas in foil and warm them in the oven (350°F for 10 minutes). Hard shells can go on a baking tray and warmed briefly to get crispy.
If using rice, prepare it in advance and keep it warm in a rice cooker or covered pot.
Step 4: Set Up the Taco Bar
Lay everything out buffet-style in sections:
- Start with shells and bases.
- Next, proteins in warmers or covered dishes.
- Then, toppings arranged in small bowls or mason jars.
- Finish with sauces and extras.
Label everything if you’re serving a crowd. It’s also helpful for dietary preferences.
Step 5: Let Everyone Build Their Tacos
Once the bar is set, step back and let your guests become taco artists. Offer a few suggested combinations for inspiration (e.g., shrimp + slaw + avocado + chipotle mayo), but part of the fun is discovering their own.
Substitutions
Taco Bars are naturally flexible, but here are some smart swaps that can take things up a notch or make the setup more inclusive.
Want a healthier option?
Swap sour cream for Greek yogurt—it still gives you that creamy tang but with added protein and less fat.
No tortillas? No problem.
Use lettuce cups or make taco rice bowls. It’s still just as satisfying.
Dairy-free or vegan guests?
Offer plant-based cheese, guacamole, and seasoned tofu or jackfruit as a meat alternative. Beans and rice also make a hearty combo.
No time to cook proteins?
Use store-bought rotisserie chicken, canned seasoned beans, or heat-and-eat pulled pork. Doctor them up with spices and lime juice for freshness.
These small changes make your taco bar more inclusive without sacrificing flavor or fun.
Best Side Dishes for DIY Taco Bar
To round out your meal and make it truly fiesta-worthy, serve a few sides that complement the tacos.
Mexican Street Corn (Elote)
Grilled corn slathered in crema, cotija cheese, lime, and chili powder. It’s rich, spicy, and totally addictive.
Cilantro-Lime Rice
Fresh and zesty, this rice pairs beautifully with any taco combination—and doubles as a base for taco bowls.
Black Bean and Avocado Salad
A refreshing and hearty side dish that adds color and extra fiber to your meal.
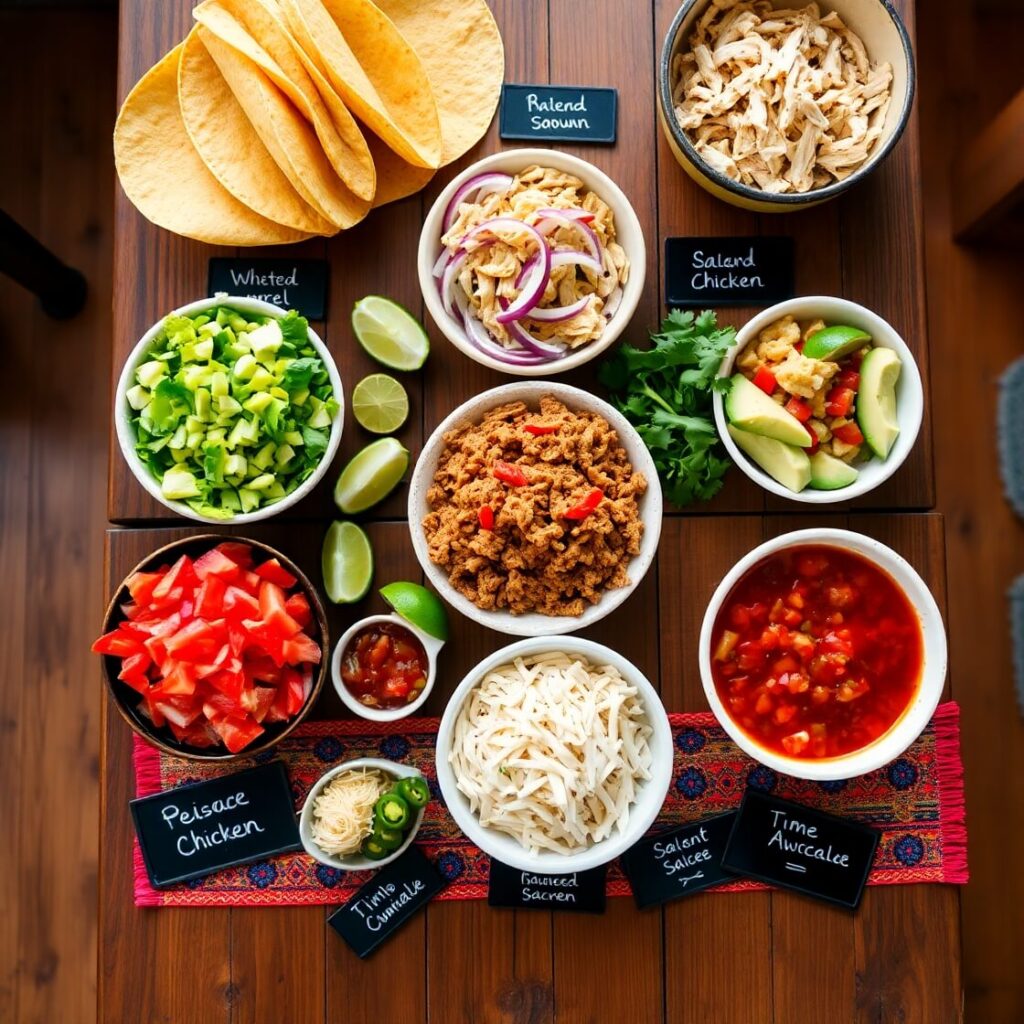
Serving and Presentation Tips
Creating a DIY Taco Bar isn’t just about the food—it’s also about how you present it. A beautifully arranged taco station can elevate the entire dining experience, making it feel festive, thoughtful, and effortlessly stylish.
Start with a clean, spacious layout. Use a long counter, dining table, or even a folding buffet table. Drape a neutral tablecloth or colorful Mexican serape as a runner to set the tone.
Arrange ingredients in an intuitive flow—start with shells, then proteins, followed by toppings, then sauces and extras. Use shallow bowls, small ramekins, mason jars, or even mini cast-iron skillets to give the spread a charming, curated look.
Label each item, especially if you’re accommodating allergies, dietary preferences, or spice levels. Small chalkboard signs or handwritten tags add a personal, rustic touch.
To keep warm items hot, use slow cookers, chafing dishes, or insulated serving bowls. Cold toppings like guac, crema, and salsas can sit on a tray of ice if you’re serving outside or in warm weather.
Scatter lime wedges, fresh cilantro, and hot sauce bottles around the table for pops of color and extra flavor. The goal? Make the spread look vibrant and inviting—like a taco feast your guests won’t forget.
Tips and Tricks to Make This Recipe Even Better
The secret to a memorable taco bar isn’t just the ingredients—it’s the thoughtful touches that enhance flavor, simplify prep, and impress your guests.
Prep in advance.
Chop toppings, cook proteins, and make sauces the night before. Store everything in labeled containers so you’re not rushing the day-of.
Warm your tortillas properly.
Don’t skip this! Cold tortillas break and taste bland. Wrap them in foil and heat in the oven, or warm them on a skillet just before serving.
Add flavor boosters.
Fresh lime juice, pickled onions, and a variety of hot sauces give each taco a punch of flavor. Don’t rely solely on seasoning the meat—build layers.
Offer a signature sauce.
Blend up a house-made chipotle mayo, avocado crema, or spicy tomatillo salsa. It adds a gourmet touch and gives your taco bar personality.
Keep textures in mind.
Crunch from lettuce, creaminess from guacamole, tang from salsa, chew from meat—great tacos are all about balance.
Provide suggested combos.
List 2–3 taco “recipes” on a chalkboard or printed menu for guests who feel overwhelmed by the options. For example:
- Carnitas + pickled onion + cilantro + lime crema
- Shrimp + cabbage slaw + chipotle sauce + avocado
Common Mistakes to Avoid
A DIY Taco Bar is hard to mess up, but a few missteps can affect the overall experience. Here’s what to watch for.
Overcomplicating the menu.
It’s tempting to go overboard with too many toppings and proteins. Stick to 2–3 meat options, one vegetarian, and 8–10 toppings max. More than that becomes chaotic.
Not labeling ingredients.
This can lead to confusion, especially with allergies or dietary preferences. Clear labeling helps your guests navigate the bar confidently.
Cold or soggy shells.
A taco is only as good as its base. Make sure tortillas and shells are warm and pliable—not cold and crumbly.
Neglecting dietary variety.
Include at least one vegetarian or vegan protein, dairy-free sauces, and gluten-free shells so everyone can join the fun.
Running out of the good stuff.
Guac, cheese, and meat go fast—have extra ready to replenish halfway through. Better to have leftovers than come up short.
How to Store It
If you have leftovers (lucky you!), storing them properly means you can enjoy taco night again with minimal effort.
Proteins:
Cool them quickly, then store in airtight containers in the fridge for up to 3 days. Reheat on the stove or in the microwave with a splash of water or broth to keep them moist.
Toppings:
Store chopped vegetables like lettuce, tomatoes, onions, and jalapeños in separate containers. Use within 2 days for best freshness.
Tortillas and shells:
Keep leftover tortillas in a zip-top bag and refrigerate. Reheat them wrapped in foil in the oven. Hard shells may lose their crunch but can be crisped up in the oven for a few minutes.
Guacamole and salsas:
Press plastic wrap directly onto the surface of guac to minimize browning. Salsas will keep in airtight jars for 3–4 days.
Rice and beans:
Refrigerate and use within 3–4 days. These make great lunch bowls or taco salads.
FAQ
What are the best proteins for a taco bar?
Ground beef, shredded chicken, carnitas, and grilled shrimp are the most popular choices. You can also add black beans, tofu, or jackfruit for plant-based eaters.
How many tacos should I plan per person?
Plan for 2–3 tacos per guest, depending on the crowd and side dishes. Kids may eat 1–2, while adults may go for 3 or more.
Can I make a taco bar gluten-free?
Absolutely. Use corn tortillas, lettuce wraps, and gluten-free seasonings and sauces. Label everything clearly.
What drinks pair well with a taco bar?
Try margaritas, Mexican beer, agua fresca, or even flavored sparkling water. For kids or non-drinkers, lemonade or horchata are great options.
Can I set up the taco bar outdoors?
Yes, just keep hot foods insulated and cold items on ice. Wind or bugs can be a factor—cover dishes with mesh lids or plastic domes if needed.

DIY Taco Bar
- Total Time: 1 hour
- Yield: 6–8 1x
- Diet: Gluten Free
Description
Build-your-own taco bars are the ultimate casual dinner or party solution. They’re colorful, festive, and endlessly customizable. From savory slow-cooked meats to bright and zesty toppings, every element is packed with flavor. Whether you’re catering to a group of picky eaters or entertaining a crowd, a DIY taco bar gives everyone a chance to create their perfect bite. Prep everything ahead, lay it all out buffet-style, and let the taco-making magic begin. This recipe includes classic proteins, a variety of shell options, fresh toppings, and clever extras that bring restaurant-quality flair to your home kitchen.
Ingredients
- 1 lb ground beef
- 2 tbsp taco seasoning
- 2 boneless skinless chicken breasts
- 1 cup salsa (for cooking chicken)
- 12 small flour tortillas or corn tortillas
- 1 head romaine lettuce, shredded
- 1 cup diced tomatoes
- ½ cup chopped red onion
- 1 cup shredded cheddar or Jack cheese
- 1 avocado, sliced or mashed
- ½ cup sour cream or Greek yogurt
- ½ cup guacamole
- ½ cup salsa (mild and spicy options)
- ½ cup chopped cilantro
- Lime wedges
- Jalapeño slices
- Hot sauce
Instructions
- Cook ground beef in a skillet, add taco seasoning and water, simmer 10 minutes.
- Slow cook chicken with salsa, then shred with forks.
- Wash and prep toppings: lettuce, tomatoes, onion, cilantro, jalapeños.
- Warm tortillas wrapped in foil at 350°F for 10 minutes.
- Arrange taco ingredients in serving bowls or trays.
- Let guests build their tacos with shells, proteins, toppings, and sauces.
Notes
- Offer vegetarian options like black beans or grilled tofu.
- Double the guac and sour cream—those disappear fast!
- Prep everything a day before for stress-free setup.
- Prep Time: 30 minutes
- Cook Time: 30 minutes
- Category: Main Course
- Method: Stovetop + Oven
- Cuisine: Mexican-inspired
Nutrition
- Serving Size: 6–8
- Calories: 410
- Sugar: 3g
- Sodium: 580mg
- Fat: 21g
- Saturated Fat: 8g
- Unsaturated Fat: 11g
- Trans Fat: 0g
- Carbohydrates: 32g
- Fiber: 5g
- Protein: 24g
- Cholesterol: 65mg