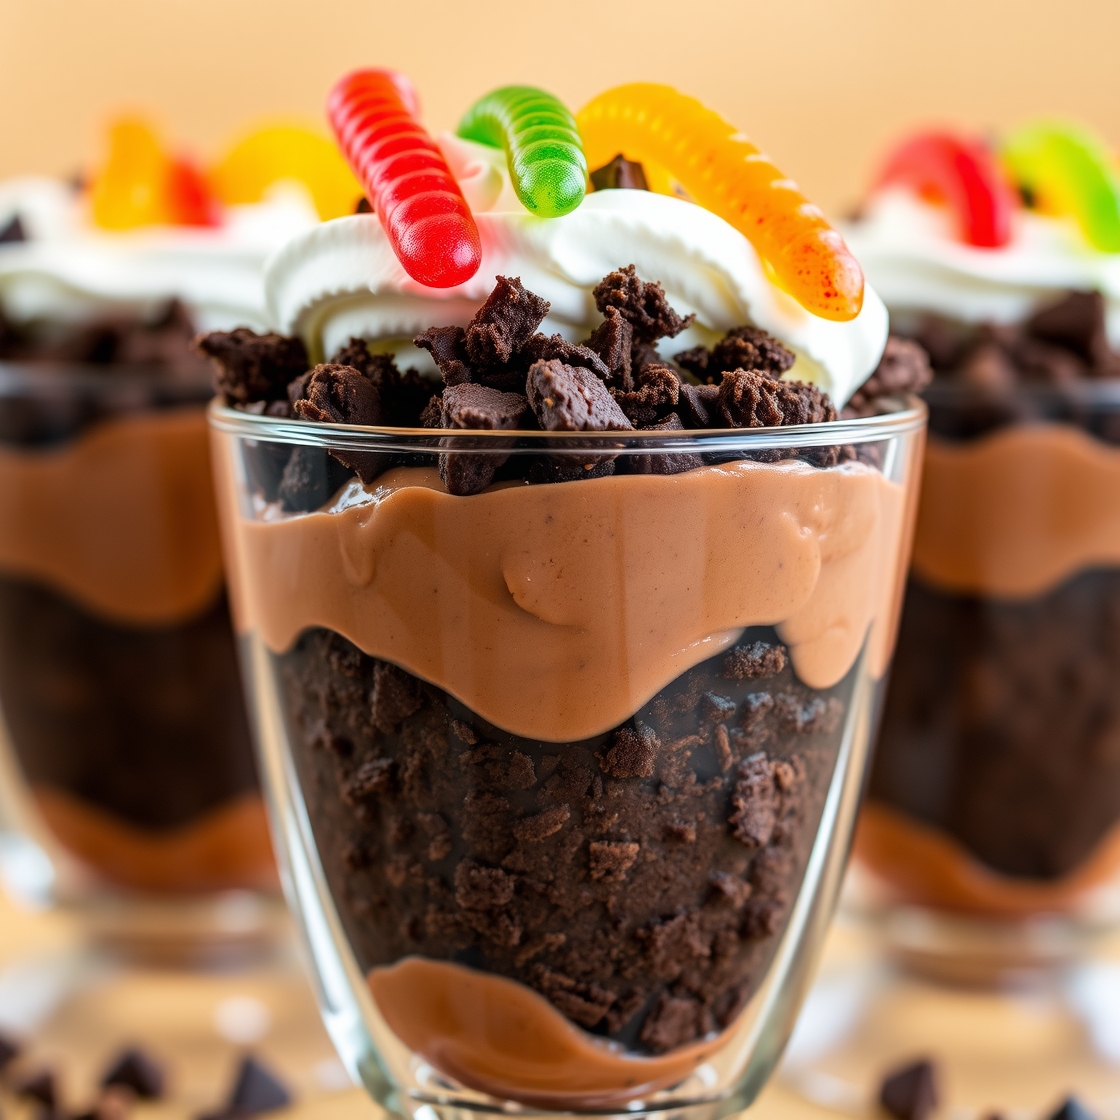
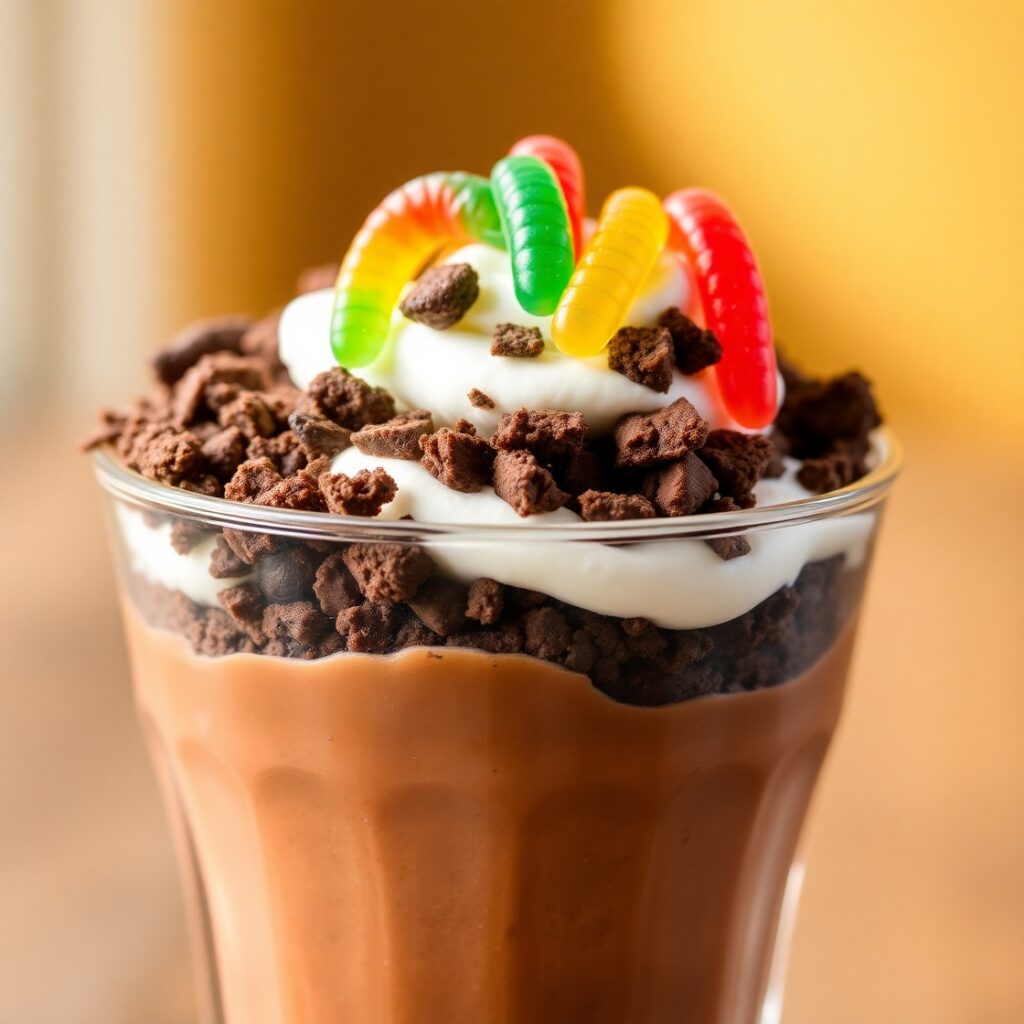
Dirt cups are one of those nostalgic treats that bring back fond memories of childhood fun and simple pleasures. I first made this recipe when I wanted a playful dessert for a kids’ party, but it quickly became a favorite for all ages. The combination of creamy pudding, crunchy cookie crumbs, and gummy worms is delightfully whimsical and unexpectedly delicious. Dirt cups not only satisfy a sweet tooth but also offer a creative and interactive way to enjoy dessert. Whether you’re making them for a birthday, a casual get-together, or just a fun weeknight treat, dirt cups bring smiles all around. If you love desserts that are easy to make but packed with flavor and texture, you’re going to enjoy this recipe.
Why I Love This Recipe

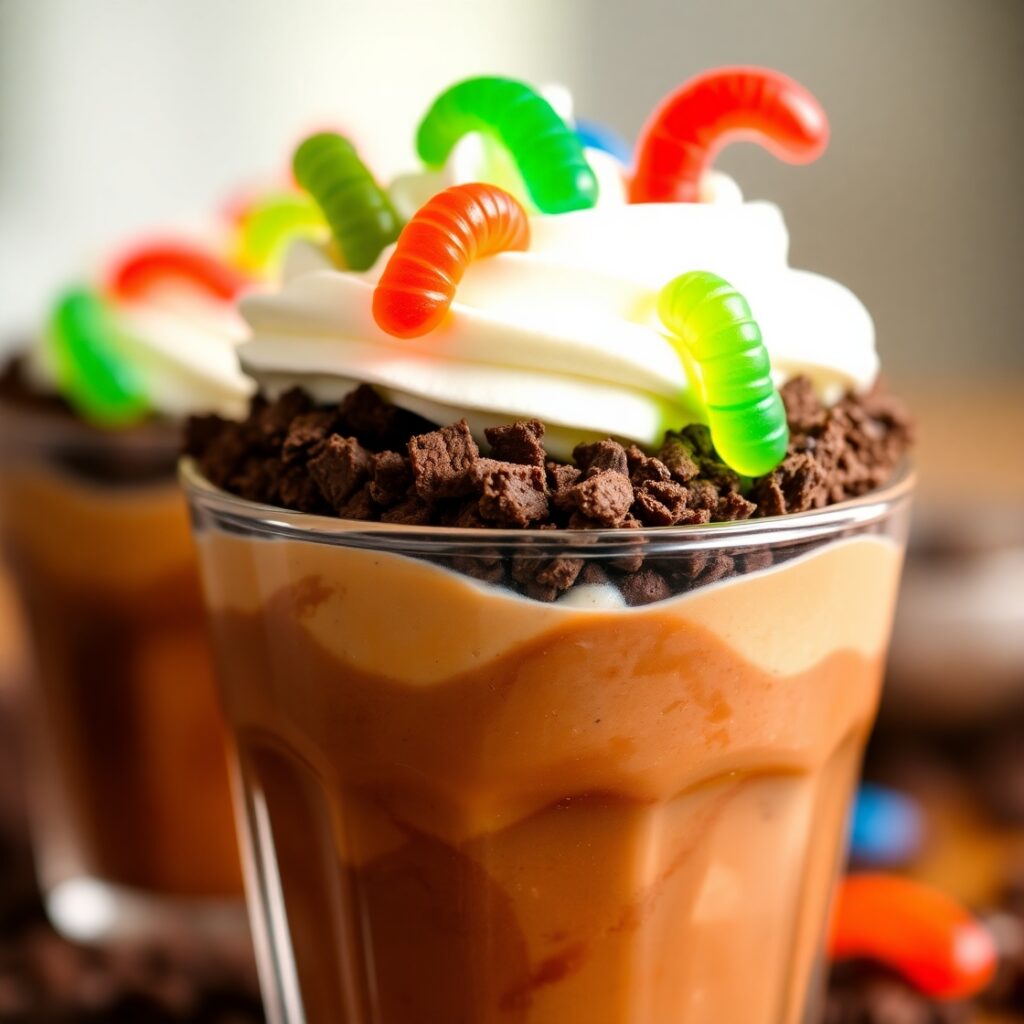
What makes dirt cups so special is their playful charm and comforting flavors wrapped in an imaginative presentation. The crunchy crushed cookies resemble dirt, while the smooth pudding provides a creamy contrast. The gummy worms crawling through the “soil” add a fun surprise that kids and adults alike find irresistible.
I often choose this recipe because it’s quick, requires no baking, and can be customized in countless ways. You can use chocolate or vanilla pudding, add different candies, or even sneak in some healthier ingredients to balance the indulgence. Dirt cups are not just about taste — they evoke a sense of fun and creativity, making dessert time feel like a mini adventure.
Plus, dirt cups are incredibly forgiving. Even if you’re new to making desserts, this recipe is straightforward, and the end result always looks impressive. That’s why I keep coming back to it, and why I think you will too.
Ingredients for Dirt Cups
To whip up this fun and easy dessert, you’ll need a handful of simple ingredients that are likely already in your pantry or easy to find at your local store. Here’s what I use to get that perfect balance of flavor and texture:
- Chocolate pudding mix: This forms the creamy base. You can use instant pudding for a quick fix or homemade for a richer taste.
- Milk: Usually whole milk works best for creamy pudding, but you can swap in plant-based milk if you prefer.
- Crushed chocolate sandwich cookies: These are the “dirt” that give the dessert its signature look and crunch. Oreos or any chocolate sandwich cookie do the trick.
- Gummy worms: The fun edible “creatures” that make the dirt cups so playful and visually appealing.
- Whipped cream: Optional but highly recommended for a light, fluffy topping that balances the richness.
The simplicity of these ingredients makes this recipe accessible and budget-friendly. You can add your twist with different cookie types or candies, but the classic dirt cups remain unbeatable.
How Much Time Will You Need
One of the reasons I adore dirt cups is how quickly they come together. From start to finish, you’re looking at about 15 to 20 minutes of active prep time. If you’re using instant pudding mix, the pudding sets in about 5 minutes, so you can enjoy these treats almost immediately.
If you want the pudding to firm up a bit more, chilling the cups in the fridge for 30 minutes to an hour helps, but it’s not a must. Overall, this recipe fits perfectly into busy days when you crave a sweet treat but don’t want to spend hours in the kitchen.
How to Make This Dirt Cups Recipe
Step-by-step is the best way to ensure you get that perfect dirt cup every time. Here’s how I make mine:
Step – 1: Prepare the pudding according to the package instructions or your homemade recipe. Typically, this means whisking the pudding mix with cold milk until it thickens. Set it aside to slightly firm up.
Step – 2: While the pudding sets, crush your chocolate sandwich cookies. I like to put them in a sealed plastic bag and gently crush with a rolling pin to get a coarse crumb—not too fine, so you get a good “dirt” texture.
Step – 3: Spoon a layer of cookie crumbs into the bottom of your serving cups or jars.
Step – 4: Add a layer of pudding on top of the cookie crumbs, smoothing it evenly.
Step – 5: Repeat layers if your cups are tall — cookie crumbs, then pudding — leaving enough space for the whipped cream topping.
Step – 6: Add a generous dollop of whipped cream on top for a creamy finish.
Step – 7: Finally, place a few gummy worms crawling out of the “dirt” for that playful, signature look.
Step – 8: Chill for a few minutes if you want or serve immediately.
With these simple steps, you’ll have a dessert that looks as good as it tastes.
Substitutions
Dirt cups are versatile, so you can easily swap ingredients to suit your taste or dietary needs.
- If you want to lighten it up, try using low-fat or plant-based milk and pudding mixes.
- For the cookie crumbs, if you’re avoiding gluten, look for gluten-free chocolate sandwich cookies or substitute with crushed gluten-free chocolate cereal.
- Instead of gummy worms, try fresh berries or chocolate chips for a different texture and flavor.
- You can also experiment with different pudding flavors like vanilla, butterscotch, or even peanut butter for a unique twist.
These substitutions don’t just accommodate dietary restrictions—they can add exciting new dimensions to this classic dessert.
Best Side Dish for Dirt Cups
Dirt cups are such a sweet, rich treat that pairing them with light, refreshing side dishes works well. Here are three I often enjoy alongside:
- Fresh fruit salad: The natural sweetness and acidity balance the creamy richness.
- Mint tea: Its refreshing taste complements the chocolate and cuts through the sweetness.
- Light vanilla yogurt: For a bit of tang and creaminess without overwhelming the palate.
These pairings help round out the dessert experience and keep your taste buds happy.
Serving and Presentation Tips
Serving dirt cups is half the fun because the visual playfulness is what makes this dessert so delightful. To make your dirt cups even more inviting, I like to use clear glass cups or small mason jars so you can see the beautiful layers of cookie crumbs and pudding. This layering creates a mini “landscape” of dirt and cream that’s visually appealing.
For an extra touch, sprinkle some extra cookie crumbs on top of the whipped cream, and arrange the gummy worms so they look like they are just emerging from the soil. You can even add edible flowers or mint leaves for a fresh contrast and a pop of color. When serving at a party, present the cups on a rustic wooden tray or a platter lined with a paper doily to enhance the “outdoor” garden vibe.
The key is to keep it playful and natural — the goal is to surprise and delight guests with a dessert that looks as fun as it tastes.
Tips and Tricks to Make This Recipe Better
To elevate your dirt cups from good to unforgettable, here are some insider tips I’ve picked up over the years:
- Use chilled pudding: Make sure your pudding is well chilled before assembling the cups. This helps the layers hold their shape better and improves the overall texture.
- Don’t over-crush the cookies: The cookie crumbs should mimic soil texture, so aim for a mix of fine crumbs and small chunks to add crunch.
- Layering is key: Building your dirt cups in alternating layers of crumbs and pudding gives each bite a perfect balance of creamy and crunchy.
- Use fresh whipped cream: Homemade whipped cream or high-quality store-bought makes a big difference in flavor and texture compared to aerosol whipped cream.
- Add a pinch of salt: Salt enhances the chocolate flavor in the cookies and balances the sweetness of the pudding, so a tiny pinch in the pudding mix or on top of the whipped cream can surprise you.
- Customize gummy worms: If you want to get creative, try cutting gummy worms into smaller pieces or mixing other gummy shapes for variety.
These small touches can really upgrade your dirt cups and impress your guests.
Common Mistakes to Avoid
Even simple recipes can go awry if you don’t watch out for some common pitfalls. Here’s what to avoid when making dirt cups:
- Don’t use soggy cookies: If your cookie crumbs absorb too much moisture, the “dirt” turns mushy and loses its crunch. Crush the cookies fresh and keep them separate until layering.
- Avoid watery pudding: Follow the pudding mix instructions carefully; too much liquid makes the dessert runny and less enjoyable.
- Don’t skip chilling: While it’s tempting to dive right in, chilling the pudding and assembled cups for a short time helps set everything nicely.
- Don’t overcrowd layers: Thick layers of crumbs or pudding can throw off the balance. Aim for thin, even layers to keep the texture perfect.
- Avoid using gummy worms that are too sticky or old, as they can lose their fun shape or get messy.
By keeping these tips in mind, your dirt cups will turn out perfect every time.
How to Store It
If you need to store your dirt cups, cover them tightly with plastic wrap or use airtight lids if in jars. Keep them refrigerated to maintain freshness and texture.
They’re best enjoyed within 1-2 days to avoid sogginess of the cookie crumbs. If storing longer, you might want to keep the cookie crumbs separate and add them just before serving to maintain crunch.
Avoid freezing dirt cups as the pudding and whipped cream don’t freeze well and can separate when thawed.
FAQ
Can I make dirt cups ahead of time?
Yes! You can prepare the pudding and crush the cookies in advance. Assemble the dirt cups a few hours before serving and keep them refrigerated. Add gummy worms just before serving for best appearance.
Are there any healthy alternatives to gummy worms?
Absolutely! Fresh fruit like sliced strawberries, blueberries, or raisins can be used instead of gummy worms for a healthier touch.
Can I use homemade pudding for this recipe?
Definitely. Homemade pudding can add richer flavor and texture. Just be sure it’s thick enough to hold the layers.
Is this recipe suitable for kids?
Yes! It’s a fun, no-bake dessert perfect for kids to help assemble and enjoy.
Can dirt cups be made dairy-free?
Yes, use dairy-free pudding mixes and plant-based milk, plus dairy-free whipped topping to keep it vegan and dairy-free.

Dirt Cups Recipe
- Total Time: 15 minutes
- Yield: 4 1x
- Diet: Vegetarian
Description
Dirt cups are a whimsical and delicious no-bake dessert that combines creamy chocolate pudding, crunchy cookie crumbs, and fun gummy worms to create a playful treat reminiscent of “dirt” and garden worms. This easy recipe comes together quickly with minimal ingredients, making it perfect for parties, family gatherings, or a casual sweet fix. The texture contrasts and delightful presentation make dirt cups a crowd-pleaser for both kids and adults. With options for substitutions and easy assembly, it’s a dessert that invites creativity and guarantees smiles.
Ingredients
- 1 package instant chocolate pudding mix
- 2 cups cold milk (whole or plant-based)
- 15 chocolate sandwich cookies, crushed
- 1 cup whipped cream (homemade or store-bought)
- 1/2 cup gummy worms
Instructions
- Prepare pudding by mixing the pudding mix with cold milk and whisk until thickened. Chill slightly.
- Crush cookies to coarse crumbs using a rolling pin inside a sealed bag.
- Layer cookie crumbs into serving cups, followed by pudding, repeating layers as desired.
- Top with whipped cream and arrange gummy worms on top.
- Chill if desired, then serve.
Notes
- For best texture, crush cookies just before assembling.
- Homemade whipped cream enhances flavor and texture.
- Add a pinch of salt to pudding to enhance chocolate flavor.
- Customize with different pudding flavors or candies.
- Prep Time: 10 minutes
- Cook Time: 5 minutes (for pudding to set)
- Category: Dessert
- Method: No-bake
- Cuisine: American
Nutrition
- Serving Size: 4
- Calories: 320
- Sugar: 28g
- Sodium: 150mg
- Fat: 14g
- Saturated Fat: 8g
- Unsaturated Fat: 4g
- Trans Fat: 0g
- Carbohydrates: 42g
- Fiber: 2g
- Protein: 4g
- Cholesterol: 30mg