The first time I made cream puff cake, it wasn’t planned at all. I had promised dessert for a small family dinner, then realized I didn’t want to fuss with piping bags, perfect swirls, or anything that required me to be overly precise. I wanted something that felt impressive but forgiving. Something cozy, nostalgic, and a little dramatic when sliced. That’s how this cream puff cake entered my kitchen and, honestly, never really left.
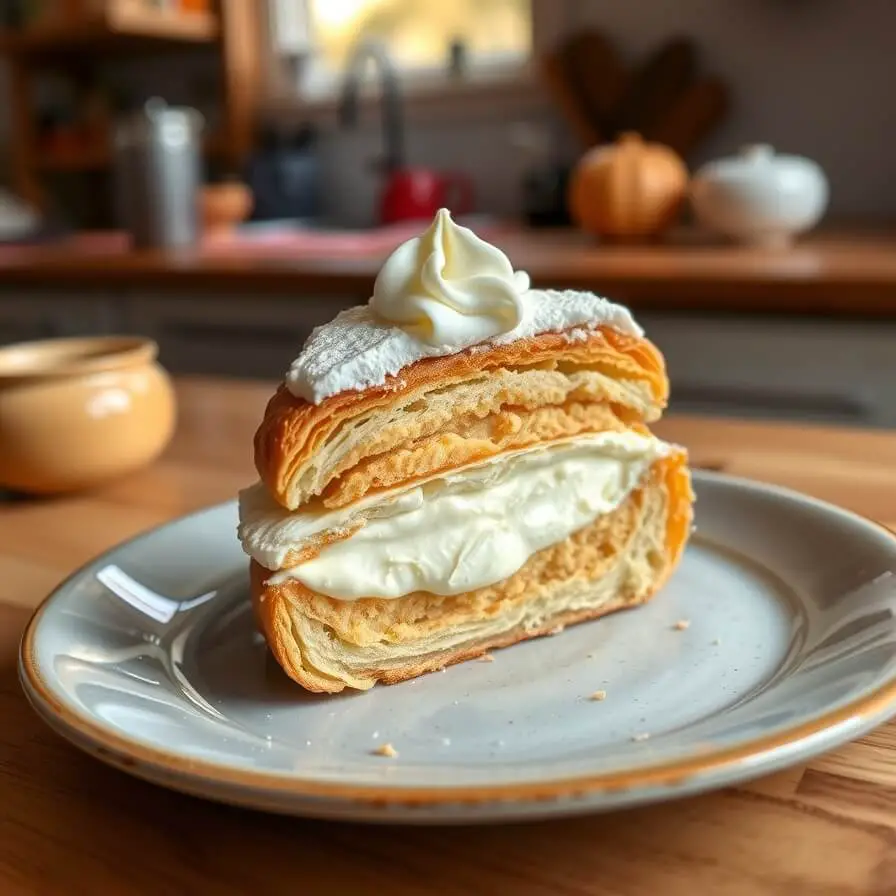
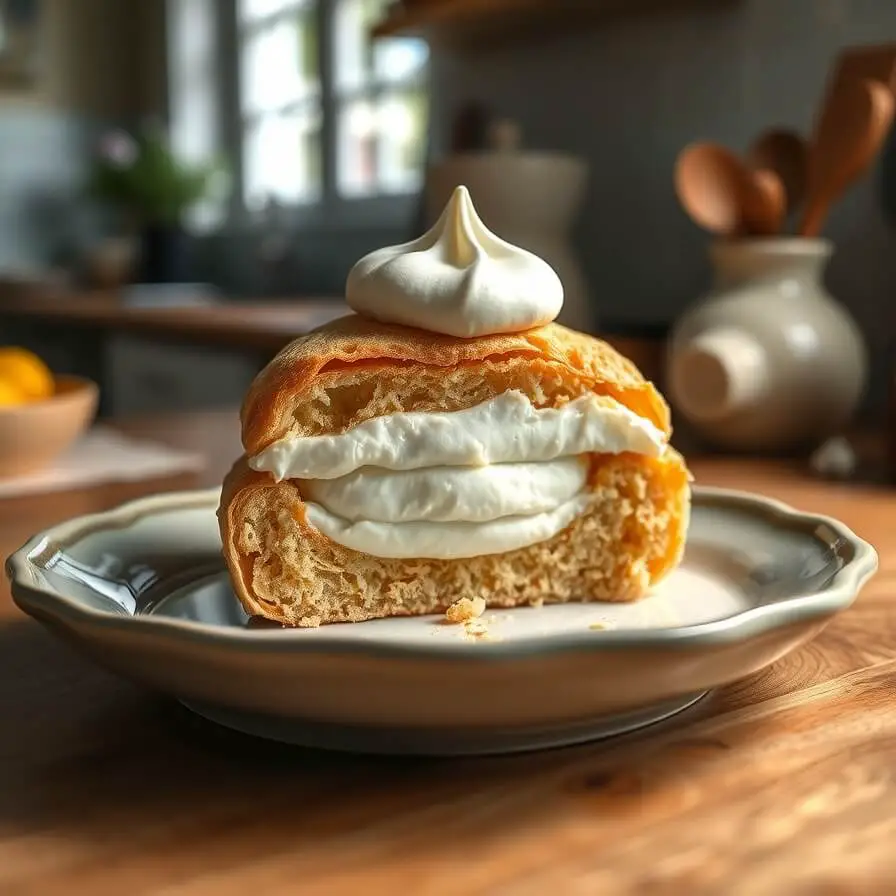
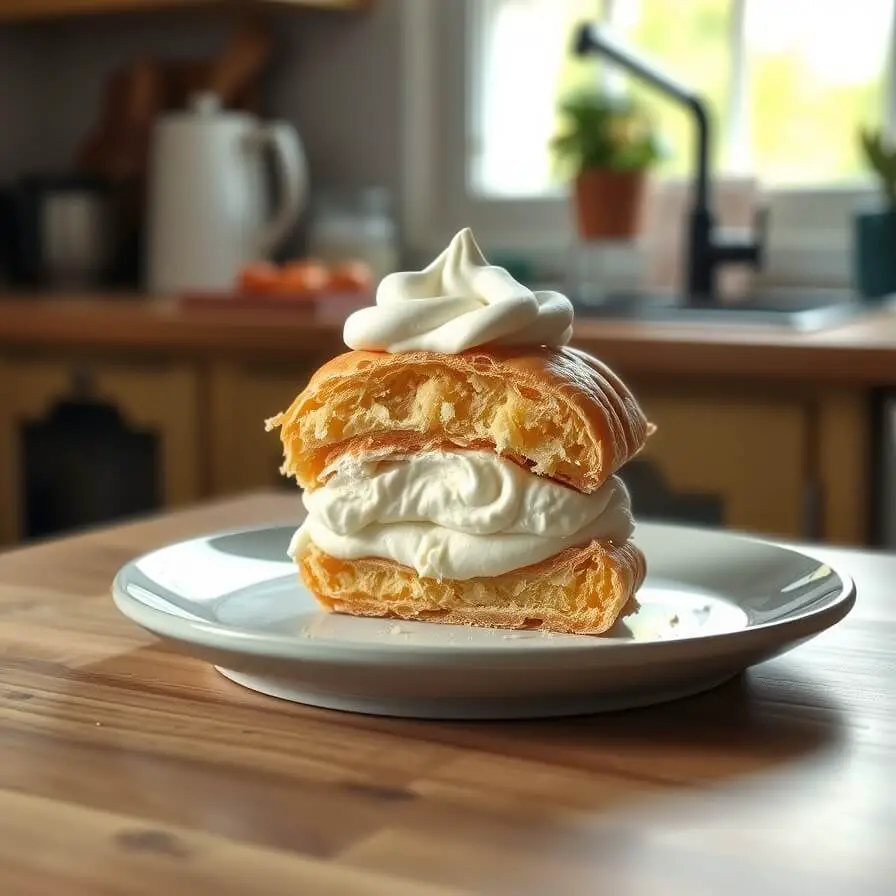
Cream puff cake has all the magic of classic cream puffs without the stress. You still get that airy, eggy choux-style base, the soft vanilla cream layer, and the light topping that pulls it all together. But instead of individual pastries, everything is baked and layered into one beautiful dish. When I set it on the table, people always pause for a second, trying to figure out what it is. After the first bite, there’s usually silence, then a very serious request for the recipe.
What I love most is how approachable it feels. You don’t need pastry-school confidence. You just need a little patience, a good mixing bowl, and the willingness to trust the process. This is the kind of dessert that makes people think you worked much harder than you did, and I’m always happy to let them believe that.
Why I Love This Recipe
I love this cream puff cake because it delivers comfort and elegance at the same time. It’s not flashy or trendy, but it has a quiet confidence that wins people over fast. The base is light and slightly crisp on the outside, soft and hollow inside, soaking up just enough cream to become tender without turning soggy. That contrast is what makes each bite so satisfying.

Another reason I keep coming back to this recipe is how reliable it is. This isn’t one of those desserts that only works if your kitchen is the perfect temperature or your ingredients are measured to the milligram. It’s flexible. If your eggs are a little larger or your cream sets a bit softer, the cake still works. That kind of forgiveness makes it perfect for home bakers who want great results without stress.
There’s also something deeply nostalgic about it. It reminds me of classic bakery desserts and family gatherings where the sweets were simple but generous. This is the dessert people go back for seconds of, even when they claim they’re “too full.” It’s light enough that it never feels heavy, yet rich enough to feel special.
Most importantly, this recipe is a crowd-pleaser across generations. Kids love the creamy layers, adults appreciate that it’s not overly sweet, and anyone who enjoys traditional desserts will recognize the cream puff influence right away. It’s the kind of recipe you make once, then find excuses to make again.
Ingredients for Cream Puff Cake
The beauty of cream puff cake is that it uses very familiar ingredients, but the way they come together feels a little magical. You don’t need anything fancy or hard to find, which is another reason I adore this recipe.
You’ll start with simple pantry staples for the base. Butter gives richness and flavor, while water helps create the steam that makes the dough puff up in the oven. Flour is what gives structure, and eggs are absolutely essential here. They’re responsible for the lift, the tenderness, and that classic cream puff texture. When you add the eggs, the dough transforms from something stiff and paste-like into a smooth, glossy batter that feels alive.
For the filling, you’re looking at a creamy, vanilla-forward layer. This usually starts with a pudding or custard-style base, combined with whipped cream or a creamy topping to lighten it. The vanilla flavor is key. It doesn’t need to be loud, but it should be warm and noticeable, tying the whole dessert together.
The topping is simple but important. A light layer on top adds sweetness and visual appeal without overwhelming the delicate layers underneath. It finishes the cake and makes it look complete, ready for the table.
Each ingredient plays a clear role, and none of them feel unnecessary. Together, they create a dessert that tastes far more complex than the ingredient list suggests.
How Much Time Will You Need
This is not a rushed recipe, but it’s also not an all-day project. I like to think of cream puff cake as a relaxed afternoon bake.
You’ll spend a short amount of time preparing the dough and baking the base. That part is active but quick, and the oven does most of the work. After baking, the cake needs time to cool completely, which is important for the layers to set properly later.
The filling comes together fairly quickly, but the finished cake benefits from chilling time. This resting period allows the cream to firm up and the flavors to meld. If you’re planning ahead, this is a great make-ahead dessert because it actually improves after a few hours in the refrigerator.
Overall, you’re looking at a recipe that fits comfortably into a day, with plenty of downtime in between steps. It’s perfect when you want a homemade dessert without feeling chained to the kitchen.
How to Make This Cream Puff Cake
Step – 1: Start by preparing the base. In a saucepan, combine water and butter and heat until the butter is fully melted and the mixture comes to a gentle boil. Remove it from the heat and stir in the flour all at once. Mix vigorously until it forms a smooth dough that pulls away from the sides of the pan.
Step – 2: Let the dough cool slightly, then add the eggs one at a time. This part takes a bit of arm strength, but it’s worth it. Each egg should be fully incorporated before adding the next. The dough will look separated at first, then suddenly come together into a thick, glossy batter.
Step – 3: Spread the batter evenly into a prepared baking dish. Don’t worry if it’s not perfectly smooth. It will puff and settle as it bakes.
Step – 4: Bake until the base is puffed, golden, and dry on top. This step is crucial for structure, so resist the urge to open the oven door too early.
Step – 5: Once baked, remove the base from the oven and let it cool completely. You’ll notice it deflates slightly, which is exactly what you want.
Step – 6: While the base cools, prepare the cream layer. Mix the pudding or custard base until smooth, then gently fold in the whipped cream or creamy topping. The result should be light, smooth, and spoonable.
Step – 7: Spread the cream mixture evenly over the cooled base, making sure it reaches all the corners.
Step – 8: Finish with your chosen topping, spreading it gently so it doesn’t disturb the cream layer underneath.
Step – 9: Refrigerate the cake until fully set. This final rest is what transforms it from good to unforgettable.
Substitutions
One of the reasons this recipe works so well is how adaptable it is. If you don’t have one ingredient, there’s usually a workaround that still gives great results.
For the base, you can use a plant-based butter alternative if needed, as long as it behaves similarly to dairy butter when melted. The texture may change slightly, but the structure will still hold.
If vanilla isn’t your favorite flavor, you can infuse the cream layer with a hint of almond, coffee, or citrus zest. These small changes give the cake a completely new personality without complicating the process.
For the topping, you can keep it classic or lighten it up depending on your preference. The key is choosing something that complements the cream without overpowering it.
Substitutions here aren’t about fixing problems. They’re about making the recipe fit your taste and your pantry.
Serving and Presentation Tips
This is the kind of cake that doesn’t need much dressing up, and that’s part of its charm. When I bring cream puff cake to the table, I like to let the layers speak for themselves. The soft, creamy middle and the delicate base already look inviting once sliced.
For clean slices, I always use a sharp knife and wipe it between cuts. That small step makes a big difference, especially when serving guests. If I’m hosting, I’ll cut the cake in the kitchen, then plate each slice carefully so it looks neat and intentional.
A simple finishing touch goes a long way here. A light dusting of powdered sugar adds elegance without extra sweetness. Sometimes I’ll drizzle a thin line of chocolate sauce across the plate rather than the cake itself, which keeps the texture intact while making it feel restaurant-worthy.
Serve it chilled, but not ice-cold. Letting the cake sit out for a few minutes softens the cream slightly and brings out the vanilla flavor. It’s a subtle thing, but it makes every bite more luxurious.
Tips and Tricks to Make This Recipe Even Better
If there’s one thing I’ve learned from making this cake over and over, it’s that small details matter.
Make sure your base is fully baked. If it looks pale or soft, give it a few extra minutes. A properly baked base holds the cream without becoming soggy later.
When mixing the eggs into the dough, patience is your friend. It may look like it’s gone wrong at first, but keep stirring. The dough will smooth out, and that’s when you know you’re on the right track.
Chilling time is not optional. This cake needs time to settle and set. I usually make it a few hours ahead or even the night before. The flavor improves, and the texture becomes beautifully cohesive.
Lastly, don’t over-sweeten. Cream puff cake shines because it’s balanced. Let the cream be creamy, not cloying, and the whole dessert feels lighter and more refined.
Common Mistakes to Avoid
One common mistake is rushing the cooling process. Spreading the cream on a warm base will melt the filling and ruin the layers. Always wait until the base is completely cool.
Another issue is under-mixing or over-mixing the dough. You want it smooth and glossy, but not stiff or dry. Trust the texture rather than the clock.
Some people also overload the topping, thinking more is better. In this recipe, restraint wins. Too much topping can overpower the delicate cream and make the cake feel heavy.
Finally, skipping the chill time is a mistake I see often. The cake might taste fine right away, but it won’t slice cleanly or have the same polished finish.
How to Store It
Cream puff cake stores beautifully, which makes it perfect for leftovers or make-ahead plans.
Keep it covered in the refrigerator to prevent it from absorbing other flavors. An airtight container or tightly wrapped dish works best.
It will stay fresh for up to three days, though in my house it rarely lasts that long. The base softens slightly over time, but many people actually prefer it that way.
I don’t recommend freezing this cake. The cream layer doesn’t thaw well and can separate, affecting both texture and appearance.
FAQ
Can I make cream puff cake ahead of time?
Yes, and it’s actually better that way. Making it a few hours or a day ahead allows the layers to set properly.
Why did my base collapse after baking?
Some deflation is normal. If it collapsed completely, it may have been underbaked or exposed to a sudden temperature change.
Can I change the flavor of the filling?
Absolutely. Vanilla is classic, but subtle variations like almond or citrus work beautifully.
Is this cake very sweet?
No, that’s one of its strengths. It’s creamy and rich without being overpowering.
Can I use a different pan size?
Yes, but keep in mind that thickness and baking time may change slightly.

Cream Puff Cake Recipe
- Total Time: 1 hour plus chilli
- Yield: 9x13 1x
- Diet: Vegetarian
Description
This cream puff cake is everything I want in a dessert: light but satisfying, simple yet impressive. It takes the essence of a traditional cream puff and turns it into a shareable, sliceable cake that feels both nostalgic and special. The airy base, soft vanilla cream, and gentle sweetness come together in a way that never overwhelms. It’s the kind of recipe you make once and then return to whenever you need a reliable, comforting dessert that everyone loves.
Ingredients
- Butter
- Water
- All-purpose flour
- Eggs
- Vanilla pudding or custard base
- Whipped cream or creamy topping
- Vanilla extract
- Light topping of choice
Instructions
- Prepare the dough by heating butter and water, then mixing in flour.
- Incorporate eggs one at a time until smooth and glossy.
- Bake the base until puffed and golden, then cool completely.
- Prepare the cream filling and spread it evenly over the base.
- Add the topping and refrigerate until fully set.
Notes
- Let the cake chill long enough to firm up before slicing. For best flavor, serve slightly softened rather than straight from the fridge.
- Prep Time: 25 minutes
- Cook Time: 35 minutes
- Category: Dessert
- Method: Baking
- Cuisine: American
Nutrition
- Serving Size: 9×13
- Calories: 320
- Sugar: 18g
- Sodium: 210mg
- Fat: 20g
- Saturated Fat: 12g
- Unsaturated Fat: 7g
- Trans Fat: 0g
- Carbohydrates: 30g
- Fiber: 1g
- Protein: 6g
- Cholesterol: 95mg