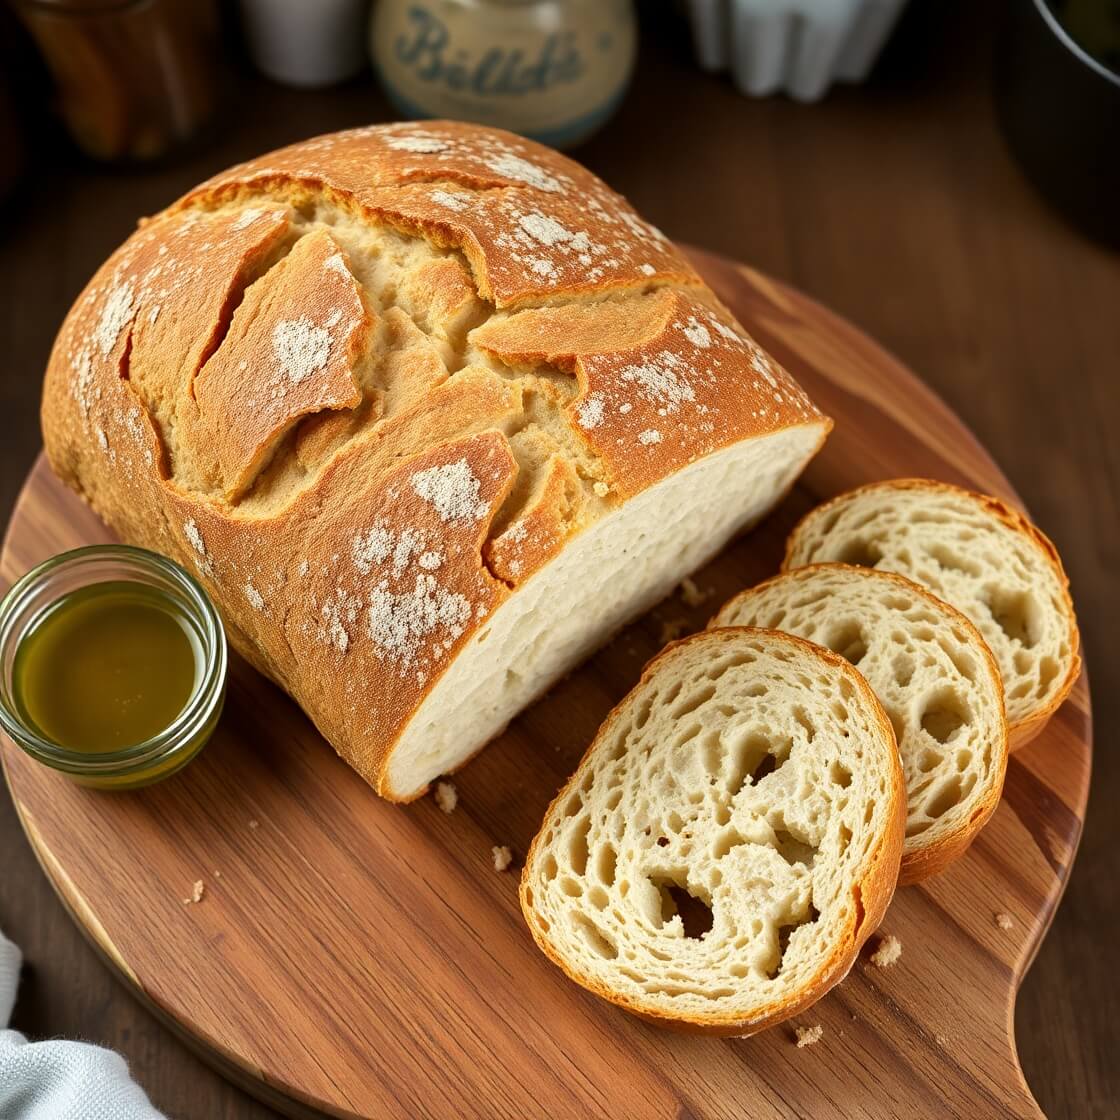
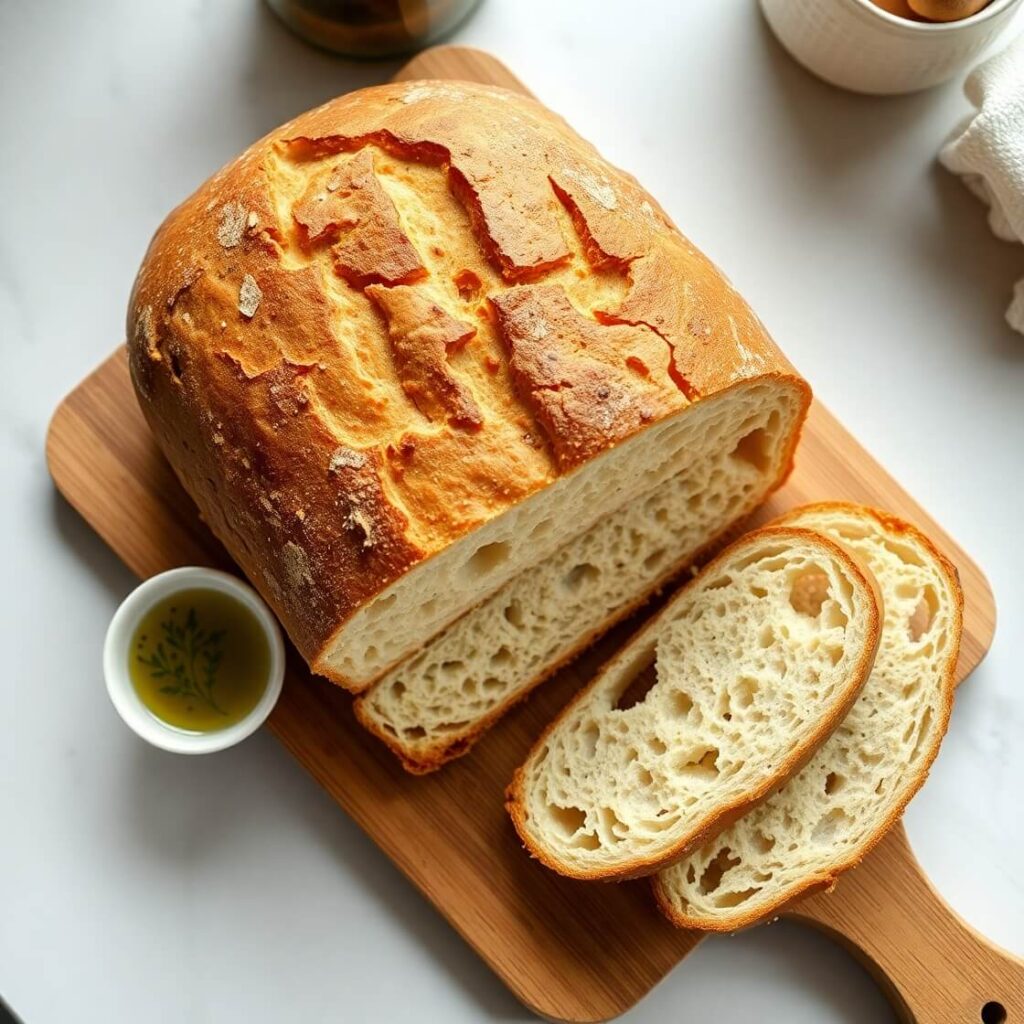
Ciabatta bread, with its rustic charm and delightfully airy crumb, has long been one of my favorite homemade breads. I first decided to try this recipe because I craved a loaf that was both crusty on the outside and soft on the inside — perfect for sandwiches or simply dipping into olive oil. There’s something so satisfying about making bread that feels artisanal yet surprisingly approachable to bake at home. If you’ve ever wanted to bake your own ciabatta but felt intimidated by the process, this recipe will guide you step-by-step with easy instructions and tips to get that signature chewy texture and beautiful holes inside.
Whether you’re a beginner baker or just want to add a new bread to your repertoire, this recipe is perfect. Keep reading — I promise you’ll want to bake this bread again and again.
Why I Love This Recipe

One of the reasons I’m so passionate about this ciabatta bread recipe is because it balances simplicity and technique beautifully. Ciabatta, which means “slipper” in Italian, is known for its open crumb structure and crispy crust, which can feel hard to master. This recipe embraces that challenge without overwhelming you.
The key here is a wet dough, which many shy away from. It’s what gives ciabatta its characteristic large air pockets and chewy texture. Unlike denser breads, this dough is sticky and loose, requiring a gentle touch, but the results are worth it. You get a loaf that’s light, flavorful, and versatile.
Another reason this recipe stands out is that it doesn’t rely on any fancy ingredients or equipment. Just flour, water, yeast, salt, and a bit of olive oil. It’s straightforward, budget-friendly, and incredibly rewarding. This recipe makes homemade ciabatta approachable, even for bakers who’ve never worked with high-hydration doughs before.
If you love bread that’s perfect for sandwiches, bruschetta, or just tearing apart with a little butter, this ciabatta recipe is a must-try.
Ingredients for Ciabatta Bread
To make the perfect ciabatta, you’ll need a handful of simple ingredients — but the quality really matters here. This bread relies on a few core elements working harmoniously:
- Flour: I recommend using bread flour with a higher protein content (around 12-14%). This helps develop gluten, which gives ciabatta its structure and chewy bite. You can experiment with a mix of bread and all-purpose flour, but bread flour gives the best results.
- Water: Use room temperature water to hydrate the dough. This recipe requires a lot of water relative to flour to create that wet, sticky dough that ciabatta is known for.
- Yeast: Active dry yeast or instant yeast both work well here. The yeast helps the dough rise and develop flavor.
- Salt: A must for taste! It also controls yeast activity and strengthens the dough.
- Olive oil: Adds richness and moisture to the bread, plus it helps the crust crisp up beautifully when baked.
I always suggest weighing your ingredients with a kitchen scale for accuracy, especially when working with wet doughs. Precision helps you achieve consistent results.
How Much Time Will You Need
Making ciabatta bread is not a quick fix — but it’s well worth your time. From start to finish, this recipe takes approximately 4 to 5 hours, including rising and baking.
- The dough needs a slow, gentle rise to develop flavor and that perfect airy crumb. Plan for at least 2 hours of rising time, sometimes more if your kitchen is cool.
- Preparing and shaping the dough is fairly quick, but handling the wet dough takes a bit of practice.
- Baking itself takes about 25 to 30 minutes, and then the bread should cool before slicing.
This is a recipe that rewards patience. The slow fermentation helps deepen the flavor, and the resting periods are key to getting the right texture.
How to Make This Ciabatta Bread

Now for the fun part — baking your own ciabatta loaf! Follow these detailed steps carefully to create bread that looks and tastes bakery-quality.
Step 1: Mix the yeast and water.
In a large mixing bowl, combine your yeast with warm water. Stir gently and let it sit for 5 minutes until foamy. This activates the yeast.
Step 2: Add flour, salt, and olive oil.
Add the bread flour and salt to the yeast mixture. Pour in the olive oil. Using a wooden spoon or a dough hook attachment on your mixer, mix everything until combined. The dough will be very sticky and loose — don’t worry, that’s normal!
Step 3: Knead gently.
If you’re kneading by hand, wet your hands and fold the dough over itself about 5-6 times to develop gluten. Alternatively, use a stand mixer with a dough hook on low speed for about 3 minutes. Avoid over-kneading as this dough is delicate.
Step 4: First rise.
Cover the bowl tightly with plastic wrap or a damp kitchen towel. Let the dough rise at room temperature for about 2 hours, until it has doubled in size and looks bubbly on the surface.
Step 5: Prepare your baking surface.
Dust a clean kitchen towel generously with flour or semolina flour. This prevents sticking when you shape the dough.
Step 6: Shape the dough.
Carefully turn the dough out onto the floured towel. Use floured hands or a bench scraper to gently fold it over itself a couple of times. Don’t deflate the dough — you want to keep as much air in it as possible. Shape it into a rough rectangle or slipper shape.
Step 7: Second rise.
Cover the dough loosely with another kitchen towel and let it rise for another 30 to 45 minutes.
Step 8: Preheat your oven and baking stone.
Preheat your oven to 450°F (230°C) with a baking stone or heavy baking sheet inside. Place an oven-safe dish with water at the bottom of the oven to create steam — this helps develop the crust.
Step 9: Transfer and bake.
Carefully slide the dough from the towel onto the preheated stone or baking sheet. Bake for 25 to 30 minutes until the crust is golden and crisp.
Step 10: Cool before slicing.
Remove the bread from the oven and let it cool on a wire rack for at least 30 minutes. This finishing step lets the crumb set perfectly.
Substitutions
If you want to tweak this recipe or work with what you have, here are some substitution ideas:
- Flour: If you don’t have bread flour, you can use all-purpose flour. The crumb won’t be quite as chewy or structured, but it will still be delicious. For a healthier twist, try substituting up to 25% whole wheat flour.
- Yeast: Instant yeast can replace active dry yeast 1:1, and it doesn’t require proofing in water first.
- Olive oil: You can substitute other mild oils like vegetable or canola oil, but olive oil adds signature flavor and richness.
- Salt: If reducing sodium, you can cut back to 1 teaspoon. The bread will be less savory but still good.
- Water: If your kitchen is warm, use cool water to slow fermentation. In colder kitchens, use warm water to speed it up.
Each substitution slightly alters the bread’s flavor and texture, so experiment to find what works best for your taste and pantry.
Best Side Dishes of Ciabatta Bread
Ciabatta shines as a companion to many meals, but here are my top three favorite side dishes that elevate the eating experience:
- Olive oil and balsamic vinegar dip: A simple classic that highlights the bread’s flavor and crust.
- Caprese salad: Fresh tomatoes, mozzarella, basil, and a drizzle of olive oil pair wonderfully with a slice of ciabatta.
- Hearty soups: Tomato basil, minestrone, or creamy mushroom soups are perfect for dipping pieces of ciabatta and soaking up all that delicious broth.
These sides balance texture and flavor, making every bite more enjoyable.
Serving and Presentation Tips
There’s something magical about serving homemade ciabatta — it instantly elevates the meal and impresses your guests. Whether you’re slicing it warm for a cozy dinner or arranging it on a rustic board for a casual brunch, presentation matters.
I like to serve ciabatta on a wooden cutting board, sliced diagonally into long, thin pieces. It gives a beautiful, rustic look that pairs well with artisan cheeses, cured meats, or even a simple olive tapenade.
If you’re hosting a dinner party, serve the bread warm wrapped in a linen cloth to keep it soft and cozy. For brunches or gatherings, lightly toast slices and arrange them beside spreads like hummus, whipped feta, or herbed butter.
And if you’re making sandwiches, cut the loaf horizontally and layer it with roasted vegetables, prosciutto, or fresh mozzarella. The bread’s chewy structure holds up well to juicy fillings without getting soggy.
Tips and Tricks to Make This Recipe More Better
Let me share a few behind-the-scenes secrets I’ve learned from trial and error — these will seriously help take your ciabatta to the next level.
- Use a wet dough scraper or oiled hands: Since ciabatta dough is high hydration, it sticks to everything. A wet bench scraper makes shaping easier without tearing the dough.
- Don’t skip the second rise: This resting period helps develop that open crumb and airy texture. Rushing this step will result in denser bread.
- Steam in the oven: Adding steam during baking helps the crust form properly. I place a metal pan with water in the bottom of the oven and spray the sides of the oven with water right after placing the dough in.
- Let it cool completely before slicing: It’s tempting to dive right in, but cutting too soon releases steam and can make the crumb gummy.
- Use a baking stone if possible: It retains heat evenly and gives a great crust on the bottom of the loaf.
These small steps really improve the texture, crust, and flavor of your bread. They also make the baking process a bit easier.
Common Mistakes to Avoid
Ciabatta is simple in ingredients but technique matters. Here are the most common mistakes to watch out for — I’ve made them all at some point!
- Adding too much flour: Because the dough is sticky, it’s tempting to add more flour. Resist that urge! Extra flour can make the bread heavy and dry. Embrace the stickiness.
- Over-kneading the dough: Unlike typical bread, ciabatta doesn’t require intense kneading. Over-mixing can actually deflate the air bubbles and result in a tighter crumb.
- Skipping the rest periods: Don’t rush the rises or skip the final proof. These breaks help gluten relax and air pockets to develop, which are signature features of good ciabatta.
- Baking in a cool oven: Make sure your oven is fully preheated before the dough goes in. A hot oven ensures the dough springs up nicely.
- Not using steam: Without steam, the crust turns dull and hard instead of crisp and crackly. You can add steam with a pan of water or a few spritzes during baking.
Avoiding these mistakes makes a huge difference between “just okay” bread and “wow, did you really make this?” bread.
How to Store It
Homemade ciabatta is best enjoyed fresh, especially on the first day when the crust is at its crispiest. But it stores well if you plan it right.
For short-term storage (1–2 days):
Wrap the completely cooled loaf in parchment or paper bag and store at room temperature. Avoid plastic, which traps moisture and softens the crust.
To refresh the crust:
If the crust softens, pop the loaf into a preheated 350°F (175°C) oven for 5–7 minutes to bring back its crunch.
For longer storage (up to 3 months):
Slice the loaf, wrap the pieces in plastic or parchment, then place in a freezer bag and freeze. This makes it easy to toast a slice straight from frozen without thawing.
To thaw:
Let slices thaw at room temperature or reheat in the oven or toaster for 5–10 minutes. The texture comes back beautifully.
Ciabatta doesn’t refrigerate well — it dries out quickly — so freeze instead if you need to save it.
FAQ
What makes ciabatta different from other breads?
Ciabatta is a high-hydration Italian bread with a chewy interior, open crumb, and crisp crust. It’s wetter than traditional sandwich loaves and baked freeform rather than in a pan.
Can I use all-purpose flour instead of bread flour?
Yes, you can. The crumb may not be as chewy, and the holes might be smaller, but the bread will still taste amazing.
How do I know when the dough has risen enough?
It should double in size and look bubbly on the surface. When you poke it gently, the dough should leave a slight indentation that slowly springs back.
Why is my dough so sticky?
That’s normal! Ciabatta dough is supposed to be sticky and loose. Resist adding more flour — use floured hands or a scraper instead.
Can I make this recipe without a stand mixer?
Absolutely. While a mixer helps, you can mix by hand with a wooden spoon and use stretch-and-fold techniques during the rise to develop gluten.
Ciabatta Bread Recipe
- Total Time: About 4 hours (including rising)
- Yield: 1 1x
- Diet: Vegetarian
Description
If you’ve ever wanted to bake rustic Italian bread at home, this homemade ciabatta recipe is the one to try. With just a few ingredients and some patience, you’ll create a beautiful loaf that’s crisp on the outside, airy and chewy on the inside. This recipe focuses on simple techniques that yield big results. Whether you enjoy it with olive oil and balsamic vinegar, turn it into a gourmet sandwich, or use it to mop up pasta sauce, ciabatta will quickly become a staple in your kitchen.
Ingredients
- 3 ½ cups (450g) bread flour
- 1 ½ cups (360ml) water, room temperature
- 2 tsp salt
- 1 ½ tsp active dry yeast
- 1 tbsp olive oil
Instructions
- Mix yeast with water and let it bloom for 5 minutes.
- Stir in flour, salt, and olive oil until a sticky dough forms.
- Knead gently with wet hands or in a mixer until just combined.
- Cover and let rise for 2 hours until doubled.
- Turn out onto a floured towel and shape gently into a rectangle.
- Let rise again for 30–45 minutes.
- Preheat oven to 450°F with baking stone and steam pan inside.
- Carefully transfer dough to hot stone and bake 25–30 minutes.
- Cool completely before slicing.
Notes
- Use bread flour for the best crumb structure.
- Don’t add extra flour — the dough should stay sticky.
- Add steam to the oven for a beautiful crust
- Prep Time: 20 minutes
- Cook Time: 30 minutes
- Category: Bread
- Method: Baking
- Cuisine: Italian
Nutrition
- Serving Size: 1
- Calories: 175
- Sugar: 0.2g
- Sodium: 290mg
- Fat: 1.8g
- Saturated Fat: 0.3g
- Unsaturated Fat: 1.4g
- Trans Fat: 0g
- Carbohydrates: 34g
- Fiber: 1.5g
- Protein: 5.6g
- Cholesterol: 0mg