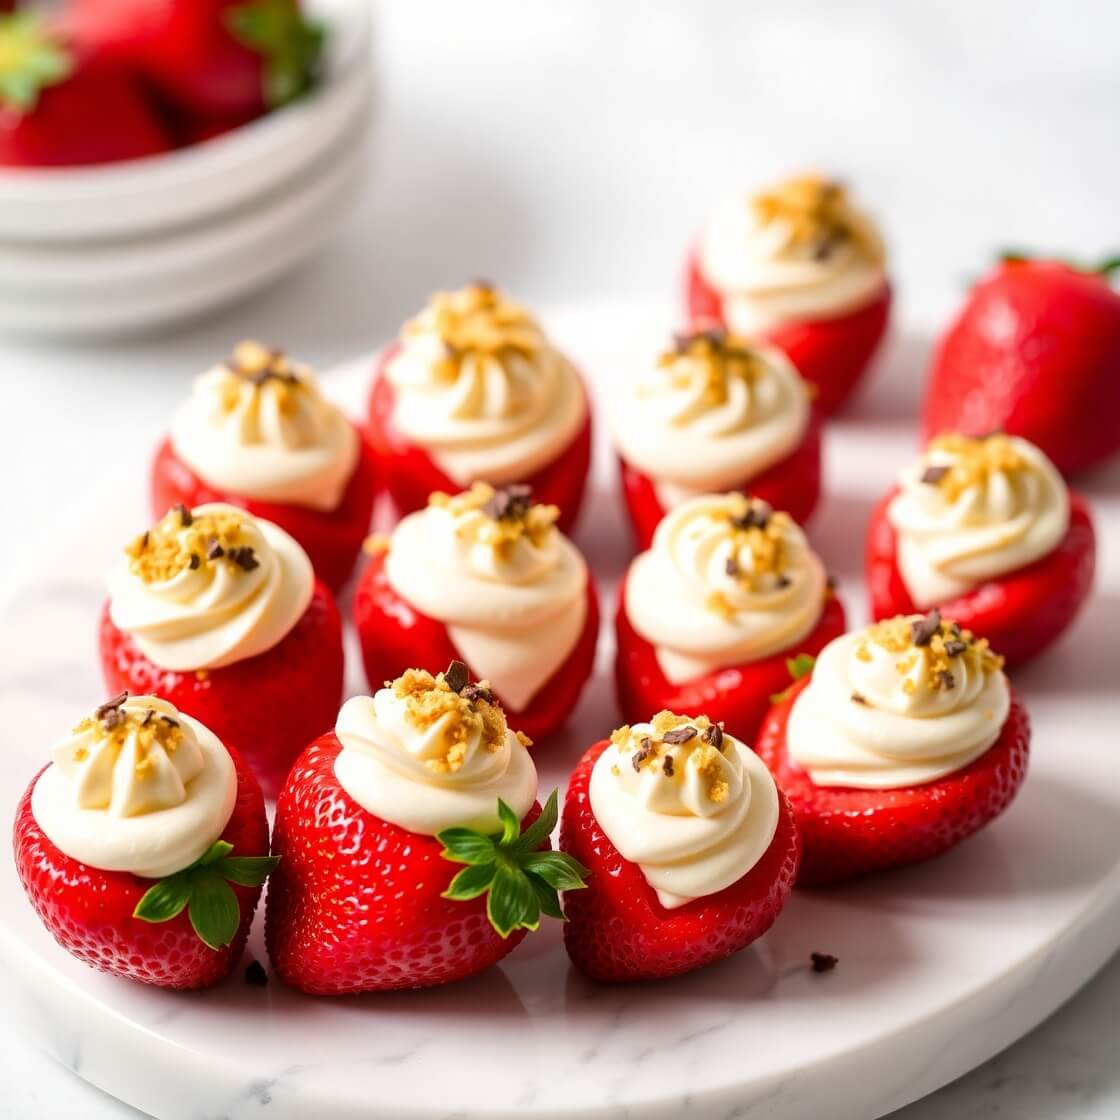
The very first time I made cheesecake deviled strawberries, it was for a springtime brunch with friends. I wanted something light, fresh, and just a little indulgent. Something that looked elegant on a platter, but didn’t require a water bath or a dozen steps like a traditional cheesecake. Enter: these dreamy little strawberry bites.
Imagine the elegance of cheesecake with the fruity brightness of strawberries — all in a poppable, finger-food form. That’s what makes this dessert so irresistible.
You don’t have to be a pastry chef to whip these up, and they’re always the first to disappear at any gathering. They’re one of those clever treats that look fancy but are surprisingly simple. You just hollow out fresh strawberries and pipe in a creamy, lightly sweet cheesecake filling. That’s it. And yet — they wow every time.
Why I Love This Recipe

What makes cheesecake deviled strawberries so special isn’t just the flavor — it’s the experience. The juicy, slightly tangy strawberries contrast beautifully with the rich, silky cheesecake filling. Each bite is a perfect balance of sweet and tart, soft and juicy.
I love how customizable they are, too. You can top them with graham cracker crumbs for that nostalgic cheesecake flavor, or go bold with shaved chocolate, crushed pistachios, or even a drizzle of balsamic glaze if you’re feeling gourmet.
These little treats are ideal for nearly every occasion. From baby showers to date nights, potlucks to after-dinner cravings — they fit the mood. Plus, they’re no-bake, which is a lifesaver during hot months when you don’t want to turn on the oven.
Another reason I keep coming back to this recipe is how crowd-friendly it is. Kids love them, adults are impressed by them, and they fit almost every diet preference. They’re also gluten-free, which makes them an easy choice when you want to serve something universally appealing.
Ingredients for Cheesecake Deviled Strawberries
The magic of this recipe lies in its simplicity. With just a few key ingredients, you can create a dessert that looks like it came from a patisserie.
Here’s what you’ll need:
Fresh strawberries: Choose large, firm strawberries that can hold the filling well. You’ll want them to be as uniform as possible in size for the best presentation.
Cream cheese: Full-fat is best for that classic rich and creamy cheesecake texture. Make sure it’s softened to room temperature for easier mixing.
Powdered sugar: This adds sweetness to the filling without the gritty texture that granulated sugar can sometimes cause.
Vanilla extract: Just a splash brings depth and warmth to the filling, complementing the berries beautifully.
Heavy cream: Optional but highly recommended. A small amount helps create a lighter, silkier texture when whipped into the cream cheese mixture.
Graham cracker crumbs: For that traditional cheesecake “crust” flavor, sprinkled on top. You can skip this or swap it for crushed cookies or nuts, depending on your taste.
Optional toppings: Think mini chocolate chips, lemon zest, shaved white chocolate, crushed pistachios, or even a drizzle of caramel sauce.
With such a short ingredient list, the quality of your ingredients really matters. Use fresh, ripe berries, good vanilla, and real cream cheese (no low-fat substitutes here unless you’re intentionally adjusting the texture).
How Much Time Will You Need
This is one of those quick and easy recipes that delivers maximum flavor for minimal effort. Here’s a breakdown of the timing:
- Prep time: 15–20 minutes
- Assembly time: 10–15 minutes
- Chill time (optional): 15–30 minutes (if you want them to firm up slightly before serving)
In total, you can have these on the table in about 30–45 minutes. That’s faster than baking a cake or chilling a full cheesecake — and you don’t even need an oven.
How to Make This Cheesecake Deviled Strawberries
Follow these detailed steps and you’ll be enjoying these beauties in no time:
Step – 1: Prep the strawberries
Wash and dry the strawberries thoroughly. Remove the green stems by slicing off the tops, creating a flat base so the berries can stand upright.
Using a small paring knife or a melon baller, gently scoop out the center of each strawberry to create a hollow pocket for the filling. Be careful not to puncture the bottom or sides — you want the filling to stay inside.
Step – 2: Make the cheesecake filling
In a mixing bowl, beat the softened cream cheese using a hand mixer or stand mixer until smooth and fluffy. This usually takes about 2–3 minutes.
Add the powdered sugar and vanilla extract. Beat again until fully combined and silky. If you’re using heavy cream, add a tablespoon at a time and beat until the filling becomes airy and slightly whipped. The texture should be pipeable but not runny.
Step – 3: Fill the strawberries
Spoon the cheesecake mixture into a piping bag fitted with a star tip or a round tip. If you don’t have a piping bag, use a zip-top bag with the corner snipped off — it works just fine.
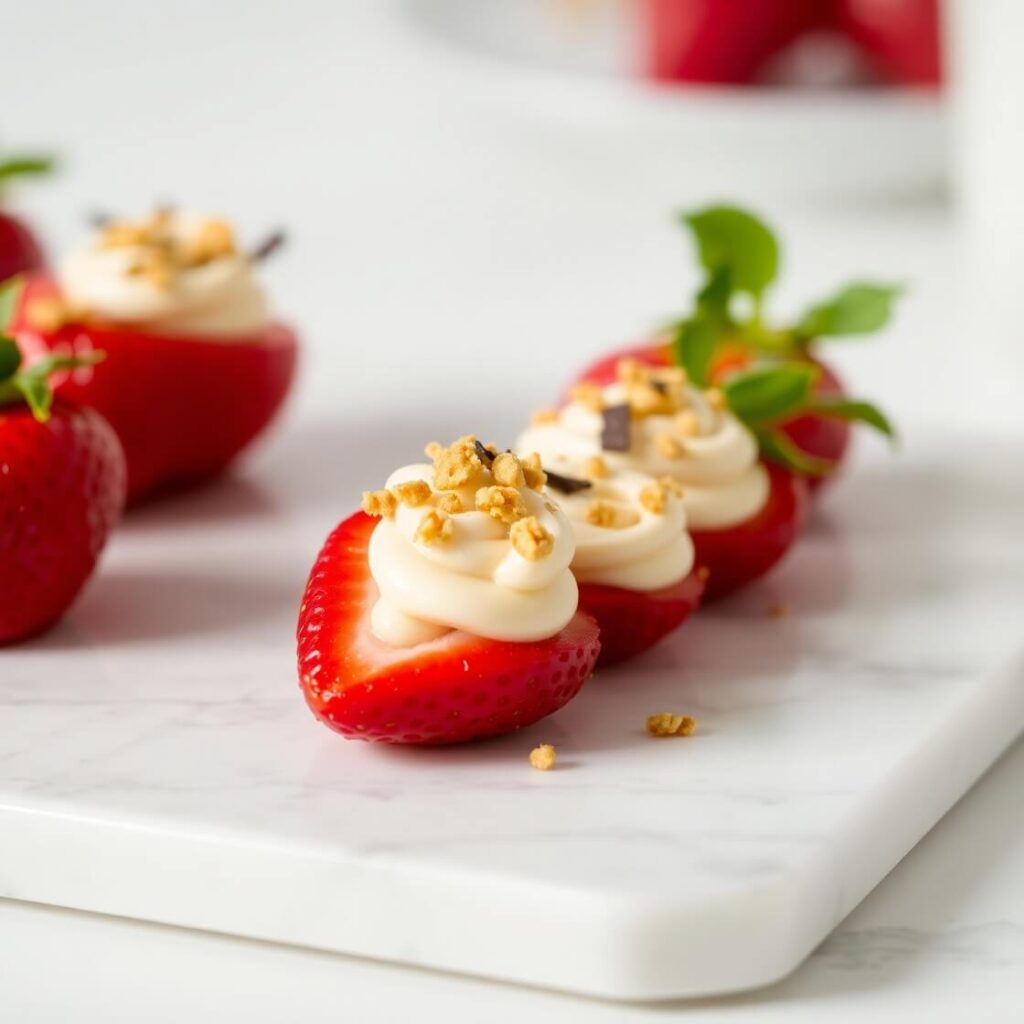
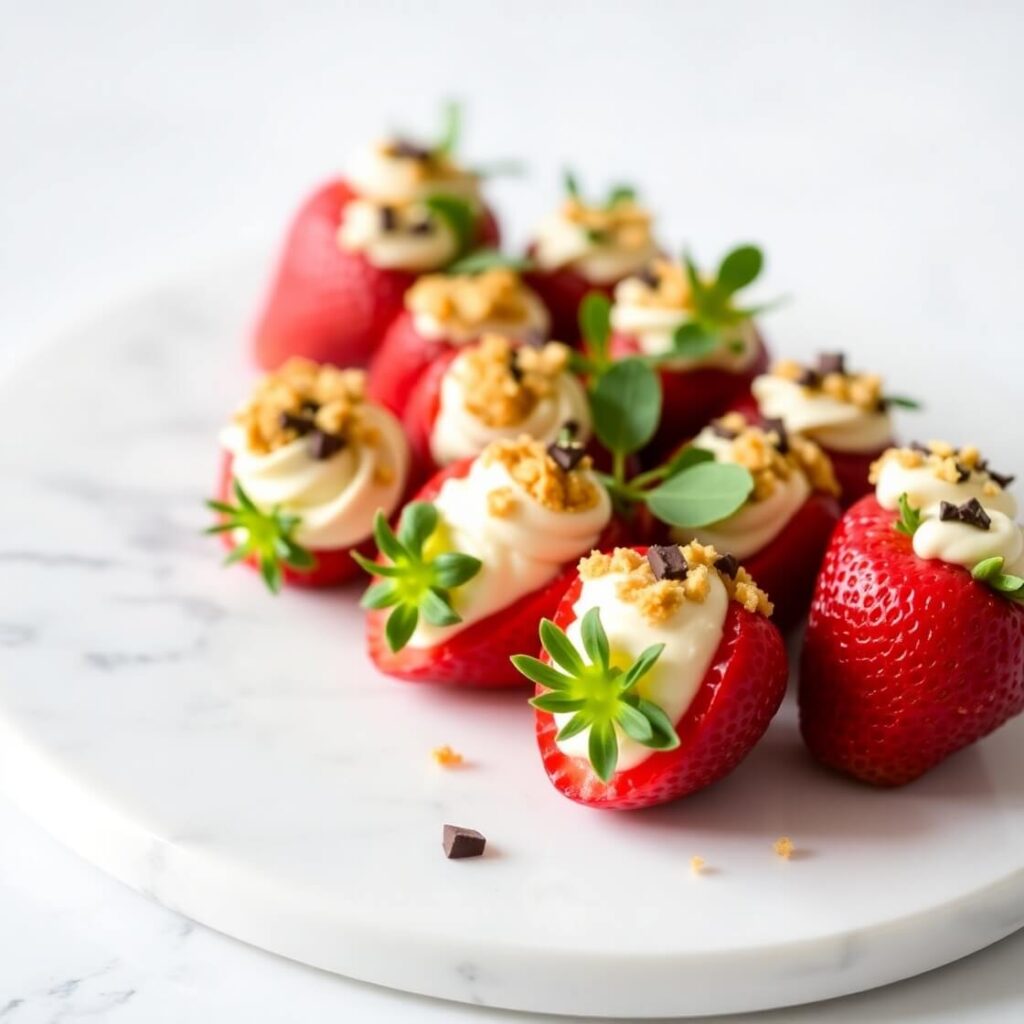
Pipe the filling into each hollowed-out strawberry, creating a small swirl on top for that “deviled” look. Don’t overfill; just enough to crown the top.
Step – 4: Add toppings
Sprinkle with graham cracker crumbs, or get creative with toppings. Crushed nuts, mini chocolate chips, or lemon zest can add flair and flavor.
Step – 5: Chill (optional)
If you’re serving immediately, they’re ready to go! But for a firmer texture, pop them in the fridge for 15–30 minutes to let the filling set up.
Step – 6: Serve and enjoy
Arrange them on a platter, admire their beauty for a moment, and then dig in. These go fast — don’t expect leftovers.
Substitutions
Let’s say you’re out of an ingredient or want to make a healthier twist — this recipe is flexible enough to adapt.
No graham crackers? Try crushed vanilla wafers, digestive biscuits, or even Oreo crumbs. Crushed nuts like pecans or almonds add crunch without gluten.
Need a dairy-free version? Use a plant-based cream cheese (almond or cashew based) and whip it with coconut cream instead of heavy cream. The texture won’t be exactly the same, but it will still be delicious.
Watching your sugar intake? Swap powdered sugar with a powdered sugar substitute like monk fruit or Swerve. Just be sure to taste and adjust as you go.
Don’t want to pipe? Spoon the filling in — it’s less decorative but still just as tasty. Or top the strawberries with a dollop of filling and garnish for a more rustic look.
Best Side Dish of Cheesecake Deviled Strawberries
While these little bites can easily stand alone, pairing them with the right sides can create a truly complete dessert experience.
Mini lemon tarts: Their zesty bite balances the richness of the cheesecake filling.
Sparkling fruit salad: Fresh melon, citrus, and berries tossed in a splash of sparkling water or juice adds brightness and contrast.
Chocolate-dipped pretzels: Add a salty-sweet element that brings a crunch to your dessert plate.
These sides work well for brunches, dessert platters, or any event where you want a little extra variety without overpowering the strawberries.
Serving and Presentation Tips
Presentation is everything when it comes to a dish like this. Because cheesecake deviled strawberries are so simple, their visual appeal really does the talking.
I love serving them on a white or marble platter — something that makes the red pop and gives them a more refined look. If I’m feeling extra, I’ll sprinkle the platter with a dusting of powdered sugar or edible flowers around the edge for a whimsical touch.
If you’re serving these for a party, you can nestle each strawberry into a mini cupcake liner. It helps keep things clean and polished, especially for guests who’ll be grabbing them with their fingers. For more formal occasions, pair them with mini dessert forks or toothpicks topped with a decorative flag or bead.
Another fun trick? Alternate rows of plain and topped strawberries (some with graham crackers, some with chocolate chips, etc.) to create contrast and interest on the serving tray.
Tips and Tricks to Make This Recipe Even Better
Want to take your cheesecake deviled strawberries to the next level? Here are a few tips I’ve learned along the way:
- Use room temperature cream cheese for the silkiest filling. Cold cream cheese will stay lumpy and won’t whip properly.
- Whip the filling well — a couple of minutes extra can really help lighten it up, especially if you’re using heavy cream. You want it fluffy and pipeable, not dense.
- Dry the strawberries completely after washing. Water inside the berries can make the filling runny or dilute the flavor. I like to pat them dry with paper towels and let them sit stem-side down to drain any excess juice.
- Chill before serving. This helps the filling firm up and keeps everything fresh longer, especially if you’re prepping them a couple of hours in advance.
- Use a sturdy piping bag (or a freezer zip-top bag) — especially if you’re adding toppings like cookie crumbs, which can sometimes clog thin tips.
- Prep components ahead of time. You can wash and hollow the strawberries a few hours ahead and store them in the fridge, then pipe in the filling just before serving.
Common Mistakes to Avoid
Even though this is an easy recipe, a few simple missteps can impact the results:
- Using overripe strawberries: They might look juicy and sweet, but overly soft strawberries will collapse once filled. Choose firm, ripe berries instead.
- Under-whipping the filling: If your filling is too soft, it’ll slide right out of the strawberries. Make sure it’s thick enough to hold shape when piped.
- Skipping the chill: The flavors meld better and the texture improves after a short chill. Don’t skip this step if you have time.
- Not drying the strawberries: Moisture is the enemy of a fluffy filling. Let the strawberries fully dry before filling.
- Overfilling: While it’s tempting to pipe a big swirl of filling, too much will overwhelm the berry and might spill over or become messy to eat.
How to Store It
If you happen to have leftovers (rare, but it happens!), store them in an airtight container in the refrigerator. I recommend placing them in a single layer on a paper towel-lined tray to absorb any excess moisture and prevent sogginess.
They’ll stay fresh for about 1 to 2 days — after that, the strawberries begin to soften too much. Avoid stacking them, as the filling will smudge and make them less pretty.
I don’t recommend freezing these. The texture of both the strawberries and the filling suffers after thawing.
If you’re prepping for a party, you can make the filling up to 2 days ahead and store it in a sealed piping bag or container in the fridge. Then fill and top the strawberries shortly before serving.
FAQ
Can I make these the night before?
You can prepare the filling and hollow the strawberries ahead, but it’s best to assemble them the day you plan to serve. They can sit in the fridge for a few hours once filled, but longer than that and the berries may begin to soften.
Do I have to use a piping bag?
Not at all. A spoon works just fine. But for that signature deviled look, a piping bag adds a beautiful finish.
Can I make these vegan?
Yes! Use a dairy-free cream cheese (like almond- or coconut-based), and coconut cream in place of heavy cream. Taste and adjust sweetness as needed.
Are these gluten-free?
They are naturally gluten-free, but if you’re adding graham cracker crumbs, be sure to use a gluten-free version or another topping like nuts or cocoa powder.
What can I top them with besides graham crackers?
Great alternatives include: crushed Oreos, toasted coconut, chopped pistachios, mini chocolate chips, or even a drizzle of melted chocolate or caramel.

Cheesecake Deviled Strawberries
- Total Time: 30–40 minutes
- Yield: 6–8 1x
- Diet: Gluten Free
Description
A fun and elegant no-bake dessert, these cheesecake deviled strawberries are perfect for brunches, parties, or anytime you want something light and sweet. Hollowed-out strawberries are filled with a rich, creamy cheesecake mixture and topped with your favorite garnish — from graham cracker crumbs to crushed pistachios or chocolate chips. They look fancy but come together quickly, and the flavor is just as good as their presentation.
Ingredients
- 20 large strawberries
- 8 oz cream cheese, softened
- 1/3 cup powdered sugar
- 1 tsp vanilla extract
- 2–3 tbsp heavy cream (optional, for light texture)
- 2 tbsp graham cracker crumbs (or toppings of choice)
Instructions
- Wash and dry strawberries. Slice off tops to create a flat base and hollow out centers with a paring knife or melon baller.
- In a mixing bowl, beat cream cheese until smooth. Add powdered sugar and vanilla extract; mix until creamy.
- Add heavy cream, one tablespoon at a time, and beat until light and fluffy (optional).
- Transfer mixture to a piping bag with a star tip (or zip-top bag) and fill each strawberry with cheesecake filling.
- Top with graham cracker crumbs or your favorite garnish.
- Chill in refrigerator for 15–30 minutes before serving.
Notes
- Use firm, ripe strawberries that can stand upright.
- You can make the filling a day ahead.
- Get creative with toppings — lemon zest, crushed cookies, or nuts all work well.
- Serve in mini cupcake liners for a cleaner presentation.
- Prep Time: 20 minutes
- Cook Time: 0 minutes
- Category: Dessert
- Method: No-bake
- Cuisine: American
Nutrition
- Serving Size: 6–8
- Calories: 105
- Sugar: 8g
- Sodium: 55mg
- Fat: 7g
- Saturated Fat: 4g
- Unsaturated Fat: 3g
- Trans Fat: 0g
- Carbohydrates: 9g
- Fiber: 1g
- Protein: 1g
- Cholesterol: 20mg