Cheesecake bars are one of those wonderfully indulgent treats that blend the rich, creamy texture of traditional cheesecake with the convenience and fun of a handheld dessert. I created this recipe because I wanted a simple, no-fuss way to enjoy the luxurious flavor of cheesecake without having to cut perfect slices or worry about a crumbly crust. Whether you’re hosting a casual get-together or craving a quick dessert fix, cheesecake bars are an ideal choice.
If you love cheesecake but sometimes find it intimidating or time-consuming to make, these bars will change the way you think about it. With a buttery crust and luscious filling baked into neat squares, it’s easy to share, serve, and savor. And the best part? You can customize them with your favorite flavors, toppings, or swirls. Keep reading to find out why this recipe is a must-try and exactly how to make these delightful cheesecake bars in your own kitchen.
Why I Love This Recipe

There’s something so satisfying about cheesecake bars that’s different from a traditional cheesecake.
First, they are incredibly versatile. The bars give you all the creamy, tangy, sweet goodness of cheesecake but packaged in a form that’s perfect for snacking or serving at parties. No need for fancy knives or plates—just grab a bar and enjoy.
Second, this recipe is approachable for all skill levels. Even if you’ve never baked a cheesecake before, these bars are forgiving and easy to make. The crust is buttery and crisp without being complicated, and the filling bakes evenly without cracks or sinking centers.
Third, cheesecake bars are easier to store and transport than round cheesecakes, which makes them great for potlucks or gifts. Plus, the flavor is rich and indulgent without being overwhelmingly sweet, striking a perfect balance that cheesecake lovers will adore.
I think people make this recipe because it hits the sweet spot of convenience, taste, and elegance. Whether you’re baking for family, impressing guests, or treating yourself, these cheesecake bars deliver a lovely dessert experience that feels special but is surprisingly simple.
Ingredients for Cheesecake Bars
When it comes to cheesecake bars, the ingredients are straightforward but quality matters a lot. The foundation is a buttery crust and a creamy filling with just the right balance of tang and sweetness.
For the crust, you’ll want finely ground graham cracker crumbs mixed with melted butter and a touch of sugar. This gives the base a crispy, slightly sweet texture that complements the richness of the filling.
The filling calls for cream cheese, which should be softened for the smoothest texture. Full-fat cream cheese works best for that classic creamy mouthfeel. Along with the cream cheese, you’ll use sugar, eggs, and vanilla extract for flavor. A small amount of sour cream or heavy cream adds silkiness and a slight tang that balances the sweetness.
You might also want to add a pinch of salt to enhance the flavors, and optional lemon zest or juice if you like a hint of citrus brightness.
All these ingredients come together to create bars that taste like a traditional cheesecake but with a crisp, easy-to-handle crust.
How Much Time Will You Need
This cheesecake bars recipe is pretty efficient compared to a full cheesecake.
Prep time usually takes around 15 to 20 minutes — mostly getting your crust ready and mixing the filling until it’s silky smooth.
The baking time is about 35 to 40 minutes. You’ll bake until the edges are set and the center is just slightly jiggly — that perfect creamy texture. After baking, you’ll need to let the bars cool at room temperature for about 30 minutes, then chill them in the fridge for at least 3 hours to fully set.
In total, you’re looking at roughly 4 hours, but most of that is hands-off time while the bars chill. So it’s great to prepare in advance or while you’re busy with other things.
How to Make This Cheesecake Bars

Step – 1: Prepare your pan by lining an 8×8 inch baking dish with parchment paper. Leave some overhang on the sides so it’s easier to lift the bars out after baking.
Step – 2: Make the crust by combining graham cracker crumbs, melted butter, and sugar in a bowl. Stir until the mixture resembles wet sand.
Step – 3: Press the crust mixture firmly and evenly into the bottom of the prepared pan. Use the back of a spoon or a flat-bottomed glass to compact it tightly.
Step – 4: Bake the crust in a preheated oven at 350°F (175°C) for about 8-10 minutes until lightly golden and fragrant. Remove and let it cool slightly.
Step – 5: While the crust bakes, beat the softened cream cheese in a large bowl until smooth and fluffy using an electric mixer.
Step – 6: Add sugar and beat until fully combined and creamy.
Step – 7: Mix in the eggs one at a time, beating well after each addition.
Step – 8: Add vanilla extract and sour cream or heavy cream, then mix until the batter is silky and smooth. Avoid overmixing, which can add too much air and cause cracks.
Step – 9: Pour the cheesecake filling over the slightly cooled crust, spreading it evenly with a spatula.
Step – 10: Bake for 35-40 minutes. The edges should be set, but the center will still have a slight wobble when you gently shake the pan.
Step – 11: Remove from oven and let the bars cool to room temperature before transferring to the fridge.
Step – 12: Refrigerate for at least 3 hours, preferably overnight, until fully set.
Step – 13: Use the parchment paper overhang to lift the cheesecake slab from the pan. Cut into bars or squares using a sharp knife wiped clean between cuts.
Enjoy!
Substitutions
One of the best things about cheesecake bars is how flexible the recipe can be with substitutions.
For the crust, if you don’t have graham crackers, you can use digestive biscuits, vanilla wafers, or even finely crushed pretzels for a salty twist.
If you want to make this recipe gluten-free, swap the graham crackers for gluten-free cookie crumbs. Just make sure your butter and other ingredients are gluten-free as well.
For the cream cheese, if you want a lighter version, you can use Neufchâtel cheese which has less fat but still keeps the creamy texture.
If you prefer a dairy-free or vegan option, try a vegan cream cheese alternative and use coconut oil or vegan butter for the crust.
Instead of sugar, you can try natural sweeteners like honey, maple syrup, or coconut sugar, but keep in mind the texture and sweetness level might change slightly.
You can also add flavor variations like swirling in melted chocolate, adding fresh fruit puree, or topping with nuts or caramel before baking.
These substitutions allow you to customize the bars based on your dietary needs or flavor preferences without sacrificing that classic cheesecake feel.
Best Side Dish of Cheesecake Bars
To elevate your cheesecake bars experience, here are three side dishes that pair beautifully and make your dessert time extra special:
- Fresh berries — strawberries, blueberries, or raspberries add a burst of juicy freshness that balances the richness of the cheesecake.
- Whipped cream — a dollop of lightly sweetened whipped cream adds a fluffy, airy contrast.
- Espresso or coffee — the slight bitterness of a good coffee complements the sweet, creamy bars perfectly.
These simple accompaniments round out the dessert beautifully and make serving cheesecake bars even more delightful.
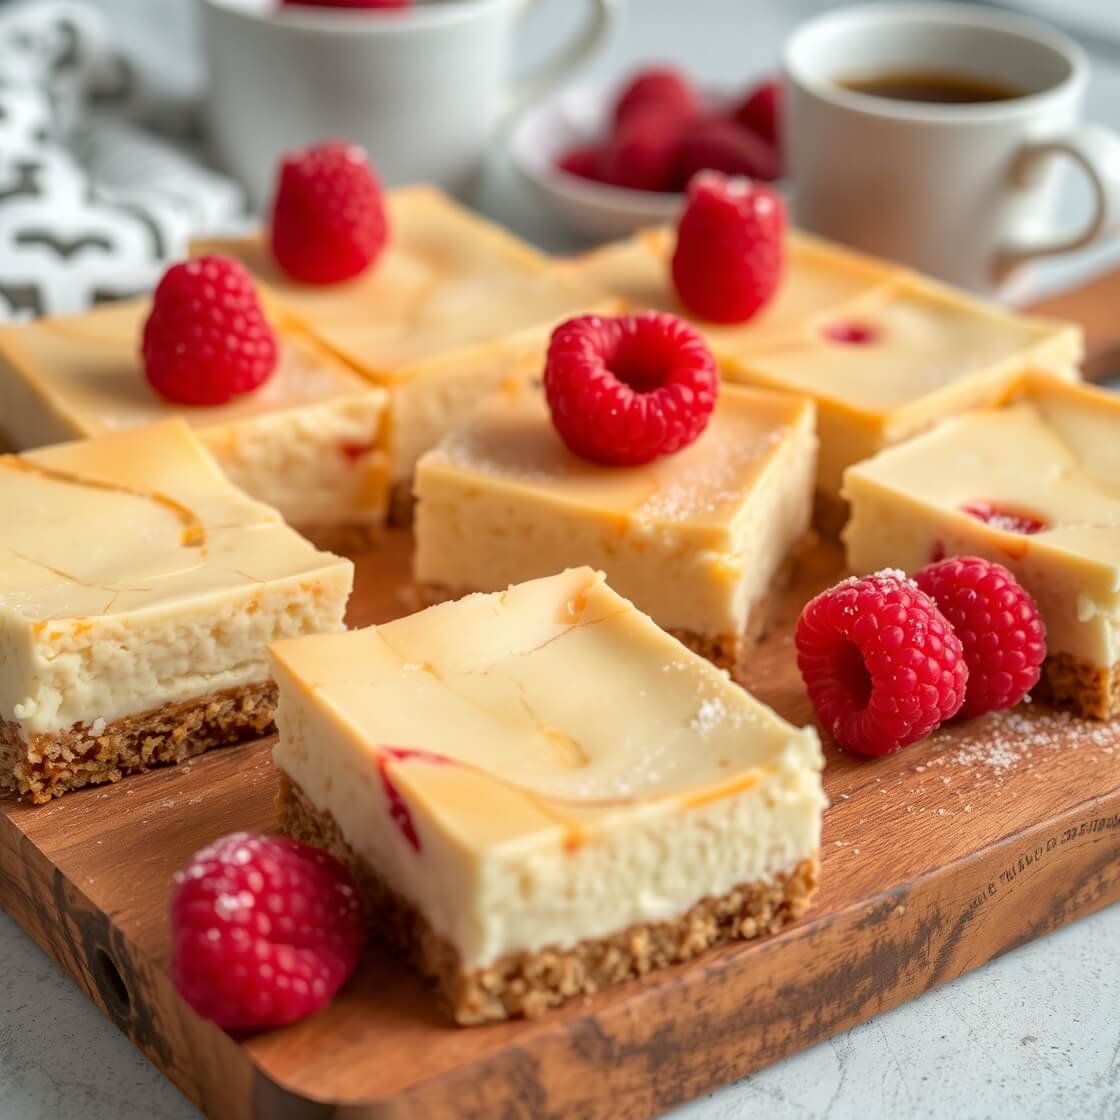
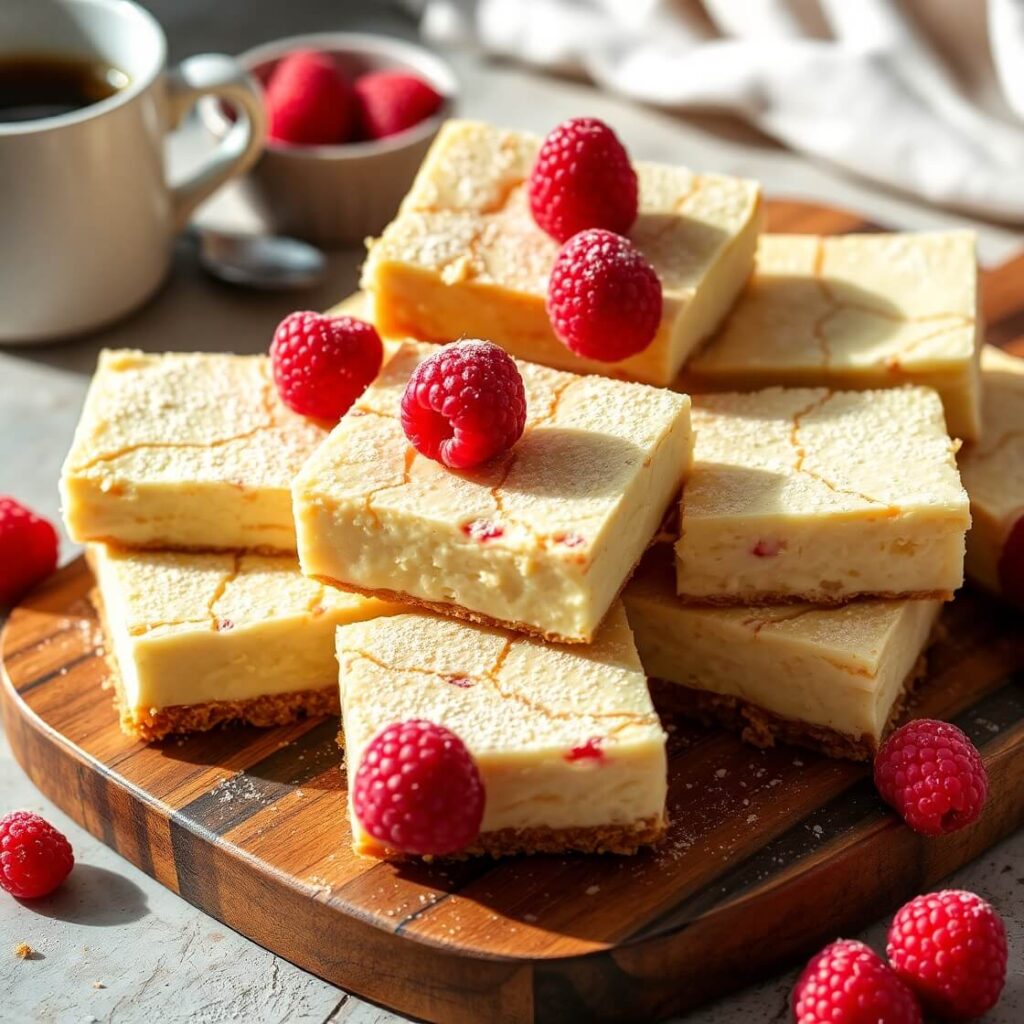
Serving and Presentation Tips
Serving cheesecake bars is an opportunity to get creative and make your dessert look as irresistible as it tastes. One of my favorite ways to present these bars is by cutting them into perfectly even squares and arranging them neatly on a decorative platter or slate board. Using the parchment paper overhang to lift the whole slab out of the pan makes this so much easier, and ensures clean edges on each bar.
For a simple yet elegant touch, dust the tops lightly with powdered sugar or cocoa powder just before serving. You can also drizzle melted chocolate or caramel sauce over the bars in thin ribbons to add a bit of visual flair and extra flavor. Fresh berries or a sprig of mint on the side add color and freshness that contrast beautifully with the creamy cheesecake.
If you want to take presentation to the next level for a special occasion, consider layering the bars on a tiered dessert stand or serving each bar individually in small dessert plates with a side of whipped cream and a few berries. Using pretty forks or dessert spoons enhances the overall experience and makes your guests feel pampered.
Remember, presentation is not just about looks — it’s about making dessert time feel joyful and inviting. Keep it simple, fresh, and appealing, and your cheesecake bars will steal the show every time.
Tips and Tricks to Make This Recipe Even Better
Every great recipe benefits from a few insider tips to make it foolproof and delicious every time. For these cheesecake bars, the first key is using room temperature cream cheese. This helps the filling blend smoothly and prevents lumps, giving you that silky texture everyone loves.
When mixing the filling, beat the cream cheese first until smooth, then gradually add the sugar and eggs one at a time. This technique prevents overmixing and helps keep the batter from getting too airy, which can cause cracks or holes after baking.
Make sure not to overbake the bars — the center should still have a slight jiggle when you take them out. They will continue to set as they cool, and overbaking can dry them out.
For easy slicing, chill the bars thoroughly for at least 3 hours or overnight. Run a sharp knife under hot water, wipe dry, and slice between bars. This gives you clean, smooth edges without crumbling.
If you like, try adding a swirl of fruit preserves, chocolate, or caramel into the batter before baking. Use a toothpick or knife to create pretty marbled patterns that add flavor and visual interest.
Finally, always line your pan with parchment paper with some overhang — it makes lifting out the entire cheesecake slab a breeze and keeps the bars intact.
Common Mistakes to Avoid
Even a simple recipe can have pitfalls, but knowing what to avoid can save you time and frustration.
One common mistake is not softening the cream cheese enough. Cold cream cheese won’t mix well and can cause a lumpy filling.
Overmixing the batter is another. Too much air incorporated can lead to cracks on the surface or a dense texture.
Not baking long enough or overbaking are both issues. Undercooked bars may be runny in the middle, while overbaked ones become dry and crumbly. Aim for the center to jiggle slightly when you pull them from the oven.
Skipping the chilling step is a big one. Cutting cheesecake bars before they’ve chilled fully can cause them to crumble or fall apart.
Using a dull knife or slicing without wiping the blade clean between cuts can lead to messy, ragged edges.
By avoiding these mistakes, you’ll get perfectly creamy, smooth, and visually appealing cheesecake bars every time.
How to Store It
Cheesecake bars store wonderfully and can be made ahead for convenience. After baking and chilling, keep the bars in an airtight container in the refrigerator.
They stay fresh and creamy for up to 5 days when properly stored. If you want to keep them longer, you can freeze the bars — wrap individual bars tightly in plastic wrap and place them in a freezer-safe bag or container. Frozen cheesecake bars last up to 2 months.
To thaw, transfer frozen bars to the fridge overnight before serving. Avoid thawing at room temperature to preserve texture and prevent condensation.
If you notice any condensation on the surface after refrigeration, simply pat dry with a paper towel before serving.
Storing them properly ensures you can enjoy the creamy goodness anytime without sacrificing texture or flavor.
Frequently Asked Questions
Can I use low-fat cream cheese for this recipe?
Yes, you can use low-fat or Neufchâtel cream cheese, but keep in mind the bars may be less rich and slightly less creamy compared to full-fat cream cheese.
Can I add flavors like chocolate or fruit to these cheesecake bars?
Absolutely! Swirling melted chocolate, fruit preserves, or adding fresh berries on top before baking can add delicious variations.
Do I have to use graham cracker crust?
No, you can substitute with digestive biscuits, vanilla wafers, or gluten-free cookie crumbs if needed.
How do I prevent cracks on the cheesecake bars?
Avoid overmixing and overbaking. Also, letting the bars cool gradually at room temperature before refrigerating helps reduce cracks.
Can I make these cheesecake bars vegan?
Yes, by using vegan cream cheese alternatives and a vegan butter substitute for the crust, you can create a delicious dairy-free version.
Cheesecake Bars Recipes
- Total Time: 4 hours (including chilling)
- Yield: 16 1x
- Diet: Vegetarian
Description
A rich, creamy dessert bar that combines a buttery graham cracker crust with a smooth, tangy cream cheese filling. Perfectly portioned for easy snacking or elegant serving, these cheesecake bars are a delightful treat for any occasion. Simple to prepare and customizable with your favorite flavors or toppings, they are ideal for both beginners and experienced bakers looking for a quick cheesecake fix.
Ingredients
- 1 ½ cups graham cracker crumbs
- 6 tablespoons unsalted butter, melted
- ¼ cup granulated sugar (for crust)
- 24 ounces (3 packages) cream cheese, softened
- 1 cup granulated sugar (for filling)
- 3 large eggs
- 1 teaspoon vanilla extract
- ½ cup sour cream or heavy cream
- Pinch of salt
Instructions
- Preheat oven to 350°F (175°C). Line an 8×8 inch pan with parchment paper, leaving overhang.
- Mix graham cracker crumbs, melted butter, and ¼ cup sugar. Press firmly into the pan. Bake 8-10 minutes. Cool slightly.
- Beat cream cheese until smooth. Add 1 cup sugar, beat well.
- Add eggs one at a time, mixing after each. Stir in vanilla, sour cream, and salt.
- Pour filling over crust, spread evenly.
- Bake 35-40 minutes until edges set and center jiggles slightly. Cool to room temp, then chill 3+ hours.
- Lift bars using parchment. Cut into squares with a hot, clean knife.
Notes
- Ensure cream cheese is softened for smooth batter.
- Avoid overmixing to prevent cracks.
- Chill bars thoroughly before slicing for clean edges.
- Customize with chocolate swirls, fruit, or nuts if desired.
- Prep Time: 20 minutes
- Cook Time: 40 minutes
- Category: Dessert
- Method: Baking
- Cuisine: American
Nutrition
- Serving Size: 16
- Calories: 310
- Sugar: 25g
- Sodium: 180mg
- Fat: 22g
- Saturated Fat: 13g
- Unsaturated Fat: 7g
- Trans Fat: 0g
- Carbohydrates: 22g
- Fiber: 1g
- Protein: 5g
- Cholesterol: 80mg