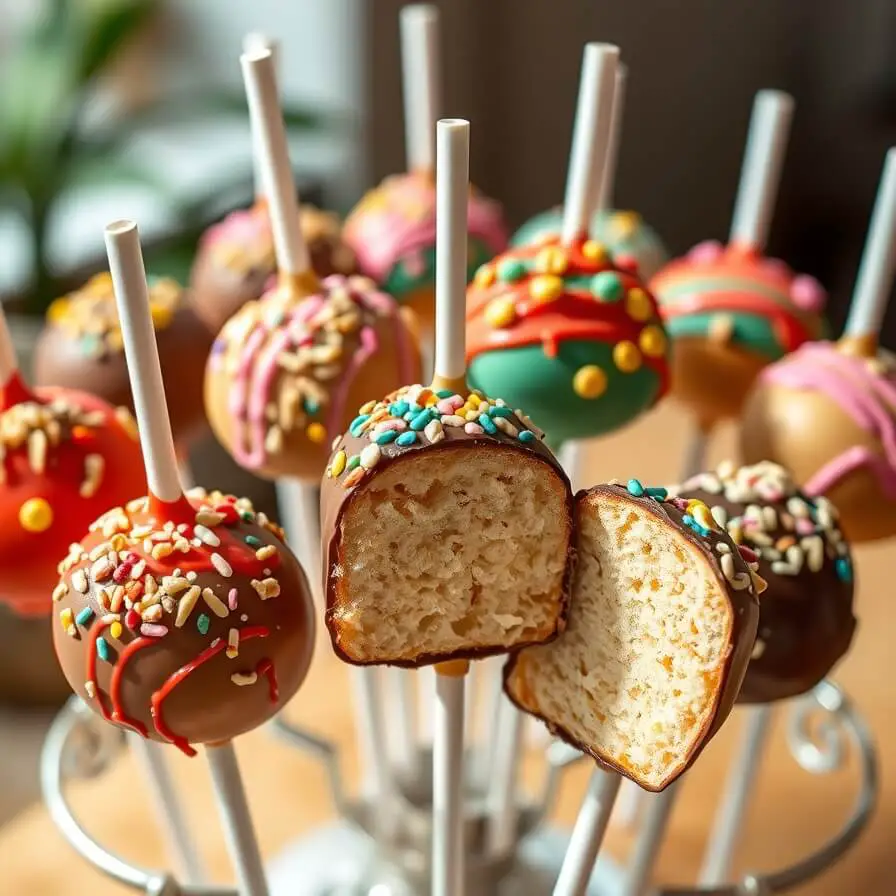
When I first made cake pops, I’ll admit—I was a little intimidated. Tiny balls of cake on sticks, perfectly coated in chocolate or frosting, seemed like something only a professional baker could master. But one rainy afternoon, with the kids clamoring for a sweet treat, I decided to give it a go. I crumbled a leftover slice of vanilla cake, mixed it with just the right amount of frosting, and rolled it into neat little balls. The first bite? Absolutely magical. Soft, creamy, and just the right size for a little indulgence. Since that day, cake pops have become my go-to for parties, casual family treats, and even quiet moments when I just need a tiny, sweet pick-me-up.
What I love most is how versatile they are. You can make them colorful for birthdays, elegant for gatherings, or even seasonal with themed sprinkles. Plus, they’re fun to involve kids in, who love rolling the cake mixture and decorating each pop with their favorite toppings.
Why I Love This Recipe

What makes this cake pops recipe so special is its simplicity and adaptability. Unlike traditional cakes that require slicing and careful layering, cake pops let you enjoy the same flavors in bite-sized portions. The magic comes from combining moist, flavorful cake with creamy frosting to hold everything together. This balance ensures that each pop is moist on the inside and perfectly coated on the outside, making them irresistible.
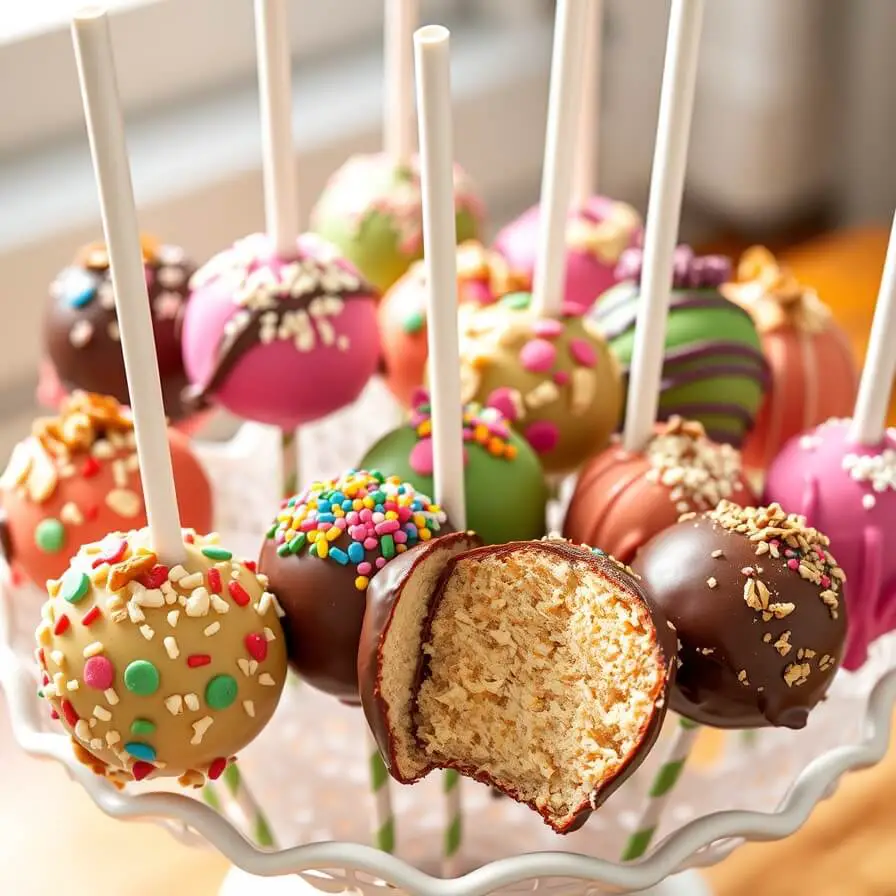
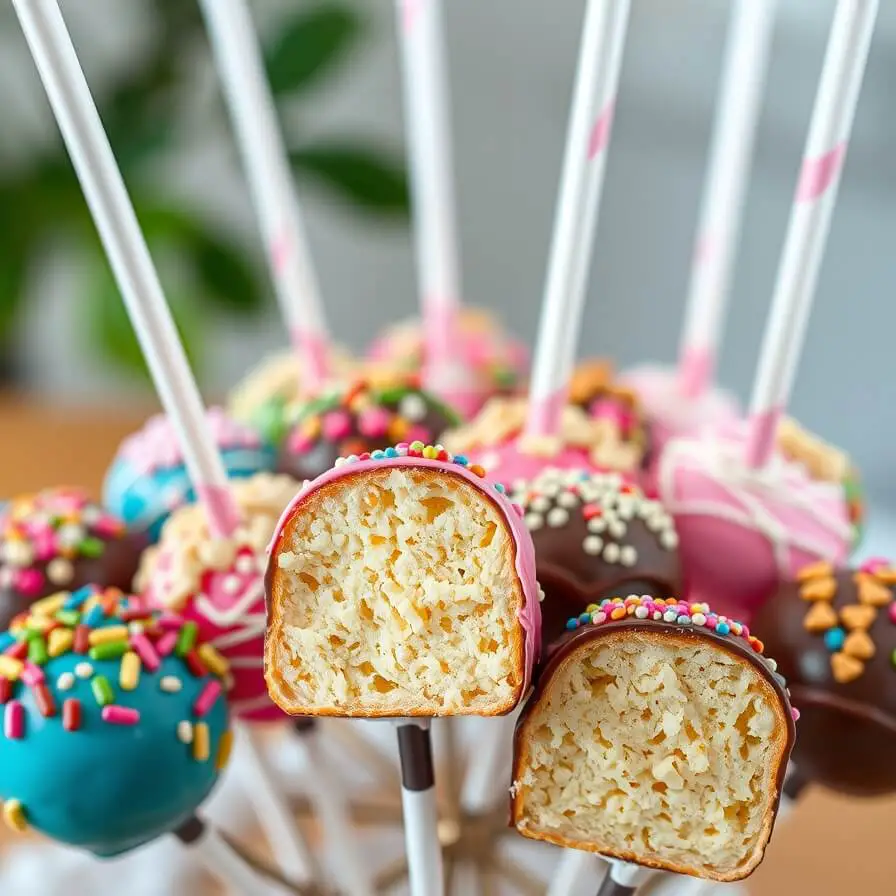
Another thing I adore about this recipe is the creativity it allows. You can use any cake flavor—vanilla, chocolate, red velvet, or even lemon. The frosting can be buttercream, cream cheese, or ganache, depending on your taste and mood. And the coatings! From white chocolate to dark chocolate, colored candy melts to sprinkles and edible glitter, the possibilities feel endless. Every batch can be a little adventure, a way to experiment with flavors and colors that bring smiles to anyone who bites into them.
Making cake pops is more than just baking—it’s a little project that turns into an edible work of art. I often find that the process itself, rolling the cake into balls, dipping them in chocolate, and decorating, is incredibly satisfying. There’s something therapeutic about it, almost like creating tiny desserts that bring joy not just through taste but through presentation too.
Ingredients for Cake Pops
When I gather the ingredients for cake pops, I like to keep it simple yet versatile. For the cake base, you’ll need either a homemade or store-bought cake. I usually opt for a moist sponge like vanilla or chocolate—it crumbles easily and blends beautifully with frosting.
Frosting is the glue that holds the cake together. Buttercream works beautifully, as it’s creamy, sweet, and easy to manipulate. Cream cheese frosting can add a slight tang, especially if you’re using a richer cake like red velvet. Ganache is another option for a more decadent taste.
For coating, I love candy melts because they’re easy to color and set quickly. White chocolate is perfect for painting or drizzling effects, while milk or dark chocolate adds richness and a classic touch. And don’t forget toppings—sprinkles, crushed cookies, nuts, coconut flakes, or even edible glitter can elevate your pops from simple treats to stunning mini desserts.
You’ll also need basic tools: lollipop sticks, a microwave-safe bowl for melting chocolate, and either parchment paper or a cake pop stand to hold them while they set. These little additions make the process much smoother and ensure your pops look as good as they taste.
How Much Time Will You Need
Cake pops aren’t an instant treat, but they’re not as time-consuming as you might think. Overall, you’re looking at around two hours from start to finish, but much of that is chilling time.
- Baking the cake: 25-35 minutes (if making from scratch)
- Cooling the cake: 20-30 minutes
- Mixing with frosting and forming balls: 15-20 minutes
- Chilling the balls before dipping: 30 minutes
- Coating and decorating: 30-40 minutes
It’s a relaxed, almost meditative process if you plan ahead. The key is not to rush the chilling steps—they help the cake balls hold their shape when you dip them.
How to Make This Cake Pops
Step – 1: Bake your favorite cake and allow it to cool completely. A warm cake will be too soft and can fall apart when forming balls.
Step – 2: Crumble the cooled cake into a large mixing bowl. Use your hands or a fork to break it down into fine crumbs.
Step – 3: Add frosting to the cake crumbs gradually. Start with a few tablespoons and mix thoroughly. The mixture should hold together when pressed but not be too sticky.
Step – 4: Scoop out small amounts of the mixture and roll them into 1-inch balls. Try to make them uniform in size so they bake evenly and look polished.
Step – 5: Insert lollipop sticks into each ball. For extra security, dip the tip of the stick into melted chocolate before inserting—it helps the stick stay in place.
Step – 6: Chill the cake balls on a baking sheet lined with parchment paper for at least 30 minutes. This step is crucial for a clean chocolate coating.
Step – 7: Melt your chocolate or candy melts according to package instructions. Make sure it’s smooth and lump-free.
Step – 8: Dip each cake ball into the melted chocolate, gently tapping off the excess. This ensures a smooth coating without clumps.
Step – 9: Add your toppings while the coating is still wet. Be creative—sprinkles, crushed nuts, or even a drizzle of contrasting chocolate make them pop.
Step – 10: Place the coated cake pops upright in a stand or on parchment paper until fully set.
Substitutions
One of the joys of this recipe is how forgiving it is. Don’t have buttercream? Cream cheese frosting works beautifully, giving a tangy twist to your pops. Out of candy melts? White chocolate or even a thin layer of ganache will coat the pops perfectly.
You can swap the cake flavor too—chocolate, lemon, red velvet, or even a spice cake for the fall season. For dietary needs, you can try gluten-free cake or vegan frosting alternatives. Experimenting with these substitutions allows the pops to suit any occasion or preference, and sometimes, the unexpected combinations become your new favorites.
Best Side Dishes of Cake Pops
While cake pops are delightful on their own, pairing them with complementary treats can enhance the experience. I recommend:
- A fresh fruit platter to balance the sweetness
- Mini milkshakes or coffee for dipping
- A small assortment of cookies or macarons for texture contrast
These side dishes turn a simple snack into a mini celebration, perfect for a tea party, birthday, or casual weekend treat.
Serving and Presentation Tips
Serving cake pops is where they truly shine. I love arranging them upright in a decorative vase or cake pop stand—it makes them look like little bouquets of sweetness. For a party, you can use colored candy melts to match the theme or add edible glitter for a touch of sparkle. If it’s a casual treat for the family, a simple plate lined with parchment paper works beautifully and keeps them neat.
One of my favorite presentation tricks is layering them in clear jars with ribbon tied around the sticks. Not only does it look charming, but it also doubles as a decorative centerpiece. For a festive touch, sprinkle a few crushed cookies or candy pieces on the plate around the pops—it’s the little details that make the experience feel special.
When serving, I usually suggest leaving them out for about 15 minutes at room temperature. This slightly softens the chocolate coating, making each bite wonderfully creamy. Pairing cake pops with a small cup of hot cocoa or coffee creates a cozy, indulgent snack moment.
Tips and Tricks to Make This Recipe Even Better
I’ve learned a few tricks over the years that make cake pops easier to handle and even more delicious. First, chilling the cake balls before dipping is non-negotiable—it helps the chocolate coating stick and prevents them from falling apart.
Use a toothpick or a small spoon to help coat tricky spots with chocolate. It gives you more control than dipping alone. When adding toppings like sprinkles or crushed nuts, sprinkle them immediately after dipping; once the chocolate hardens, it’s too late.
Another tip is to slightly warm the sticks before inserting them—it prevents cracking in delicate cake balls. If you want a professional finish, use a piping bag to drizzle contrasting chocolate over each pop. It adds texture and visual interest without needing intricate decorating skills.
Finally, don’t stress about perfection. Each pop is handmade, and a slightly irregular shape adds charm and character. This recipe thrives on creativity, so enjoy experimenting with colors, flavors, and designs.
Common Mistakes to Avoid
Even with a simple recipe, a few common mistakes can affect your results. First, never skip the chilling step. If the cake balls are too soft, the coating will crack or slide off.
Overmixing the frosting with the cake crumbs can also make the mixture too wet, leading to a sticky mess that’s hard to roll. I always start with a small amount of frosting and add more gradually until the mixture holds together perfectly.
Another frequent mistake is heating the chocolate too quickly. Overheated chocolate can seize or become grainy, so melt it slowly in short bursts if using a microwave, stirring between each.
Finally, avoid overcrowding your cake pops while they set. Each pop needs space to cool evenly and maintain its shape. Patience is key—rushing this step often leads to cracked or misshapen pops.
How to Store Cake Pops
Cake pops are surprisingly easy to store and stay fresh for several days. If you plan to eat them within a few days, store them in an airtight container at room temperature. Avoid humid areas, as moisture can affect the chocolate coating.
For longer storage, place them in the refrigerator for up to a week. Just bring them to room temperature before serving to soften the chocolate slightly. Cake pops can also be frozen for up to two months—wrap them individually in plastic wrap and place them in a freezer-safe container. Thaw them in the refrigerator overnight, then leave at room temperature for 15–20 minutes before serving.
Frequently Asked Questions
Can I use store-bought cake?
Absolutely! Using a pre-made cake is a great shortcut. Just make sure it’s moist and not too dry, as dry cake makes rolling difficult.
Can I make these dairy-free or vegan?
Yes! Substitute butter-based frosting with a vegan buttercream and use dairy-free chocolate or candy melts. The process remains the same.
How do I prevent cake pops from falling off the sticks?
Dip the tip of the stick into melted chocolate before inserting into the cake ball, then chill. This creates a secure bond that keeps the pop in place.
Can I use cupcakes instead of a whole cake?
Definitely! Cupcakes are perfect for small batches. Crumble them just like cake and mix with frosting to form your pops.
Can I make them ahead for a party?
Yes! Cake pops can be made 1–2 days in advance and stored in an airtight container at room temperature or refrigerated. Decorating can be done the day before for fresher presentation.

Cake Pops Recipe
- Total Time: 1 hour 15 minutes
- Yield: 20–24 1x
- Diet: Vegetarian
Description
Cake pops are perfect for any occasion, from birthday parties to casual family treats. They’re moist, creamy, and covered in a smooth chocolate coating that can be customized with colors, sprinkles, or edible glitter. Easy to make and endlessly versatile, these little treats allow you to enjoy all the flavors of cake in a fun, portable form. Whether you’re sharing them with kids, gifting them at a party, or simply enjoying a sweet snack, cake pops are sure to delight every time.
Ingredients
- 1 batch of your favorite cake (homemade or store-bought, cooled)
- 1/2 to 3/4 cup frosting (buttercream, cream cheese, or ganache)
- 12 oz chocolate or candy melts for coating
- Sprinkles, crushed nuts, or edible glitter for decoration
- 20–24 lollipop sticks
Instructions
- Crumble cooled cake into a large bowl.
- Mix in frosting gradually until mixture holds together.
- Roll mixture into 1-inch balls and insert sticks (dip sticks in chocolate first for stability).
- Chill the cake balls for 30 minutes.
- Melt chocolate or candy melts according to package directions.
- Dip each cake ball in melted chocolate, tap off excess, and add toppings immediately.
- Place upright until fully set.
- Serve and enjoy!
Notes
- Chill cake balls well for a clean coating.
- Customize with your favorite cake, frosting, and toppings.
- Use a piping bag for drizzled chocolate effects.
- Prep Time: 45 minutes
- Cook Time: 30 minutes
- Category: Dessert
- Method: Baking and dipping
- Cuisine: American
Nutrition
- Serving Size: 20–24
- Calories: 180
- Sugar: 16g
- Sodium: 50mg
- Fat: 10g
- Saturated Fat: 6g
- Unsaturated Fat: 3g
- Trans Fat: 0g
- Carbohydrates: 20g
- Fiber: 1g
- Protein: 2g
- Cholesterol: 15mg