Sometimes, you just want dessert right now—no fuss, no oven, and definitely no waiting an hour. That’s exactly why I started making this microwave cake in a mug. It all began on a rainy afternoon when my sweet tooth kicked in and I didn’t have the time (or energy) to whip up a full cake. I wanted something quick, comforting, and warm—something I could mix up in minutes and enjoy curled up with a blanket.
And that’s when I discovered the magic of cake in a mug.
This single-serve dessert is everything you love about cake: warm, fluffy, chocolatey (or vanilla-y, or red velvety—you name it), and ready in less time than it takes to preheat your oven. If you’ve never made a microwave mug cake before, get ready to have your dessert game changed for good.
Why I Love This Recipe

There’s something incredibly satisfying about making a cake just for yourself. No sharing, no leftovers—just a perfectly portioned, fresh-out-of-the-microwave cake to satisfy your sweet craving instantly. That’s part of what makes this recipe so special.
But it’s not just the convenience—it’s how good it actually tastes. You might think, “Okay, it’s a microwave cake. How good can it be?” But trust me, when made right, it’s soft, moist, and deeply flavorful. And the best part? You can make it in under five minutes from start to finish.
It’s ideal for those solo evenings when you want a quick pick-me-up, for students in dorms with only a microwave, or for busy parents who need a speedy dessert fix after the kids go to bed. It also makes a cute surprise for a friend or partner—just hand them a warm mug with cake inside. It doesn’t get more comforting than that.
Whether it’s chocolate, vanilla, or even peanut butter swirl, you can tailor this recipe endlessly. No stand mixer, no complicated steps. Just a mug, a fork, and a microwave.
Ingredients for Cake in a Mug Microwave
Before you start thinking this might be complicated—it’s not. The ingredients are probably already sitting in your pantry. You don’t need anything fancy or hard to pronounce. Just the good, simple stuff that brings this cake to life.
Here’s what you’ll need for a classic chocolate mug cake (and how you can tweak it to your taste later):
- All-purpose flour – This is your structure. Just a few tablespoons do the trick.
- Sugar – Granulated sugar works perfectly. You’ll only need a little for that touch of sweetness.
- Unsweetened cocoa powder – For that deep chocolate flavor. Don’t skip this if you’re doing chocolate cake.
- Baking powder – This gives the cake its rise and fluff.
- Salt – Just a pinch to balance the sweetness.
- Milk – Any milk works here—dairy or plant-based.
- Vegetable oil – Or melted butter, if you prefer a richer taste.
- Vanilla extract – A splash adds warmth and depth to the flavor.
- Chocolate chips (optional) – Toss a few in for extra gooey goodness.
That’s it! No eggs, no special tools—just pantry staples that work together to create a mini cake miracle in your microwave.
How Much Time Will You Need
You’ll be amazed at how quick this comes together. Here’s what to expect:
- Prep time: 3 minutes
- Cook time: 1 to 2 minutes (depending on microwave wattage)
- Cooling time: 1 to 2 minutes
So yes, in under 6 minutes, you’ll be diving into a warm, fluffy mug cake. Perfect for those emergency dessert situations.
How to Make This Cake in a Mug Microwave
This is where the magic happens. You don’t need a mixer or even a bowl. Everything happens in the mug. Here’s how I make mine:
Step – 1: Choose the right mug
Start with a microwave-safe mug that holds at least 12 oz. You’ll need the extra space for the cake to rise without spilling over.
Step – 2: Mix dry ingredients
Add 4 tablespoons of all-purpose flour, 2 tablespoons of sugar, 2 tablespoons of cocoa powder, 1/4 teaspoon of baking powder, and a pinch of salt directly into the mug. Stir with a fork or small whisk until well combined.
Step – 3: Add wet ingredients
Pour in 3 tablespoons of milk, 2 tablespoons of vegetable oil, and 1/4 teaspoon of vanilla extract. Stir until smooth. Make sure to scrape the bottom of the mug so there’s no dry flour hiding out.
Step – 4: Add chocolate chips (optional)
If you want a gooey center, sprinkle in a tablespoon of chocolate chips. I like to press a few into the top so they melt beautifully.
Step – 5: Microwave
Place the mug in the microwave and cook on high for 60 to 90 seconds. Start with 60 seconds, then check. The cake should rise and look set on top, but still slightly soft in the center. If needed, cook in 10-second bursts.
Step – 6: Let it cool (just a bit)
Let the mug sit for 1 to 2 minutes before digging in. This helps it finish cooking and avoids burning your mouth on molten chocolate.
Substitutions
Sometimes you don’t have everything on hand, and that’s okay. This recipe is flexible and forgiving. Here’s how to make it work with what you’ve got:
- No milk? Use water, almond milk, oat milk, or even coffee for an extra kick.
- No cocoa powder? Skip it and make a vanilla version by increasing the flour by a tablespoon and adding a tiny bit more sugar.
- Out of vegetable oil? Melted butter, coconut oil, or even olive oil (for a richer depth) will work fine.
- Gluten-free option: Use a 1:1 gluten-free flour blend in place of all-purpose flour.
- Vegan-friendly? This recipe is already eggless and can easily be dairy-free if you use plant milk and non-dairy chocolate chips.
The best part is you can experiment and still end up with a satisfying dessert.
Best Side Dishes for Cake in a Mug Microwave
While this little cake is great on its own, pairing it with something extra makes it even more indulgent. Here are three simple additions:
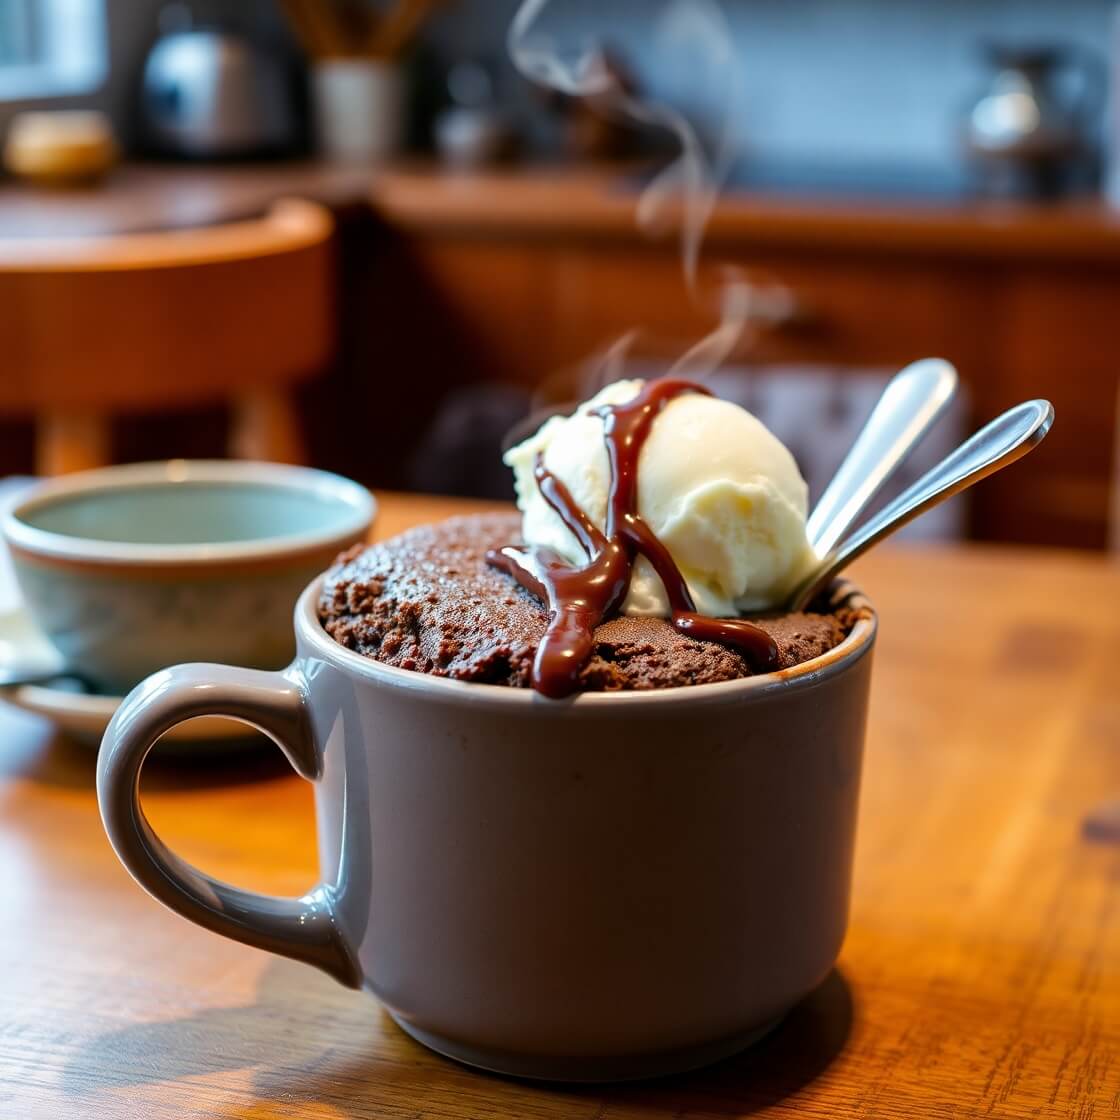
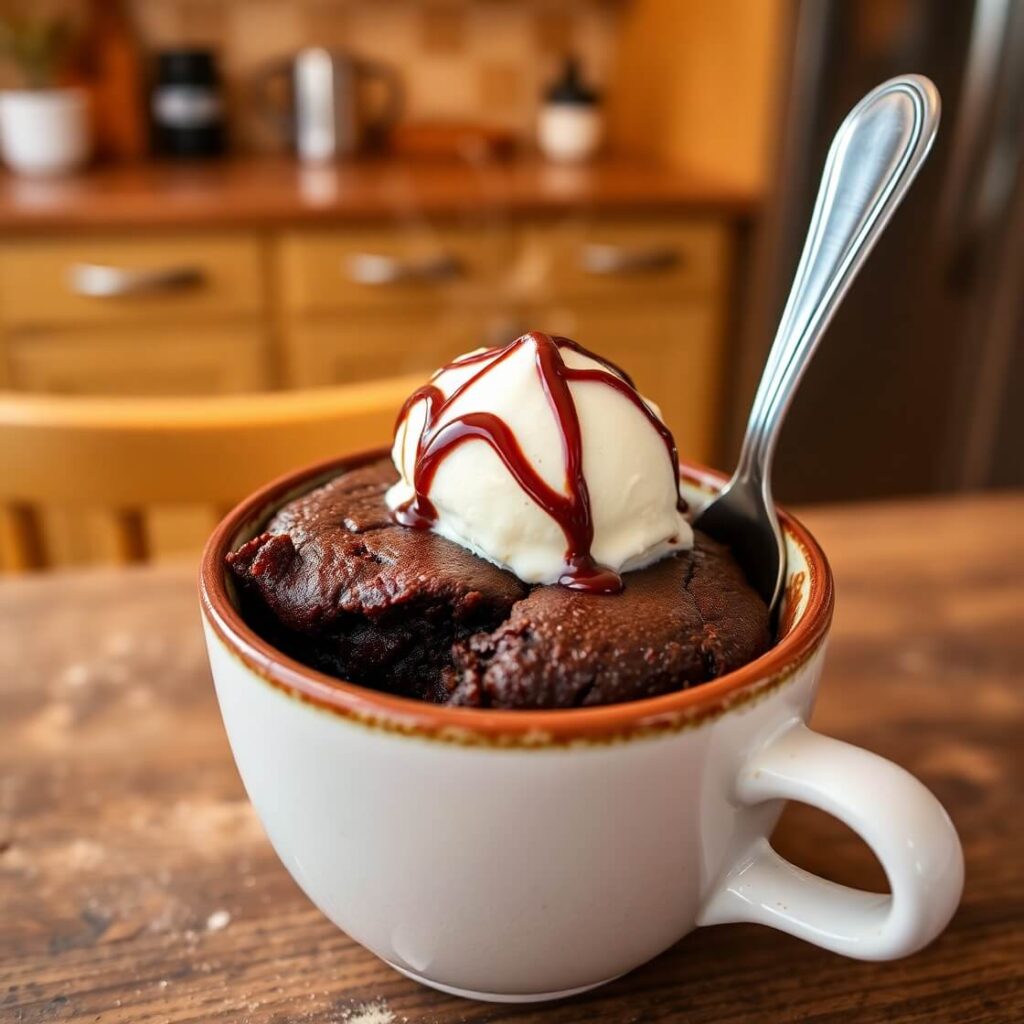
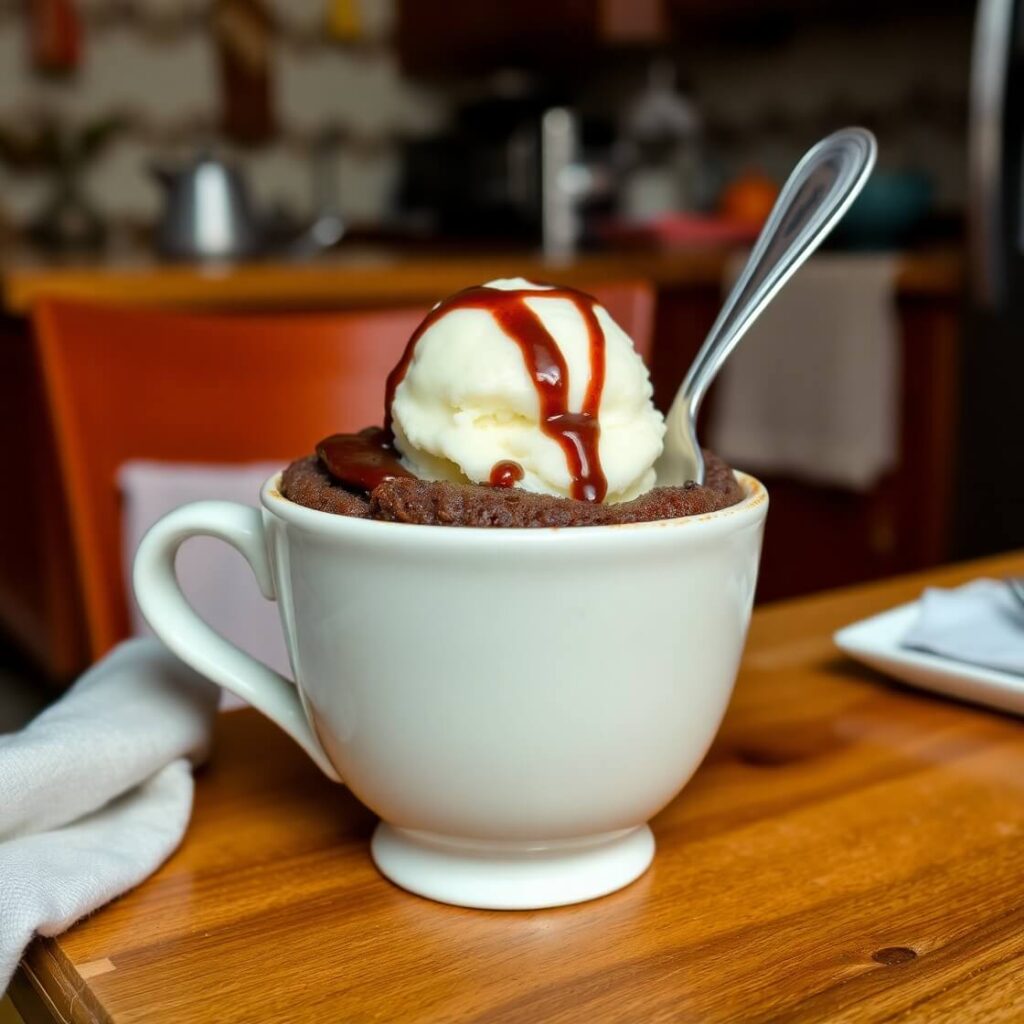
- A scoop of vanilla ice cream – Cold meets hot. Creamy meets rich. It’s dessert heaven.
- Fresh berries – Strawberries or raspberries add a tart balance to the chocolate.
- Whipped cream – A big dollop on top makes this feel like a mini cake from a bakery.
Add a sprinkle of cinnamon or drizzle of caramel sauce and you’re in full dessert mode.
Serving and Presentation Tips
Just because it’s a microwave dessert doesn’t mean it can’t look beautiful. In fact, presentation can turn this quick treat into something truly memorable. I always say that even the simplest dish deserves a bit of flair.
Once your mug cake is cooked and slightly cooled, here’s how I love to present it:
- Dress it up with toppings: A swirl of whipped cream, a scoop of ice cream, or even a dusting of powdered sugar instantly elevates the look. A few fresh berries on top or shaved chocolate make it feel luxurious.
- Serve it with a spoon tucked in: It gives that “ready-to-eat” vibe, making it look inviting and cozy.
- Use a clear glass mug: You’ll see the layers rise and the molten bits peek through. It’s visual dessert therapy.
- Add a drizzle: Chocolate sauce, caramel, or peanut butter drizzle right over the top adds flavor and a gourmet finish.
If you’re making this for someone else, place it on a small saucer or dessert plate and tuck in a napkin. It feels thoughtful and intentional—like you planned it all along.
Tips and Tricks to Make This Recipe Better
Want your cake in a mug to go from great to outstanding? These are some of the things I’ve learned from making this recipe way more times than I care to admit:
- Don’t overcook it: The biggest mistake is microwaving too long. Start with 60 seconds and only add a few seconds at a time. Overcooking = dry and rubbery.
- Mix thoroughly: Make sure to stir well, getting the bottom corners of the mug, so no flour pockets are left behind.
- Use quality cocoa powder: If you’re doing chocolate cake, this makes a big difference. Dutch-process cocoa makes it taste deeper and richer.
- Add mix-ins wisely: A spoonful of Nutella in the center before microwaving = gooey chocolate lava core. You’re welcome.
- Let it rest: Just a minute or two after microwaving helps it set and improves the texture.
You can also experiment with flavors—try a dash of cinnamon or espresso powder for a more adult version.
Common Mistakes to Avoid
Even a simple mug cake can go wrong if you’re not careful. Here’s what to watch out for:
- Using too small of a mug: If your mug is under 12 oz, it might overflow in the microwave. That’s a mess you don’t want to clean.
- Skipping the mixing step: It might seem harmless to mix halfway, but unmixed ingredients result in an uneven, lumpy texture.
- Overfilling with toppings before microwaving: Save whipped cream, sauces, and berries for after it’s cooked. Otherwise, it can get watery or burn.
- Microwaving too long: It’s better to undercook a little than to overcook. You can always pop it back in for 10 seconds if needed.
- Forgetting to let it cool slightly: It’s tempting to dig right in, but giving it a minute or two makes a big difference in texture (and avoids burnt tongues).
How to Store It
Let’s be honest—this dessert rarely has leftovers. But if you’ve made two or have half a cake left, here’s how to store it:
- Short-term: Cover the mug loosely with plastic wrap or foil and leave it at room temperature for up to 6 hours. The texture will be a bit denser but still tasty.
- Overnight: You can refrigerate it for up to 2 days. Just let it come to room temperature or microwave it for 10-15 seconds before eating.
- Freezing? Not ideal. The texture changes too much, and you’re better off making it fresh each time since it takes so little effort.
FAQ
Can I make this mug cake gluten-free?
Yes! Just use a 1:1 gluten-free flour blend. Almond flour won’t give the same structure, so a blend works best.
Can I double the recipe?
You can, but don’t put it all in one mug—it’ll overflow. Use two mugs and microwave one at a time.
Why is my mug cake rubbery?
It was likely microwaved too long. Next time, reduce the cook time and watch for doneness around the 60-second mark.
Can I add eggs?
You can, but it’s not necessary. Mug cakes without eggs tend to be lighter. If adding, only use a tiny bit (like 1/2 a beaten egg), or it’ll get too dense.
Can I make this without cocoa powder?
Absolutely! Skip the cocoa and add a bit more flour and sugar for a simple vanilla version. You can add cinnamon, lemon zest, or almond extract for fun flavors.

Cake in a Mug Microwave
- Total Time: 5-6 minutes
- Yield: 1 1x
- Diet: Vegetarian
Description
This microwave cake in a mug is the ultimate solution to your late-night dessert cravings. Made with pantry staples and ready in just a few minutes, it’s soft, warm, chocolatey, and wonderfully moist. There’s no egg, no oven, and no mess—just a perfectly portioned treat that feels indulgent and comforting. Whether you’re cozying up on the couch or need a quick dessert fix, this mug cake delivers. Customize it with chocolate chips, Nutella, or a scoop of ice cream for a dreamy finish.
Ingredients
- 4 tbsp all-purpose flour
- 2 tbsp granulated sugar
- 2 tbsp unsweetened cocoa powder
- 1/4 tsp baking powder
- Pinch of salt
- 3 tbsp milk (dairy or plant-based)
- 2 tbsp vegetable oil (or melted butter)
- 1/4 tsp vanilla extract
- 1 tbsp chocolate chips (optional)
Instructions
- Use a 12 oz microwave-safe mug.
- Add flour, sugar, cocoa powder, baking powder, and salt. Mix well.
- Stir in milk, oil, and vanilla until smooth.
- Fold in chocolate chips or other mix-ins.
- Microwave for 60-90 seconds until cake rises and is set on top.
- Let cool for 1-2 minutes before eating.
Notes
- For vanilla cake, omit cocoa powder and increase flour by 1 tbsp.
- Don’t overcook—start with 60 seconds and add in 10-second bursts.
- Top with whipped cream, berries, or a scoop of ice cream for extra indulgence.
- Prep Time: 3 minutes
- Cook Time: 1-2 minutes
- Category: Dessert
- Method: Microwave
- Cuisine: American
Nutrition
- Serving Size: 1
- Calories: 340
- Sugar: 18g
- Sodium: 160mg
- Fat: 18g
- Saturated Fat: 3g
- Unsaturated Fat: 14g
- Trans Fat: 0g
- Carbohydrates: 38g
- Fiber: 2g
- Protein: 4g
- Cholesterol: 0mg