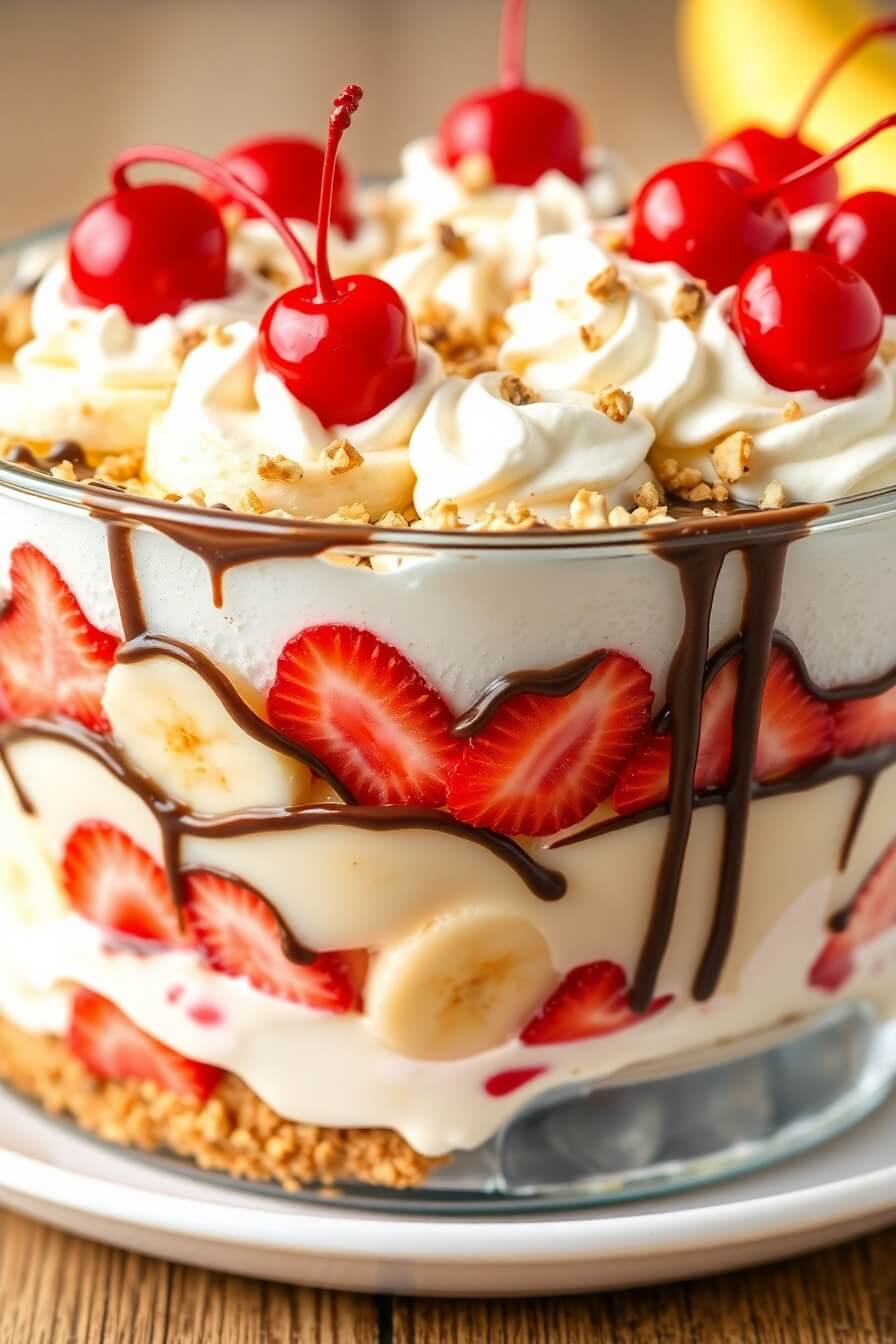
The banana split dessert is one of those timeless treats that brings smiles with every spoonful. It’s nostalgic, comforting, and beautifully layered with all the best things: ripe bananas, creamy vanilla pudding, sweet crushed pineapple, juicy strawberries, fluffy whipped topping, crunchy nuts, and a drizzle of chocolate. It’s like the classic ice cream banana split—but no melting, and you can make it ahead of time!
I created this recipe after craving something fun, fresh, and crowd-pleasing for a summer potluck. Ice cream was out of the question—it would never survive the heat. So I thought, why not turn the classic banana split into a chilled, no-bake dessert that keeps all the layers intact?
This version is perfect for birthdays, BBQs, baby showers, or simply spoiling your loved ones with something sweet and nostalgic. If you’ve ever had a banana split and thought, “I wish I could eat this without the mess,” this dessert is your answer.
Why I Love This Recipe?

There’s something magical about layered desserts, especially when they’re as colorful and indulgent as this one. What makes this banana split dessert so special is the way every bite offers a different texture and flavor—sweet fruit, creamy pudding, fluffy whipped topping, a soft crust, and a crunch of nuts and chocolate.
It’s also incredibly versatile. You can tweak the layers based on your preferences, make it ahead of time (which is a lifesaver for busy hosts), and serve a crowd with ease. No last-minute scooping, no melting mess—just slice and serve.
This dessert is also a conversation starter. Everyone recognizes the nostalgic flavor, but the presentation surprises them. It looks fancy, yet it’s easy to make. Even if you’re not confident in the kitchen, this recipe is forgiving and fun.
Ingredients for Banana Split Dessert
One of the best things about this dessert is how accessible the ingredients are. You don’t need fancy kitchen tools or exotic produce. Everything is easy to find and easy to prepare.
Here’s what you’ll need to bring this dreamy banana split dessert to life:
- Graham cracker crust – This forms the buttery, sweet base. You can use store-bought or make your own using crushed graham crackers, melted butter, and a bit of sugar.
- Cream cheese – Softened cream cheese adds a slightly tangy layer that balances out the sweetness. It’s the glue that holds the middle together and adds richness.
- Powdered sugar – Sweetens the cream cheese without adding graininess.
- Whipped topping (like Cool Whip) – Light and fluffy, it blends into the cream cheese and adds airiness to the dessert. You’ll also need more to top off the layers.
- Bananas – Ripe, but not too soft. Look for bananas with yellow skins and minimal brown spots for the perfect texture.
- Crushed pineapple (drained) – Adds a tropical sweetness and juicy texture.
- Strawberries (sliced) – Fresh strawberries give the dessert a pop of color and tangy sweetness. Frozen strawberries can also work if they’re thawed and drained.
- Vanilla pudding mix (instant) – This forms the creamy filling. Mix it with cold milk until thick and luscious.
- Chocolate syrup – For drizzling over the top to add that classic banana split flavor.
- Chopped nuts – Walnuts or pecans add a crunchy finish. Toast them lightly for more flavor.
- Maraschino cherries (optional) – For garnish. Adds a bright, fun touch if you’re going for full presentation.
You can layer these components to suit your mood—add extra fruit, go heavier on the cream, or sprinkle in chocolate chips for more texture. It’s one of those recipes that invites you to play.
How Much Time Will You Need?
This recipe is mostly about assembling rather than cooking, which is perfect for beginners or anyone short on time.
- Prep time: 25–30 minutes
- Chill time: At least 2–4 hours (preferably overnight for best results)
- Total time: About 4 hours including chilling, but only 30 minutes of hands-on work.
Once it’s chilled and set, it slices beautifully and serves like a dream.
How to Make This Banana Split Dessert
Here’s a step-by-step guide to building your dessert. Don’t rush through—each layer deserves love and care.
Step – 1: Prepare the crust
In a medium bowl, combine 2 cups of graham cracker crumbs with 1/2 cup melted unsalted butter and 1/4 cup granulated sugar. Mix until it resembles wet sand.
Press the mixture firmly into the bottom of a 9×13-inch glass dish. Use the back of a spoon or a flat-bottomed cup to make an even layer. Chill in the fridge while you prepare the next step.
Step – 2: Make the cream cheese layer
In a large bowl, beat 8 oz of softened cream cheese with 1 cup powdered sugar until smooth and creamy. Fold in one 8 oz tub of whipped topping gently until combined.
Spread this mixture evenly over the chilled crust, making sure to seal the edges so the fruit doesn’t leak through. Place back in the fridge while prepping fruit.
Step – 3: Layer the bananas
Slice 3–4 ripe bananas into thin rounds. Layer them evenly over the cream cheese mixture. Work quickly so the bananas don’t brown. You can lightly brush with lemon juice to prevent this if desired.
Step – 4: Add pineapple and strawberries
Spread 1 can (20 oz) of well-drained crushed pineapple evenly over the bananas. Then layer on 2 cups of thinly sliced strawberries. Pat the strawberries with a paper towel if they’re too wet, to avoid sogginess.
Step – 5: Prepare and layer the pudding
Make the vanilla pudding according to package instructions using cold milk (typically 2 cups milk per 3.4 oz box). Let it thicken for a few minutes, then spoon and spread it gently over the fruit layer.
Step – 6: Add the whipped topping
Top everything with another layer of whipped topping—about one full 8 oz tub. Use a spatula to create soft peaks or smooth swirls for a clean finish.
Step – 7: Final toppings
Sprinkle chopped nuts (about 1/2 cup) over the whipped topping, drizzle chocolate syrup in a zigzag motion, and add maraschino cherries if desired.
Step – 8: Chill
Cover the dessert with plastic wrap and refrigerate for at least 2 hours, but overnight is even better. This allows the layers to set and the flavors to meld beautifully.
Substitutions
If you don’t have everything on hand or want to experiment, here are some smart swaps that work beautifully:
- Crust: Use crushed Nilla wafers, digestive biscuits, or even brownie pieces for a richer base.
- Cream cheese layer: Swap out the cream cheese for Greek yogurt for a lighter twist.
- Whipped topping: Use homemade whipped cream or coconut whipped cream for a dairy-free version.
- Pudding: Banana pudding or cheesecake-flavored instant pudding can replace vanilla for a bolder flavor.
- Fruit: Try blueberries, raspberries, or mango slices for a twist. Just make sure they’re well-drained or patted dry.
Substitutions give you flexibility and make this recipe adaptable for dietary needs or personal taste.
Best Side Dish of Banana Split Dessert
Pairing this dessert with the right sides can elevate your meal or event. Here are three complementary side dishes:
- Grilled Fruit Skewers – Adds a warm, smoky contrast to this cool, creamy dessert.
- Lemon Mint Iced Tea – Refreshing, citrusy, and lightens the palate after a rich dessert.
- Mini Chicken Sliders – If you’re serving this at a casual gathering, the savory-sweet contrast works wonders.
Serving and Presentation Tips
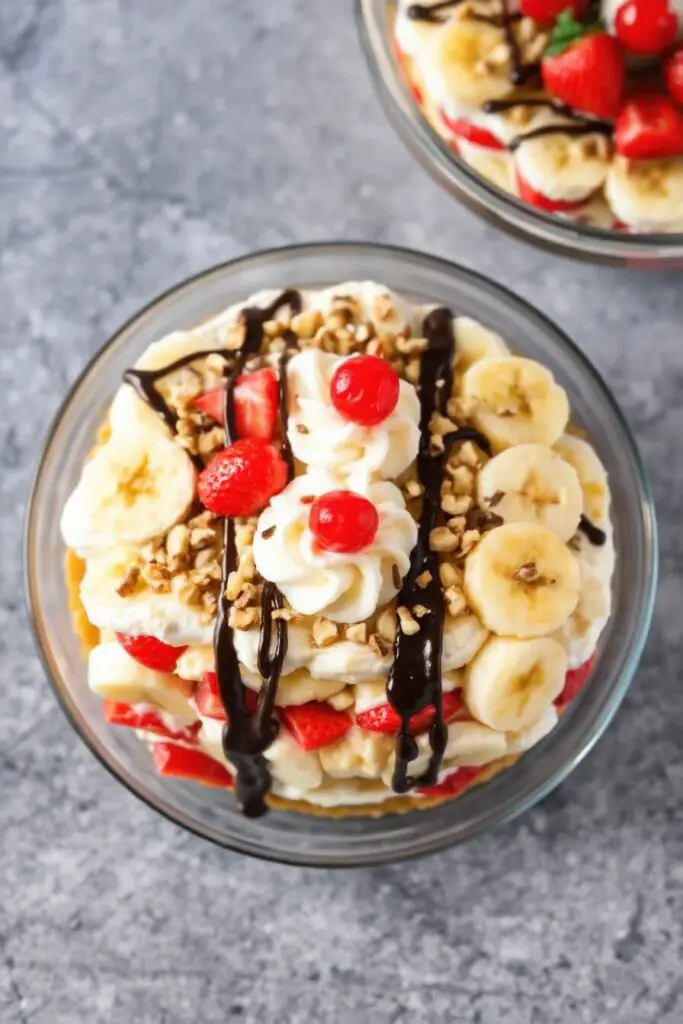
To make this dessert shine like a centerpiece, presentation is everything. The beauty of a banana split dessert is its colorful layers—so showcase them!
If serving at a party or potluck, use a clear glass dish so guests can admire every layer before diving in. For individual servings, consider scooping the dessert into small mason jars or dessert cups. Garnish each portion with a cherry, a drizzle of chocolate syrup, and a sprinkle of chopped nuts. Want to go the extra mile? Add thin banana slices fanned out on top with a touch of fresh mint.
Presentation is not just about beauty—it’s about building anticipation. A well-plated dessert creates excitement even before the first bite.
Tips and Tricks to Make This Recipe Better
The secret to an unforgettable banana split dessert lies in the little touches. Here’s how to elevate it:
- Drain everything thoroughly: Crushed pineapple and thawed strawberries tend to hold excess moisture, which can make your dessert soggy. Use a fine-mesh sieve and press out the juices before layering.
- Chill the bowl before whipping: If making homemade whipped cream, chill your bowl and beaters to get firmer peaks that hold up longer.
- Layer gently: Don’t rush or press down on layers. A light hand ensures the dessert stays fluffy and airy.
- Seal the edges of each layer: Especially the cream cheese layer—this prevents wet ingredients from seeping into the crust.
- Make it a day ahead: The flavors marry better after 8–12 hours. It tastes even better the next day!
These little details make a huge difference in texture and flavor.
Common Mistakes to Avoid
Many first-timers rush through this no-bake dessert thinking it’s foolproof. While it’s beginner-friendly, avoiding these mistakes will ensure perfection:
- Using overly ripe bananas: Soft bananas break down and turn brown quickly. Choose firm, yellow bananas without too many spots.
- Skipping the chill time: The dessert needs time to set—cutting into it too early will result in messy slices.
- Overloading with syrup: Too much chocolate syrup can overpower the other flavors and make the topping too runny. A light drizzle is more than enough.
- Not sealing the crust layer: If your cream cheese layer doesn’t fully cover the crust, fruit juices may seep in and make it soggy.
- Using warm ingredients: Always let components like melted butter cool slightly before using. Warm ingredients can affect texture.
Avoiding these will make your dessert as gorgeous as it is delicious.
How to Store It
Storage is simple and effective with this dish.
- Refrigerate in an airtight container or tightly cover the dish with plastic wrap. It will stay fresh for 3–4 days. After that, the bananas may brown slightly and the texture may become softer.
- Do not freeze. Freezing changes the texture of the pudding and fruit, making the dessert watery when thawed.
If you’re prepping it ahead, wait until just before serving to add the final toppings like nuts, syrup, and cherries for the freshest presentation.
FAQ
Can I make banana split dessert the night before?
Yes! In fact, making it 12–24 hours ahead allows the flavors to blend beautifully. Just add toppings before serving.
What can I use instead of Cool Whip?
You can use homemade whipped cream. Whip 1 cup heavy cream with 2 tablespoons powdered sugar and 1/2 teaspoon vanilla until soft peaks form.
Can I make it gluten-free?
Absolutely. Just use gluten-free graham crackers or cookies for the crust.
How do I keep bananas from turning brown?
Use fresh bananas and optionally toss them lightly in lemon juice. Just don’t soak them too long, or they may taste sour.
Can I customize the fruit layers?
Yes! Feel free to add or substitute fruits like raspberries, blueberries, or mango. Just make sure they’re not too watery.

Banana Split Dessert
- Total Time: 4 hours
- Yield: 12 servings 1x
- Diet: Vegetarian
Description
A no-bake layered dessert that transforms the nostalgic banana split into a chilled slice of heaven. Creamy pudding, fresh fruit, whipped topping, and a graham cracker crust come together in a dreamy combination that’s perfect for potlucks, parties, or family nights. The vibrant layers not only taste divine but look stunning, especially when served in a glass dish. Make it ahead for easy entertaining, and enjoy the creamy, fruity, chocolate-drizzled goodness that brings a smile with every bite.
Ingredients
- 2 cups graham cracker crumbs
- 1/2 cup unsalted butter, melted
- 1/4 cup granulated sugar
- 8 oz cream cheese, softened
- 1 cup powdered sugar
- 2 tubs (8 oz each) whipped topping (like Cool Whip), divided
- 3–4 ripe bananas, sliced
- 1 can (20 oz) crushed pineapple, well-drained
- 2 cups fresh strawberries, sliced
- 1 package (3.4 oz) instant vanilla pudding mix
- 2 cups cold milk
- 1/2 cup chopped walnuts or pecans
- Chocolate syrup, for drizzling
- Maraschino cherries, for garnish (optional)
Instructions
-
Mix graham cracker crumbs, melted butter, and sugar. Press into a 9×13-inch dish. Chill.
-
Beat cream cheese and powdered sugar until smooth. Fold in 1 tub of whipped topping. Spread over crust.
-
Layer sliced bananas evenly.
-
Top with drained crushed pineapple and strawberries.
-
Prepare pudding with cold milk and let it set. Spread gently over fruit layer.
-
Add remaining whipped topping on top and smooth out.
-
Sprinkle nuts, drizzle syrup, and garnish with cherries.
-
Chill for at least 2 hours or overnight.
Notes
- For a sturdier crust, bake it for 8 minutes at 350°F and let cool before adding layers.
- Use clear glass to showcase the layers for presentation.
- Swap in flavored pudding or fruit for seasonal twists.
- Prep Time: 30 minutes
- Cook Time: 2–4 hours
- Category: Dessert
- Method: No-bake
- Cuisine: American
Nutrition
- Serving Size: 1 square
- Calories: 320