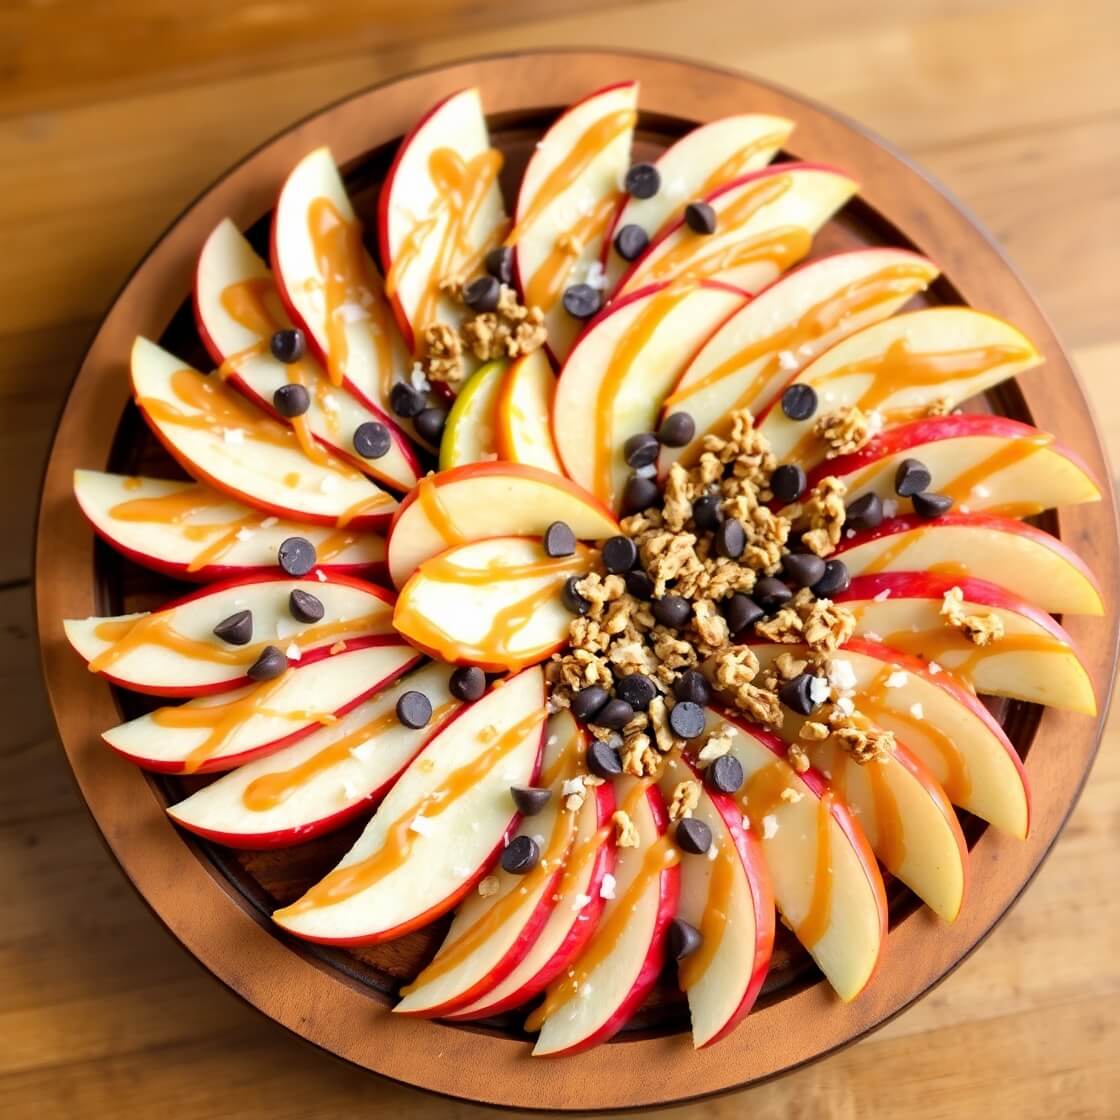
There’s something magical about taking a simple snack and turning it into something that feels indulgent, exciting, and a little unexpected. That’s exactly what happened the first time I made apple nachos. I remember standing in my kitchen, staring at a bowl of apples that needed to be eaten before they softened, and suddenly thinking: what if I layered them like tortilla chips and topped them with something sweet and crunchy?
The idea was both playful and practical—healthy enough to feel guilt-free, but fun enough that even kids or guests at a gathering would dive in without hesitation. Apple nachos quickly became a staple in my home, and now whenever I’m looking for a quick yet impressive treat, this recipe is one of the first that comes to mind.
If you’re tired of the same old apple slices with peanut butter, let me assure you: this is going to change the way you snack. It’s the perfect mix of crisp fruit, drizzled toppings, and crunchy extras. Whether you make it for yourself, your kids, or to bring to a party, these nachos are always a hit.
Why I Love This Recipe
What makes apple nachos so special is that they’re endlessly customizable. Unlike traditional nachos that lean heavy with cheese and chips, this version is refreshing and light while still satisfying a sweet tooth. The crispness of the apples creates the perfect base, while the toppings—anything from creamy peanut butter to chocolate drizzle to crunchy granola—turn the dish into a layered, textural experience.
I also love how this recipe bridges the gap between “treat” and “healthy snack.” When I serve apple nachos to my family, I feel like I’m giving them something that’s both fun and nourishing. For a mid-afternoon snack, it feels indulgent, yet I know it’s loaded with fiber, vitamins, and natural sweetness.
The versatility also keeps it exciting. You can make it a healthier post-workout snack with nut butter and seeds, or dress it up with caramel drizzle and mini chocolate chips for a dessert-style nacho platter. There’s no one way to do it—and that’s why I keep coming back to this recipe again and again.
Ingredients for Apple Nachos
The beauty of apple nachos is that you don’t need a long shopping list. In fact, you probably already have most of the ingredients in your kitchen. The apples are the star, but the toppings allow you to make this recipe truly your own.
To start, you’ll need a few fresh, crisp apples. Choose varieties that hold their shape well and have a good balance of sweetness and tartness. I often go for Honeycrisp, Fuji, or Granny Smith.
For the toppings, there are endless directions you can take:
- A nut butter drizzle, like almond or peanut butter, brings richness and protein.
- A sweet drizzle—honey, caramel sauce, or even melted chocolate—adds dessert-like flair.
- Something crunchy, like granola, chopped nuts, or crushed pretzels, creates balance.
- Optional extras like mini chocolate chips, coconut flakes, or dried fruit take the flavor up a notch.
You don’t need to overcomplicate it. A handful of pantry staples and a few fresh apples are all it takes to transform this dish into a showstopper snack.
How Much Time Will You Need
One of the best parts of apple nachos is how fast they come together. If you’re just making a single plate for yourself, you can have everything ready in 5 to 10 minutes. Preparing a platter for a party may take closer to 15 minutes, especially if you’re chopping extra toppings or melting chocolate for drizzling.
There’s no oven time, no long prep list, and no waiting for anything to set. It’s instant gratification, which makes it perfect for unexpected guests or those moments when your sweet craving won’t wait.
How to Make Apple Nachos

Here’s the step-by-step process I follow every time. It’s so simple, but each little detail makes a difference in how the final dish looks and tastes.
Step – 1: Prepare the apples
Wash and dry your apples thoroughly. Slice them into thin wedges—about ¼-inch thick. I usually cut around the core and then slice each section thinly so that the pieces fan out nicely on the plate. If you’re worried about browning, toss the slices in a bit of lemon juice before arranging.
Step – 2: Arrange the base
Lay your apple slices out on a large plate or platter, slightly overlapping them like tortilla chips in a nacho spread. This creates the perfect base for layering toppings without everything sliding off.
Step – 3: Drizzle the nut butter
Warm your nut butter slightly if it’s too thick to drizzle. I usually microwave it for 10–15 seconds. Then, use a spoon to drizzle it evenly across the apple slices, making sure each piece gets some of that creamy flavor.
Step – 4: Add the sweet drizzle
Next, drizzle honey, caramel sauce, or melted chocolate across the apples. This not only adds sweetness but also makes the nachos visually appealing.
Step – 5: Sprinkle the crunch
Now comes the fun part—sprinkle on your chosen crunchy toppings. Granola, chopped almonds, walnuts, or even crushed pretzels all work beautifully. I like to go for a mix so that every bite has a little variety.
Step – 6: Finish with extras
If you’re making dessert-style nachos, now’s the time to add mini chocolate chips, shredded coconut, or dried fruit. This step really turns the snack into something festive and eye-catching.
Step – 7: Serve immediately
Apple nachos are best enjoyed fresh, while the apple slices are still crisp and the drizzles haven’t had time to slide off. Serve right away and watch them disappear.
Substitutions
The great thing about apple nachos is their flexibility. You can swap ingredients easily to match dietary needs, flavor preferences, or simply what you have on hand.
Instead of peanut butter, try almond butter, sunflower seed butter, or even Greek yogurt for a creamy drizzle. If you’d like a lighter version, swap caramel or chocolate sauce for honey or maple syrup.
For the crunchy toppings, granola is a classic choice, but pumpkin seeds, chia seeds, or even a sprinkle of cinnamon-sugar can work beautifully. You can also make them more savory by skipping sweet drizzles and instead adding a bit of cheese, nuts, and herbs.
Best Side Dish of Apple Nachos
While apple nachos can absolutely stand on their own, pairing them with the right side dish makes the experience even better.
- Greek yogurt dip with cinnamon – A creamy, tangy dip that balances out the sweetness.
- A warm cup of chai tea or spiced cider – Perfect for cozy afternoons, especially in fall.
- Trail mix or roasted nuts – Adds extra crunch and protein to round out the snack.
Serving and Presentation Tips
When it comes to apple nachos, presentation makes all the difference. Since the recipe is simple and relies heavily on toppings, arranging everything thoughtfully elevates the dish from a casual snack to something you’d proudly serve at a party.
One of my favorite tricks is to fan the apple slices in a circular pattern on a large platter, almost like a blooming flower. This creates a sturdy base and gives your nachos a professional, “made-for-guests” appearance. Another option is to use a long rectangular board and layer the slices in rows, giving it more of a grazing-board style look.
The drizzles are where you can get creative. Instead of randomly spooning on peanut butter or caramel, make sweeping zigzag patterns across the entire platter. It looks elegant, and it ensures every bite gets coated evenly. Finally, be generous with color and texture—dark chocolate chips, golden caramel, bright red apple skin, and crunchy granola create a visual feast as much as a flavorful one.
If you’re serving these nachos for a party, you can also set up a “build-your-own” station with bowls of toppings so everyone can customize their plate. It’s interactive, fun, and guarantees every guest gets the flavor combination they love most.
Tips and Tricks to Make This Recipe Better

The simplicity of apple nachos is part of the charm, but there are a few ways to really take them from good to unforgettable.
- Slice apples evenly – Thin, consistent slices not only look better but also make it easier to pick them up and layer toppings.
- Use cold apples – Chilling apples before slicing keeps them extra crisp and refreshing.
- Prevent browning – A quick dip in lemon juice or even pineapple juice keeps your apple slices looking fresh for longer.
- Warm your nut butter – Just 10 seconds in the microwave will make it easier to drizzle without clumping.
- Mix textures – Combining creamy, crunchy, chewy, and sweet toppings keeps the nachos interesting with every bite.
- Serve immediately – These nachos don’t hold up well if they sit too long, so make them just before serving.
These small steps add up and make a noticeable difference in flavor, texture, and presentation.
Common Mistakes to Avoid
Even though apple nachos are easy to make, there are a few pitfalls that can affect the final result.
- Cutting apples too thick – Thick slices can feel clunky and don’t hold toppings well. Stick to thinner wedges for the best balance.
- Skipping the browning prevention step – If you’re making these ahead, untreated apples can quickly turn brown, which doesn’t look appetizing.
- Overloading with toppings – It’s tempting to add everything you love, but too much can make the nachos soggy or overwhelming. Stick to 3–4 main toppings.
- Not serving right away – Apples release moisture over time, and sauces can slide off, leaving the platter messy. For the best experience, assemble just before serving.
- Forgetting to balance flavors – Sweet on sweet can be cloying. Pair caramel with something crunchy or salty, like nuts or pretzels, to keep the flavor balanced.
Avoiding these mistakes ensures your apple nachos stay fresh, crisp, and delicious every time.
How to Store It
Apple nachos are at their best when eaten fresh, but if you find yourself with leftovers, there are a few tricks to keeping them tasty.
First, separate any apple slices that haven’t been covered with drizzles or toppings. Store these in an airtight container with a squeeze of lemon juice to slow down browning. They’ll stay crisp for about 1–2 days in the refrigerator.
For nachos that already have toppings, storage is a bit trickier. They can become soggy if left overnight. The best method is to scrape off the toppings and save them in separate small containers, then reassemble with fresh apples later.
If you know you’ll have leftovers ahead of time, I recommend only assembling as much as you’ll eat and keeping the extra apple slices and toppings ready to assemble later. That way, you always enjoy them at their freshest.
FAQ
Can I make apple nachos ahead of time?
You can prep the toppings and slice the apples ahead of time (tossing them in lemon juice to prevent browning), but it’s best to assemble just before serving.
What’s the best apple variety for this recipe?
Honeycrisp, Fuji, and Granny Smith are my top picks because they’re crisp and hold up well under toppings.
Can I make these nut-free?
Absolutely! Swap nut butter for sunflower seed butter, tahini, or even a drizzle of yogurt.
Are apple nachos healthy?
They can be! Stick with lighter toppings like nut butter, seeds, and granola for a protein-packed snack. For dessert-style nachos, caramel and chocolate make them more indulgent.
Can I make savory apple nachos?
Yes—you can! Try topping apple slices with a little cheese, chopped nuts, and fresh herbs for a unique savory twist.

Apple Nachos
- Total Time: 10 minutes
- Yield: 4 1x
- Diet: Vegetarian
Description
Apple nachos are the ultimate balance of fresh, crisp fruit and indulgent toppings, making them the perfect snack or light dessert. What I love about this recipe is how versatile it is—you can keep it wholesome with nut butter and granola, or turn it into a sweet treat with caramel drizzle and chocolate chips. No matter how you prepare them, apple nachos come together in minutes and always feel special. They’re a great option for after-school snacks, party platters, or just when you want something quick, colorful, and satisfying. The combination of textures—crisp apples, creamy drizzles, and crunchy toppings—makes every bite a little adventure.
Ingredients
- 3 large apples (Honeycrisp, Fuji, or Granny Smith)
- 3 tablespoons peanut butter or almond butter
- 2 tablespoons caramel sauce or honey
- ¼ cup granola
- 2 tablespoons mini chocolate chips
- Optional: shredded coconut, chopped nuts, dried cranberries
Instructions
- Wash and thinly slice the apples, about ¼-inch thick. Toss in lemon juice if storing.
- Arrange slices on a large platter, slightly overlapping.
- Warm nut butter until smooth, then drizzle evenly over apples.
- Add caramel or honey drizzle in sweeping motions.
- Sprinkle granola and chocolate chips over the top.
- Add optional toppings like coconut or dried fruit.
- Serve immediately while apples are crisp.
Notes
- To prevent browning, toss apples with lemon or pineapple juice.
- Mix sweet and salty toppings for better flavor balance.
- For a lighter version, replace caramel with honey or skip chocolate.
- Prep Time: 10 minutes
- Cook Time: 0 minutes
- Category: Snack / Dessert
- Method: No-cook assembly
- Cuisine: American
Nutrition
- Serving Size: 4
- Calories: 245
- Sugar: 19g
- Sodium: 65mg
- Fat: 11g
- Saturated Fat: 3g
- Unsaturated Fat: 7g
- Trans Fat: 0g
- Carbohydrates: 34g
- Fiber: 5g
- Protein: 5g
- Cholesterol: 0mg


