The smell of warm apples and cinnamon drifting through the kitchen is something I’ll never get tired of. Growing up, apple desserts were a sign that fall had truly arrived. My mom used to bake apple pies for Thanksgiving, but on weeknights, when time was short, she’d whip up a simple apple crisp instead. It wasn’t fancy, but it was comforting—crunchy, golden topping with bubbling spiced apples underneath.
Now, I find myself making apple crisp more often than pie. It’s less work, but the reward is just as delicious. I love how forgiving the recipe is—whether you’re using tart Granny Smiths, sweet Honeycrisps, or a mix of both, it always turns out wonderful. There’s just something about the buttery oat topping that makes it feel cozy and satisfying. This is one of those desserts that tastes like home, no matter where you are.
Why I Love This Recipe

Apple crisp has become my go-to dessert for several reasons. First, it strikes the perfect balance between sweet and tart. Unlike pie, where the crust can sometimes feel heavy, crisp gives you the best of both worlds—juicy, spiced apples underneath and a light, crunchy topping that adds texture.
Another reason I adore this recipe is how flexible it is. You don’t need to fuss over rolling dough or worrying if your crust shrinks. Instead, the topping is mixed in one bowl, scattered over the apples, and baked until golden. It’s rustic, easy, and honestly, a little forgiving if you make small mistakes.
What really sets this recipe apart is the use of oats in the topping. They toast beautifully in the oven and give that nutty, chewy bite that contrasts with the softness of the apples. A hint of cinnamon, nutmeg, and brown sugar deepens the flavor, making it taste like the holidays—even if you’re baking it in the middle of summer.
This dessert is special because it doesn’t need a celebration to justify making it. It’s perfect for a family dinner, a potluck, or just because you had a few apples sitting on the counter. And when served warm with a scoop of vanilla ice cream, it feels like an indulgence far greater than the effort it requires.
Ingredients for Apple Crisp
You’ll be happy to know that most of the ingredients for apple crisp are pantry staples. That’s one of the reasons I make it so often. Let’s break them down:
- Apples: The heart of the dish. I recommend using a mix of tart Granny Smith apples and sweeter ones like Honeycrisp or Fuji. This balance keeps the filling from being overly sweet and gives depth of flavor.
- Brown sugar: Adds caramel-like sweetness that pairs beautifully with apples. I prefer light brown sugar, but dark works too if you want a deeper molasses note.
- Cinnamon and nutmeg: These two spices bring warmth and a cozy aroma. Don’t skip them; they’re what make the apples taste like dessert.
- Lemon juice: Just a splash helps brighten the apples and keeps them from browning.
- Flour: Used both in the filling (to thicken the apple juices) and in the topping.
- Old-fashioned oats: Rolled oats give the topping its classic crisp texture. Quick oats don’t hold up as well, so stick with old-fashioned.
- Butter: Cold, unsalted butter is cut into the topping, creating those irresistible golden crumbs.
- Salt: Just a pinch sharpens the flavors and balances the sweetness.
Everything comes together with minimal fuss, which is why I often pull this recipe out on a whim.
How Much Time Will You Need
One of the best parts about apple crisp is how quickly it comes together.
- Prep time: About 20 minutes, depending on how fast you peel and slice apples. (If you have an apple corer or peeler, even faster!)
- Baking time: 40–45 minutes, until the topping is golden and the apples are bubbling.
- Cooling time: 10 minutes before serving, so the filling can set a little.
All in all, you can have this dessert ready in just about an hour. That’s a big win in my book, especially compared to pie, which can take twice as long.
How to Make This Apple Crisp
Step – 1: Prep the apples
Peel, core, and slice about 6–7 medium apples. I like them about ¼-inch thick—thin enough to soften but thick enough to hold shape. Place them in a large mixing bowl.
Step – 2: Season the filling
Add 2 tablespoons of flour, ½ cup of brown sugar, 1 teaspoon of cinnamon, ¼ teaspoon nutmeg, and a splash of lemon juice. Toss the apples well until everything is evenly coated. Transfer the mixture to a buttered 9×13-inch baking dish.
Step – 3: Make the topping
In another bowl, combine 1 cup of flour, 1 cup of old-fashioned oats, ½ cup of brown sugar, ½ teaspoon of salt, and 1 teaspoon of cinnamon. Cut in ½ cup of cold butter using a pastry cutter or your fingers until the mixture looks like coarse crumbs.
Step – 4: Assemble
Sprinkle the topping evenly over the apples. Don’t press it down too firmly; you want it crumbly so it bakes up crisp.
Step – 5: Bake
Place in a preheated oven at 350°F (175°C) and bake for 40–45 minutes. The topping should be golden brown, and the apples should be bubbling underneath.
Step – 6: Cool and serve
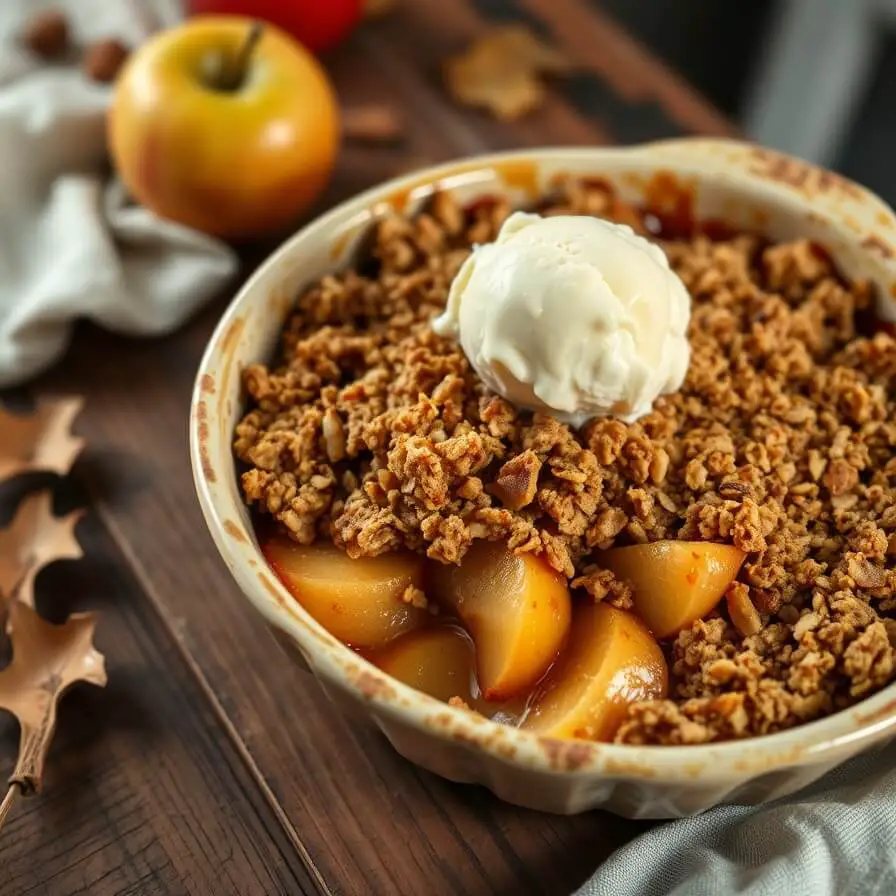
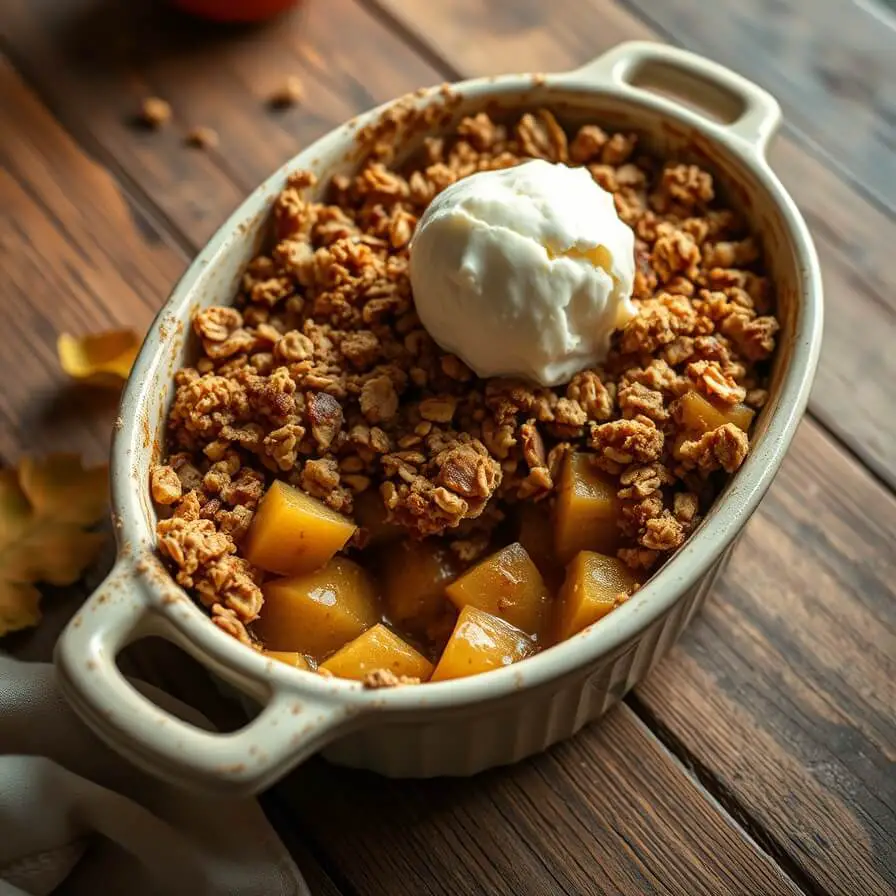
Let it rest for 10 minutes before serving. This allows the juices to thicken slightly. Serve warm with a scoop of vanilla ice cream or whipped cream.
Substitutions
Sometimes you don’t have the exact ingredients, and that’s perfectly fine. Here are a few swaps I’ve tried:
- Apples: Pears work beautifully in place of apples. You can even mix half apples, half pears for variety.
- Butter: If you’re out of butter, coconut oil makes a great alternative, though the flavor will be slightly different.
- Sugar: Maple syrup or honey can replace some of the sugar in the filling. Just reduce the flour slightly since liquid sweeteners add moisture.
- Oats: If oats aren’t your thing, use crushed graham crackers or chopped nuts for the topping.
These substitutions not only save you a grocery run but can also give the dessert a new twist.
Best Side Dish of Apple Crisp
While apple crisp is amazing on its own, pairing it with the right side can make the experience even better. Here are three favorites:
- Vanilla bean ice cream – The cold, creamy texture melts into the warm crisp, making every bite indulgent.
- Maple whipped cream – Light and airy with just a hint of sweetness.
- Sharp cheddar cheese slices – This may sound unusual, but in New England, apple desserts are often paired with cheese, and the salty tang is surprisingly perfect with sweet apples.
Serving and Presentation Tips
There’s nothing more inviting than bringing a bubbling apple crisp straight from the oven to the table. The key is presentation that highlights its rustic charm. I usually serve it in the same baking dish it was cooked in—it feels warm, cozy, and family-style. If you want to dress it up a bit for guests, scoop portions into individual ramekins and top each with a dollop of whipped cream or a neat scoop of vanilla ice cream.
For an extra touch, sprinkle a pinch of cinnamon or a drizzle of caramel sauce over the top. If you’re serving at a dinner party, garnish with a sprig of fresh mint or a thin apple slice for color. The contrast of warm crisp with a cool topping is what makes it irresistible, so don’t skip that final flourish.
Tips and Tricks to Make This Recipe Better
The beauty of apple crisp is that it’s hard to mess up, but a few tricks can make it shine even brighter:
- Use a mix of apples: Combining tart and sweet varieties creates depth of flavor. Granny Smith with Honeycrisp is my favorite combination.
- Cut butter into small cubes: The smaller the butter pieces, the more evenly they’ll distribute in the topping, giving that perfect crumbly texture.
- Don’t overwork the topping: You want visible pieces of butter for that crispy, golden finish.
- Bake until bubbling: The apples need enough time to release their juices. If the topping is browned but the filling isn’t bubbling, cover with foil and bake a little longer.
- Add texture: A handful of chopped pecans or walnuts in the topping adds crunch and a nutty flavor.
Common Mistakes to Avoid
Even a simple recipe like apple crisp has its pitfalls. Here’s what to watch out for:
- Slicing apples too thin: They’ll turn mushy instead of tender. Aim for about ¼-inch thick.
- Using instant oats: These don’t hold up in baking and can make the topping soggy. Always use old-fashioned rolled oats.
- Skipping the flour in the filling: Without it, the apple juices can get watery instead of thick and syrupy.
- Overloading with sugar: Apples are naturally sweet, so balance is key. Let the fruit shine.
- Not cooling before serving: If you dig in immediately, the filling will be too loose. Let it rest at least 10 minutes.
How to Store It
If you happen to have leftovers (rare in my house!), apple crisp stores beautifully.
- Room temperature: Keep it covered for up to one day.
- Refrigerator: Store in an airtight container for up to 4–5 days. To reheat, warm it in the oven at 350°F until the topping is crisp again.
- Freezer: You can freeze baked apple crisp for up to 3 months. Thaw overnight in the fridge, then reheat in the oven.
A quick note—if you plan on freezing, avoid adding ice cream or whipped cream until you’re ready to serve again.
FAQ
Can I make apple crisp ahead of time?
Yes! You can prepare the apple filling and topping separately, store them in the fridge, and assemble right before baking.
What are the best apples for apple crisp?
A mix of tart Granny Smith and sweet Honeycrisp or Fuji apples works best.
Can I make it gluten-free?
Absolutely. Use almond flour or a gluten-free flour blend, and make sure your oats are certified gluten-free.
Do I need to peel the apples?
I usually do for a softer texture, but you can leave the peels on for extra fiber and a slightly chewier bite.
Why is my topping soggy?
This usually happens if too much butter was used, instant oats replaced rolled oats, or the dish wasn’t baked long enough to fully crisp.

Apple Crisp Recipe
- Total Time: 1 hour 5 minutes
- Yield: 6–8 1x
- Diet: Vegetarian
Description
This apple crisp recipe is warm, comforting, and incredibly easy to make. With tender spiced apples and a buttery oat topping, it’s the kind of dessert that feels like a hug in a bowl. Perfect for family dinners, holidays, or a weeknight treat, it requires minimal effort but delivers maximum comfort. Pair it with vanilla ice cream or whipped cream for the ultimate indulgence.
Ingredients
- 6–7 medium apples (mix of tart and sweet), peeled and sliced
- 1 cup brown sugar, divided
- 2 tbsp flour (for filling)
- 1 tsp cinnamon, divided
- ¼ tsp nutmeg
- 1 tsp lemon juice
- 1 cup old-fashioned rolled oats
- 1 cup all-purpose flour
- ½ cup cold unsalted butter, cubed
- Pinch of salt
Instructions
- Toss sliced apples with 2 tbsp flour, ½ cup brown sugar, ½ tsp cinnamon, nutmeg, and lemon juice. Transfer to a greased 9×13-inch dish.
- In another bowl, mix oats, flour, ½ cup brown sugar, remaining cinnamon, and salt. Cut in butter until crumbly.
- Sprinkle topping evenly over apples.
- Bake at 350°F (175°C) for 40–45 minutes until topping is golden and filling is bubbling.
- Let rest 10 minutes before serving.
Notes
- Mix apple varieties for the best flavor balance.
- Add chopped nuts to the topping for extra crunch.
- Serve warm with ice cream or whipped cream.
- Prep Time: 20 minutes
- Cook Time: 45 minutes
- Category: Dessert
- Method: Baking
- Cuisine: American
Nutrition
- Serving Size: 6–8
- Calories: 320
- Sugar: 34g
- Sodium: 120mg
- Fat: 11g
- Saturated Fat: 6g
- Unsaturated Fat: 4g
- Trans Fat: 0g
- Carbohydrates: 55g
- Fiber: 4g
- Protein: 3g
- Cholesterol: 25mg