Spring is the season of renewal, making it the ideal time to celebrate birthdays with vibrant and delightful cakes. Whether you’re looking for floral designs, fresh fruit toppings, or playful themes, we’ve got a collection of 21 spring birthday cake ideas that will inspire your sweet creation. Dive in to find the perfect cake that captures the essence of spring and makes any celebration special!
Chocolate Mint Layer Cake
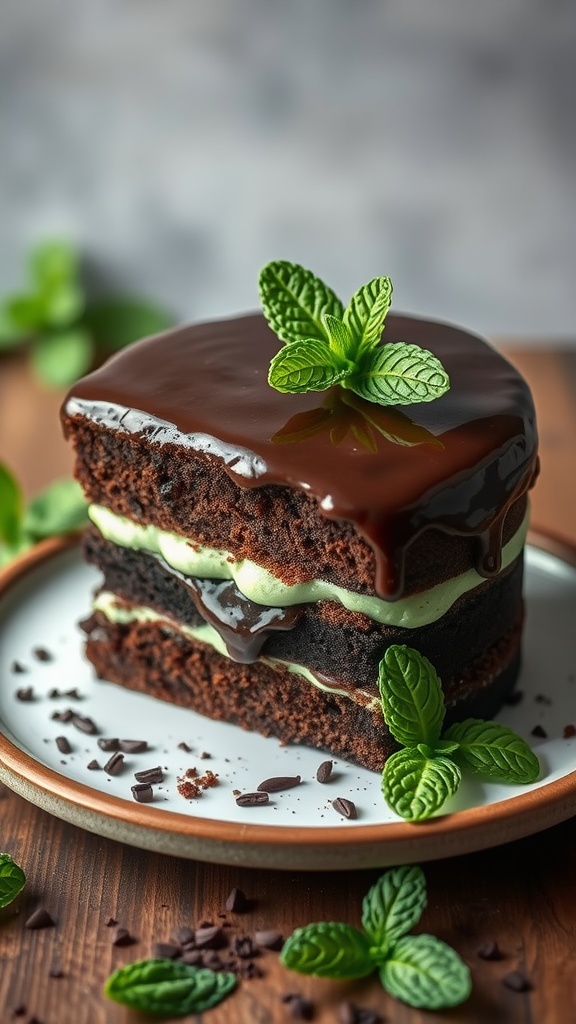
This Chocolate Mint Layer Cake is a delightful treat perfect for spring celebrations. With rich chocolate layers and a refreshing mint frosting, it offers a delicious contrast that’s sure to impress. While it may look fancy, the recipe is straightforward enough for bakers of all skill levels to try their hand at.
The combination of dark chocolate and mint creates a refreshing flavor profile that feels both indulgent and light. It’s a wonderful choice for birthday parties or any spring gathering, bringing joy to chocolate lovers and mint enthusiasts alike.
Ingredients
- 1 ¾ cups all-purpose flour
- 1 ½ cups granulated sugar
- ¾ cup unsweetened cocoa powder
- 1 ½ teaspoons baking powder
- 1 ½ teaspoons baking soda
- 1 teaspoon salt
- 2 large eggs
- 1 cup whole milk
- ½ cup vegetable oil
- 2 teaspoons pure vanilla extract
- 1 cup boiling water
- 1 ½ cups unsweetened whipped cream
- 1 teaspoon peppermint extract
- Green food coloring (optional)
- Chocolate ganache for drizzling
Instructions
- Preheat your oven to 350°F (175°C) and grease two 9-inch round cake pans.
- In a large bowl, combine flour, sugar, cocoa powder, baking powder, baking soda, and salt. Mix well.
- Add eggs, milk, vegetable oil, and vanilla to the dry ingredients, and beat for 2 minutes on medium speed. Stir in boiling water until combined.
- Divide the batter evenly between the prepared pans and bake for 30-35 minutes, or until a toothpick comes out clean.
- Let the cakes cool in the pans for 10 minutes before transferring to wire racks to cool completely.
- For the mint frosting, whip the cream until soft peaks form, then gently fold in peppermint extract and green food coloring if desired.
- Place one cake layer on a serving plate, spread a layer of mint frosting on top, and place the second layer on top of it. Frost the top and sides of the cake with remaining mint frosting.
- Drizzle chocolate ganache over the top of the cake and garnish with mint leaves if desired.
Vanilla Almond Blossom Cake
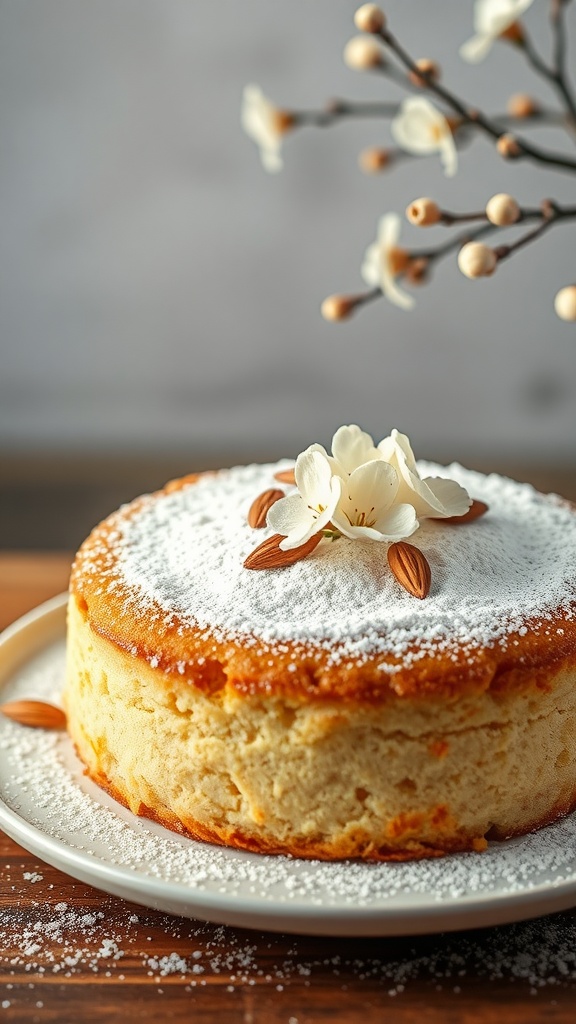
Indulge in the delicate flavors of a Vanilla Almond Blossom Cake, where the soothing essence of vanilla merges beautifully with a hint of almond. This cake is light and fluffy, making it a delightful treat for any spring birthday celebration. The gentle sweetness is perfectly balanced, creating a taste that’s both comforting and refreshing.
This cake is also straightforward to make, making it suitable for bakers of all levels. It’s an easy-to-follow recipe that results in a scrumptious dessert everyone will love. Pair it with some fresh flowers or a light dusting of powdered sugar for an elegant touch!
Ingredients
- 2 cups all-purpose flour
- 1 cup granulated sugar
- 1/2 cup unsalted butter, softened
- 1 cup milk
- 3 large eggs
- 1 tablespoon vanilla extract
- 1 teaspoon almond extract
- 2 teaspoons baking powder
- 1/4 teaspoon salt
- Powdered sugar for dusting
- Almonds and edible flowers for decoration (optional)
Instructions
- Preheat your oven to 350°F (175°C) and grease a 9-inch round cake pan.
- In a large mixing bowl, cream together the softened butter and granulated sugar until light and fluffy.
- Add the eggs, one at a time, beating well after each addition. Stir in the vanilla and almond extracts.
- In another bowl, combine the flour, baking powder, and salt. Gradually add this dry mixture to the wet ingredients, alternating with the milk. Mix until just combined.
- Pour the batter into the prepared cake pan and smooth the top. Bake for 25-30 minutes, or until a toothpick inserted in the center comes out clean.
- Allow the cake to cool in the pan for 10 minutes before transferring it to a wire rack to cool completely. Once cooled, dust with powdered sugar and decorate with almonds and flowers if desired.
Lemon Lavender Cake
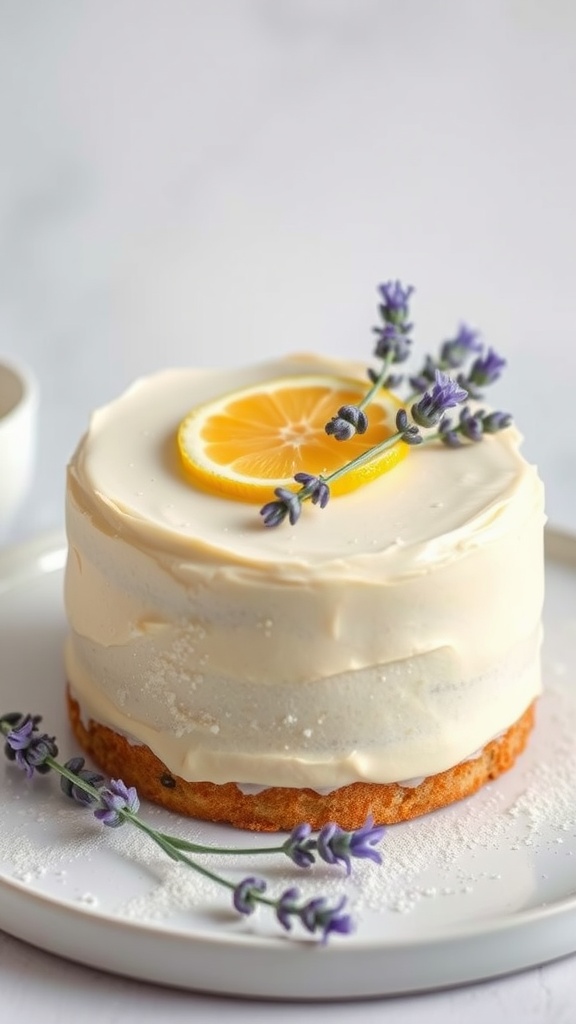
The Lemon Lavender Cake is a delightful spring dessert that perfectly balances zesty lemon and aromatic lavender. This cake is light, refreshing, and offers a unique flavor profile that makes it a lovely addition to any birthday celebration. It’s surprisingly easy to prepare, making it ideal for bakers of all skill levels.
With its moist layers and creamy frosting, this cake not only tastes delicious but also looks beautiful on any dessert table. The floral notes of lavender combined with the brightness of lemon create a harmonious blend that feels perfect for a spring birthday. Let’s dive into the recipe so you can create this standout cake for your next gathering!
Ingredients
- 1 ½ cups all-purpose flour
- 1 cup granulated sugar
- ½ cup unsalted butter, softened
- 3 large eggs
- 1 teaspoon baking powder
- 1 teaspoon vanilla extract
- ⅓ cup milk
- 2 tablespoons lemon zest
- 2 tablespoons dried culinary lavender
- ¼ cup fresh lemon juice
Instructions
- Preheat the oven to 350°F (175°C). Grease and flour two 6-inch round cake pans.
- In a mixing bowl, cream together the softened butter and sugar until light and fluffy. Add the eggs one at a time, mixing well after each addition.
- In another bowl, whisk together the flour, baking powder, lavender, and lemon zest.
- Gradually add the dry ingredients to the wet mixture, alternating with the milk and lemon juice, until fully combined.
- Pour the batter evenly into the prepared cake pans and bake for 25-30 minutes, or until a toothpick comes out clean.
- Let the cakes cool in the pans for 10 minutes before transferring to wire racks to cool completely.
- Once cooled, frost with your favorite lemon frosting and garnish with lemon slices and lavender sprigs for a beautiful presentation.
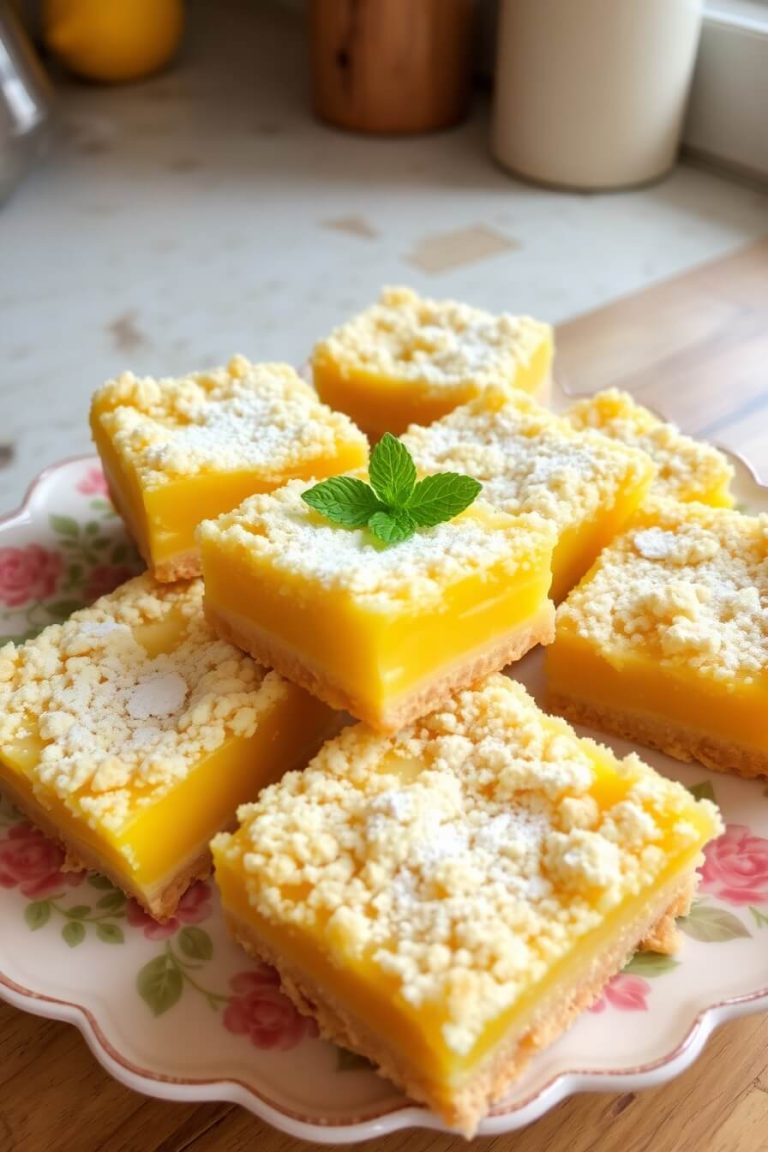
Key Lime Pie Cake
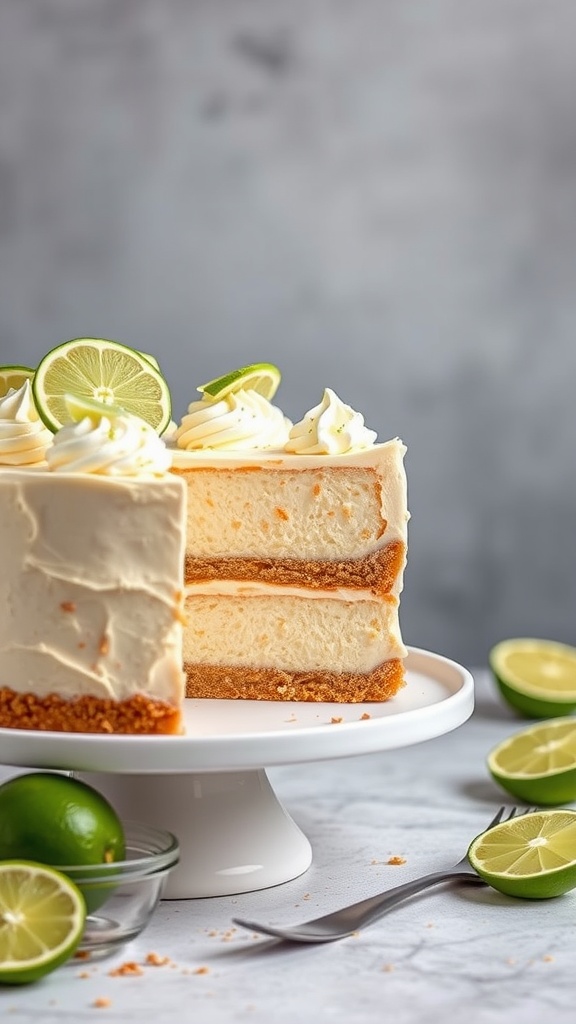
If you’re looking for a refreshing dessert to celebrate a spring birthday, a Key Lime Pie Cake might just be the ticket! This delightful creation combines the tart, zesty flavor of key limes with the creamy texture of cake, making it a delicious choice for any occasion. It’s not too complicated to whip up, making it a great option even for those new to baking.
With a buttery graham cracker crust and a smooth, tangy filling, this cake is sure to impress your guests. The addition of whipped cream on top adds a light, airy finish that complements the citrus flavor beautifully. Plus, it’s a fun twist on the traditional key lime pie, perfect for celebrating in style!
Ingredients
- 1 ½ cups graham cracker crumbs
- 1/3 cup granulated sugar
- 1/2 cup unsalted butter, melted
- 1 ¼ cups all-purpose flour
- 1 teaspoon baking powder
- 1/2 teaspoon salt
- 1 cup granulated sugar
- 3 large eggs
- 1/2 cup key lime juice
- 1 teaspoon vanilla extract
- 1 cup heavy cream
- 2 tablespoons powdered sugar
- Key lime slices for garnish
Instructions
- Preheat the oven to 350°F (175°C). In a bowl, mix graham cracker crumbs, sugar, and melted butter. Press this mixture into the bottom of a greased 9-inch round cake pan to form the crust.
- In another bowl, combine flour, baking powder, and salt. In a large mixing bowl, beat together sugar and eggs until light and fluffy. Gradually add the lime juice and vanilla extract, mixing well.
- Slowly incorporate the dry ingredients into the wet mixture, stirring until just combined. Pour the batter over the crust in the pan.
- Bake for 25-30 minutes or until a toothpick inserted in the center comes out clean. Let the cake cool in the pan for about 10 minutes before transferring it to a wire rack to cool completely.
- While the cake cools, whip the heavy cream with powdered sugar until soft peaks form. Once the cake is cool, spread the whipped cream on top and garnish with key lime slices before serving.
Strawberry Shortcake
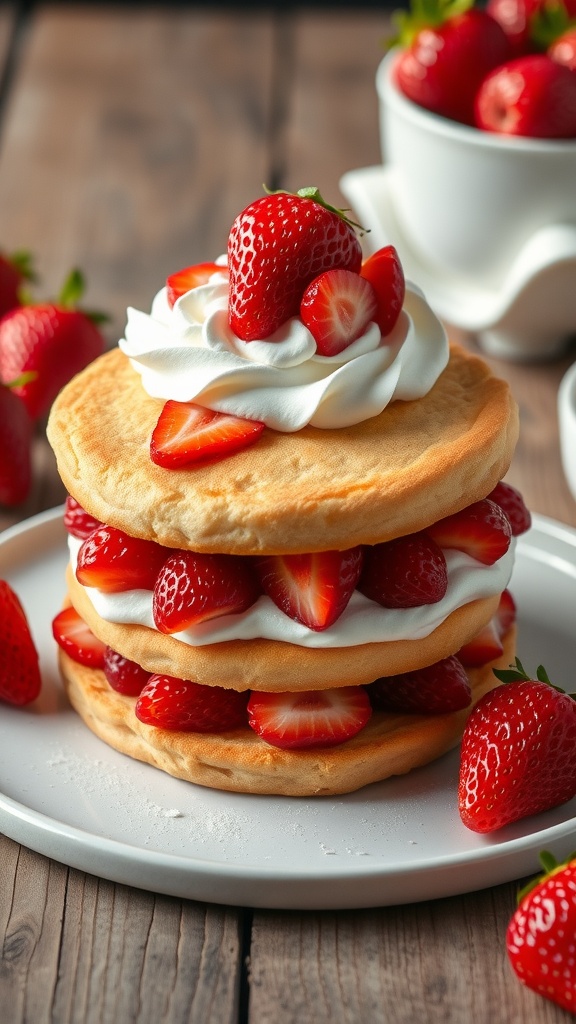
Strawberry shortcake is a delightful spring dessert that combines layers of fluffy cake, fresh strawberries, and sweet whipped cream. It’s light, refreshing, and packed with flavor, making it an ideal treat for birthday celebrations in the warmer months. The simplicity of this recipe allows anyone to whip it up, whether you’re a seasoned baker or a beginner in the kitchen.
This cake brings together the sweet juiciness of strawberries and the airy texture of the cake, creating a dessert that feels both indulgent and light. Perfect for sharing, strawberry shortcake not only tastes delicious but also looks beautiful on any birthday table.
Ingredients
- 2 cups all-purpose flour
- 1/4 cup granulated sugar
- 1 tablespoon baking powder
- 1/2 teaspoon salt
- 1/2 cup unsalted butter, cold and cubed
- 1 cup heavy cream
- 1 teaspoon vanilla extract
- 4 cups fresh strawberries, sliced
- 1/4 cup powdered sugar
- 1 cup whipped cream, for topping
Instructions
- Preheat the oven to 425°F (220°C). In a large bowl, mix the flour, granulated sugar, baking powder, and salt.
- Add the cold butter and mix until the mixture resembles coarse crumbs. Slowly add the heavy cream and vanilla, stirring until just combined.
- Turn the dough onto a floured surface and gently knead it a few times until smooth. Pat the dough into a 1-inch thick circle and cut into rounds.
- Place the rounds on a baking sheet and bake for 12-15 minutes until golden brown. Let them cool.
- While the cakes cool, mix the sliced strawberries with powdered sugar in a bowl and let them sit for about 15 minutes to create a syrup.
- To assemble, slice the cakes in half horizontally. Layer strawberries and whipped cream between the cake halves, then top with more strawberries and whipped cream before serving.
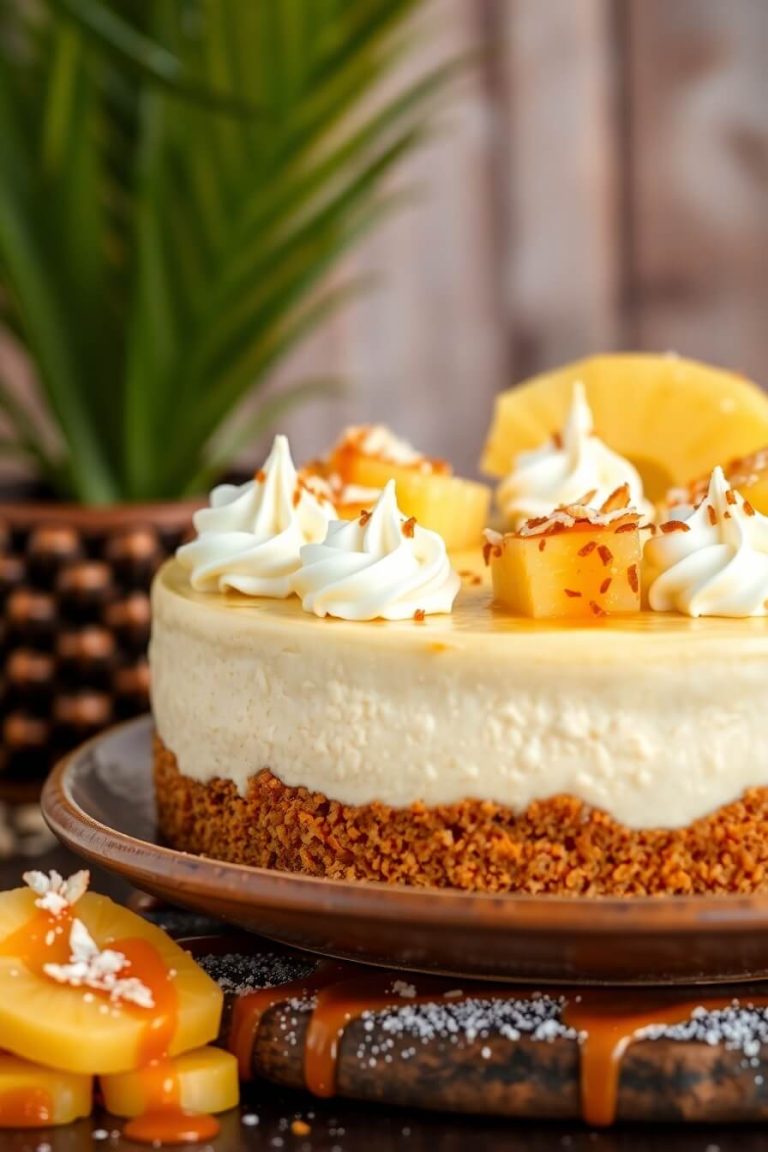
Pineapple Coconut Cake
Pineapple Coconut Cake is a delightful treat that perfectly captures the essence of spring. With its light, fluffy texture and tropical flavors, it’s the kind of cake that can brighten up any birthday celebration. The combination of sweet pineapple and creamy coconut creates a refreshing dessert that’s both satisfying and simple to make.
This cake is great for bakers of all skill levels. The moist layers are easy to whip up, and the frosting can be spread on without the need for complicated techniques. Whether it’s for a birthday party or just a sunny day, this cake will surely be a hit!
Ingredients
- 2 cups all-purpose flour
- 1 ½ cups granulated sugar
- ½ cup unsalted butter, softened
- 1 cup coconut milk
- 1 teaspoon vanilla extract
- 2 teaspoons baking powder
- ½ teaspoon baking soda
- 1/4 teaspoon salt
- 3 large eggs
- 1 cup crushed pineapple, drained
- 1 cup shredded coconut
Instructions
- Preheat the oven to 350°F (175°C) and grease two 9-inch round cake pans.
- In a large mixing bowl, cream together the softened butter and sugar until light and fluffy. Add eggs one at a time, mixing well after each addition.
- In another bowl, combine the flour, baking powder, baking soda, and salt. Gradually add this dry mixture to the wet ingredients, alternating with the coconut milk, and mix until just combined.
- Fold in the crushed pineapple and shredded coconut until evenly distributed.
- Divide the batter between the prepared cake pans and bake for 25-30 minutes, or until a toothpick inserted in the center comes out clean. Allow the cakes to cool in the pans for 10 minutes before transferring to a wire rack to cool completely.
- Once cooled, frost with whipped cream or a coconut frosting, and decorate with extra pineapple chunks and shredded coconut, if desired.
Carrot Cake with Cream Cheese Frosting
Carrot cake is a delightful spring dessert that perfectly balances sweetness and spice. The natural moisture from the carrots gives the cake a tender crumb, while warm spices like cinnamon and nutmeg add a cozy warmth. Topped with rich cream cheese frosting, this cake is both indulgent and comforting, making it a superb choice for spring birthday celebrations.
Not only is this cake delicious, but it’s also quite simple to make. With straightforward ingredients and easy steps, you’ll be able to whip it up in no time, impressing your guests with both the taste and the beautiful presentation.
Ingredients
- 2 cups all-purpose flour
- 2 cups granulated sugar
- 1 teaspoon baking soda
- 1 teaspoon baking powder
- 1 teaspoon ground cinnamon
- 1/2 teaspoon ground nutmeg
- 1/2 teaspoon salt
- 1 cup vegetable oil
- 4 large eggs
- 3 cups grated carrots
- 1 cup crushed pineapple, drained
- 1/2 cup chopped walnuts or pecans (optional)
- 1 cup cream cheese, softened
- 4 cups powdered sugar
- 1 teaspoon vanilla extract
Instructions
- Preheat the oven to 350°F (175°C). Grease and flour two 9-inch round cake pans.
- In a large bowl, whisk together flour, sugar, baking soda, baking powder, cinnamon, nutmeg, and salt.
- In another bowl, combine oil, eggs, grated carrots, and crushed pineapple. Mix well.
- Pour the wet ingredients into the dry ingredients and mix until just combined. Fold in walnuts or pecans if using.
- Divide the batter evenly between the prepared pans. Bake for 25-30 minutes or until a toothpick inserted in the center comes out clean.
- Allow the cakes to cool in the pans for 10 minutes, then remove and transfer to wire racks to cool completely.
- For the frosting, beat together cream cheese, powdered sugar, and vanilla until smooth.
- Once the cakes are completely cooled, spread frosting between the layers and on top of the cake. Decorate as desired.
Raspberry Lemonade Cake
This Raspberry Lemonade Cake is a delightful treat that captures the essence of spring. With its bright flavors of tart lemon and sweet raspberry, it’s a refreshing choice for any birthday celebration during the warmer months. The combination of zesty lemonade and juicy raspberries creates a vibrant taste that brings a smile to everyone’s face.
Not only is this cake delicious, but it’s also easy to make! The layers are light and fluffy, making it perfect for a light dessert. Plus, the colorful frosting and fresh fruit on top make it visually appealing. Let’s dive into the ingredients and instructions to create this cheerful cake!
Ingredients
- 1 ½ cups all-purpose flour
- 1 cup granulated sugar
- 1 teaspoon baking powder
- ½ teaspoon baking soda
- ¼ teaspoon salt
- ½ cup unsalted butter, softened
- 2 large eggs
- ½ cup buttermilk
- ¼ cup lemon juice
- 1 teaspoon lemon zest
- 1 cup raspberries, fresh or frozen
- 3 cups powdered sugar
- ½ cup unsalted butter, softened
- 2 tablespoons lemon juice
- 1 tablespoon raspberry puree
- Fresh raspberries and mint for garnish
Instructions
- Preheat the oven to 350°F (175°C). Grease and flour two 8-inch round cake pans.
- In a large bowl, whisk together flour, sugar, baking powder, baking soda, and salt. Add softened butter, eggs, buttermilk, lemon juice, and lemon zest. Beat until smooth and creamy.
- Gently fold in the raspberries. Divide the batter evenly between the prepared pans.
- Bake for 25-30 minutes, or until a toothpick inserted in the center comes out clean. Let the cakes cool in the pans for 10 minutes, then transfer to a wire rack to cool completely.
- For the frosting, beat together powdered sugar, softened butter, and lemon juice until light and fluffy. Mix in raspberry puree until well combined and desired color is achieved.
- Once the cakes are completely cooled, frost the top of one layer, then place the other layer on top. Frost the sides and top of the cake, then decorate with fresh raspberries and mint leaves.
Peach Cobbler Cake
If you’re dreaming of a cake that tastes like a warm, comforting hug, look no further than the Peach Cobbler Cake. This delightful treat combines the sweetness of peaches with a buttery cake base that’s soft and fluffy. It’s like enjoying a slice of summer, no matter what the season is!
What makes this cake so appealing is its simplicity. With just a few ingredients and straightforward steps, even novice bakers can whip it up with ease. Serve it warm with a scoop of vanilla ice cream on top for that perfect balance of flavors. Get ready to impress your friends and family with this cozy dessert!
Ingredients
- 4 ripe peaches, sliced
- 1 cup granulated sugar
- 1/2 cup unsalted butter, melted
- 1 cup all-purpose flour
- 1 tablespoon baking powder
- 1/2 teaspoon salt
- 1 cup milk
- 1 teaspoon vanilla extract
- 1/2 teaspoon ground cinnamon
Instructions
- Preheat the oven to 350°F (175°C). Grease a 9-inch baking dish or skillet.
- In a bowl, toss the sliced peaches with half of the sugar. Set aside to draw out the juices.
- In another bowl, combine the melted butter, remaining sugar, flour, baking powder, salt, milk, and vanilla extract. Mix until smooth.
- Pour the batter into the prepared dish, then evenly distribute the peaches on top. Sprinkle with ground cinnamon.
- Bake for 30-35 minutes or until the top is golden and a toothpick inserted into the center comes out clean.
- Allow to cool slightly before serving. Enjoy warm with a scoop of ice cream!
Cherry Blossom Cake
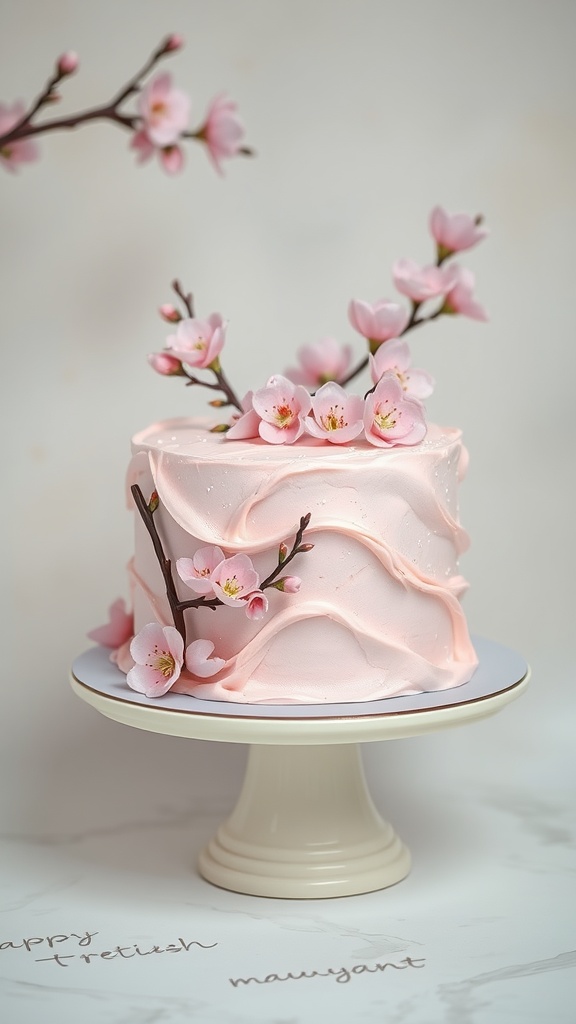
The Cherry Blossom Cake is a delightful dessert that beautifully combines spring flavors with a touch of elegance. With its light and airy sponge, paired with a sweet cherry filling and finished off with a delicate pink frosting, this cake is perfect for celebrating birthdays during the blossoming season. Its subtle taste and charming aesthetic make it a crowd-pleaser that’s relatively simple to make, even for novice bakers.
This cake not only looks stunning but also brings a refreshing taste to your palate, making it a great choice for spring gatherings. The combination of cherry flavor and fluffy cake creates a delightful harmony that will have everyone reaching for seconds!
Ingredients
- 2 cups all-purpose flour
- 1 1/2 teaspoons baking powder
- 1/2 teaspoon baking soda
- 1/4 teaspoon salt
- 3/4 cup unsalted butter, softened
- 1 1/2 cups granulated sugar
- 3 large eggs
- 1 teaspoon vanilla extract
- 1 cup buttermilk
- 1 cup cherry preserves
- 2 cups heavy whipping cream
- 1/4 cup powdered sugar
- 1 teaspoon almond extract
- Pink food coloring (optional)
Instructions
- Preheat the oven to 350°F (175°C). Grease and flour two 9-inch round cake pans.
- In a bowl, whisk together flour, baking powder, baking soda, and salt. Set aside.
- In a large mixing bowl, cream the softened butter and granulated sugar until light and fluffy. Add the eggs one at a time, mixing well after each addition. Stir in vanilla extract.
- Gradually add the dry ingredients to the wet mixture, alternating with buttermilk. Mix until just combined.
- Divide the batter evenly between the prepared pans and bake for 25-30 minutes or until a toothpick inserted comes out clean. Let cool in the pans for 10 minutes before transferring to wire racks to cool completely.
- Once cooled, spread a layer of cherry preserves on top of one cake layer. Place the second layer on top and set aside.
- In a separate bowl, whip the heavy cream with powdered sugar and almond extract until stiff peaks form. If desired, add pink food coloring for a soft hue.
- Frost the top and sides of the cake with the whipped cream. Decorate with fresh cherries or edible flowers as desired.
Lavender Honey Cake
If you’re looking for a delightful spring dessert, a lavender honey cake fits the bill perfectly. With its floral notes and a hint of sweetness from the honey, this cake offers a unique flavor profile that’s both refreshing and comforting. It’s surprisingly simple to make, making it a great choice for birthday celebrations or gatherings.
The cake’s light texture paired with a drizzle of honey glaze creates a lovely treat that’s sure to impress your guests. Plus, it’s an elegant option to celebrate spring birthdays, filled with the essence of the season.
Ingredients
- 2 cups all-purpose flour
- 1 tablespoon culinary lavender
- 1 teaspoon baking powder
- 1/2 teaspoon baking soda
- 1/4 teaspoon salt
- 1/2 cup unsalted butter, softened
- 1 cup granulated sugar
- 3 large eggs
- 1/2 cup honey
- 1 cup milk
- 1 teaspoon vanilla extract
Instructions
- Preheat the oven to 350°F (175°C) and grease two 9-inch round cake pans.
- In a bowl, mix flour, lavender, baking powder, baking soda, and salt. Set aside.
- In another bowl, cream together the butter and sugar until light and fluffy. Add the eggs one at a time, mixing well after each addition.
- Stir in honey, milk, and vanilla until combined. Gradually add the dry ingredients, mixing until just combined.
- Divide the batter evenly between the prepared pans and bake for 25-30 minutes, or until a toothpick inserted into the center comes out clean.
- Let the cakes cool in the pans for 10 minutes before transferring to wire racks to cool completely. Drizzle with honey before serving.
Funfetti Spring Cake

Spring is the perfect time to celebrate with a funfetti cake that bursts with colors and flavors. This cake is light, fluffy, and packed with sprinkles, making it a cheerful addition to any birthday party. It’s not just visually appealing; the taste is delightful, combining a sweet vanilla cake with a hint of nostalgia from the classic sprinkles.
Making a funfetti spring cake is simple and can be an enjoyable activity to do with friends or family. With just a few basic ingredients and some festive decorations, you’ll have a delightful treat ready to impress your guests. They’ll love the surprise of sprinkles in every bite!
Ingredients
- 2 ½ cups all-purpose flour
- 1 ½ cups granulated sugar
- 1 tablespoon baking powder
- ½ teaspoon salt
- 1 cup unsalted butter, softened
- 4 large eggs
- 1 tablespoon vanilla extract
- 1 cup milk
- 1 cup rainbow sprinkles
- 2 cups whipped cream for frosting
- Additional sprinkles for decoration
Instructions
- Preheat the oven to 350°F (175°C) and grease two 9-inch round cake pans.
- In a large bowl, mix the flour, sugar, baking powder, and salt together.
- Add the softened butter, eggs, and vanilla extract to the dry ingredients. Beat the mixture on medium speed until well combined.
- Gradually add the milk, mixing until the batter is smooth. Fold in the rainbow sprinkles.
- Divide the batter evenly between the prepared cake pans and bake for 25-30 minutes, or until a toothpick inserted in the center comes out clean.
- Let the cakes cool in the pans for about 10 minutes before transferring them to a wire rack to cool completely.
- Once cooled, frost the top of one cake layer with whipped cream, place the second layer on top, and frost the sides and top of the cake.
- Decorate with additional sprinkles and serve!
Honey Bee Cake
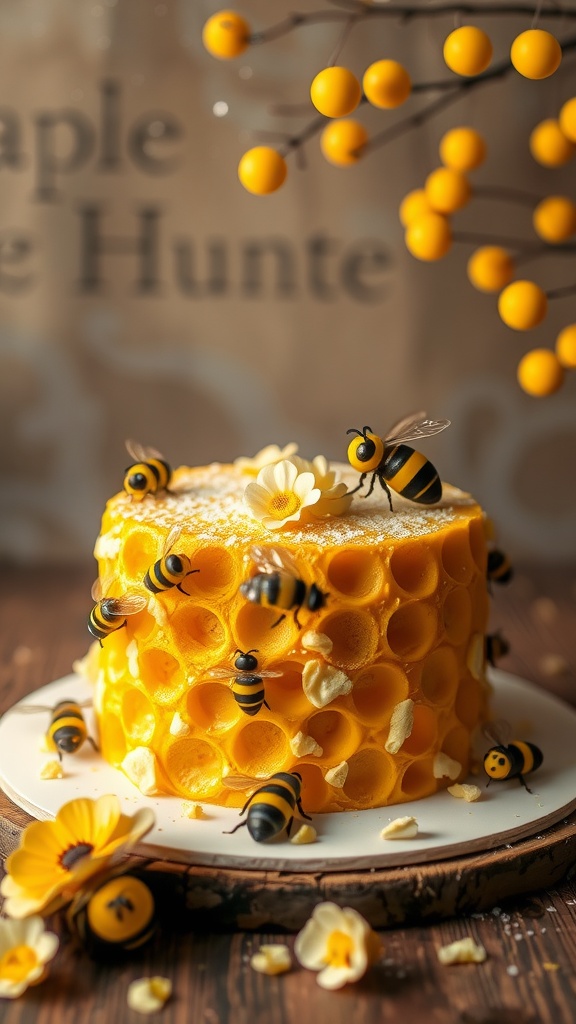
The Honey Bee Cake is a delightful treat that captures the essence of spring with its sweet, floral flavors. This cake is moist and fluffy, infused with the natural sweetness of honey, making it a wonderful option for birthday celebrations.
Not only is it simple to make, but it also brings a charming aesthetic to your dessert table. Decorated with bee-themed elements and a golden hue, it’s perfect for spring gatherings. The combination of honey and buttercream creates a rich flavor that is sure to please your guests.
Ingredients
- 2 cups all-purpose flour
- 1 cup granulated sugar
- 1/2 cup unsalted butter, softened
- 1 cup honey
- 2 large eggs
- 1 cup milk
- 2 teaspoons baking powder
- 1/2 teaspoon salt
- 1 teaspoon vanilla extract
- Buttercream frosting (store-bought or homemade)
Instructions
- Preheat your oven to 350°F (175°C). Grease and flour two 9-inch round cake pans.
- In a large bowl, cream together the softened butter and granulated sugar until light and fluffy. Add in the honey and mix well.
- Beat in the eggs one at a time, then stir in the vanilla extract.
- In another bowl, combine the flour, baking powder, and salt. Gradually add this dry mixture to the honey mixture, alternating with milk, until just combined.
- Divide the batter evenly between the prepared pans. Bake for 25-30 minutes, or until a toothpick inserted in the center comes out clean.
- Allow the cakes to cool in the pans for 10 minutes before transferring them to a wire rack to cool completely.
- Once cooled, frost with buttercream frosting and decorate with bee-themed decorations, if desired. Enjoy your Honey Bee Cake!
Mint Chocolate Chip Cake
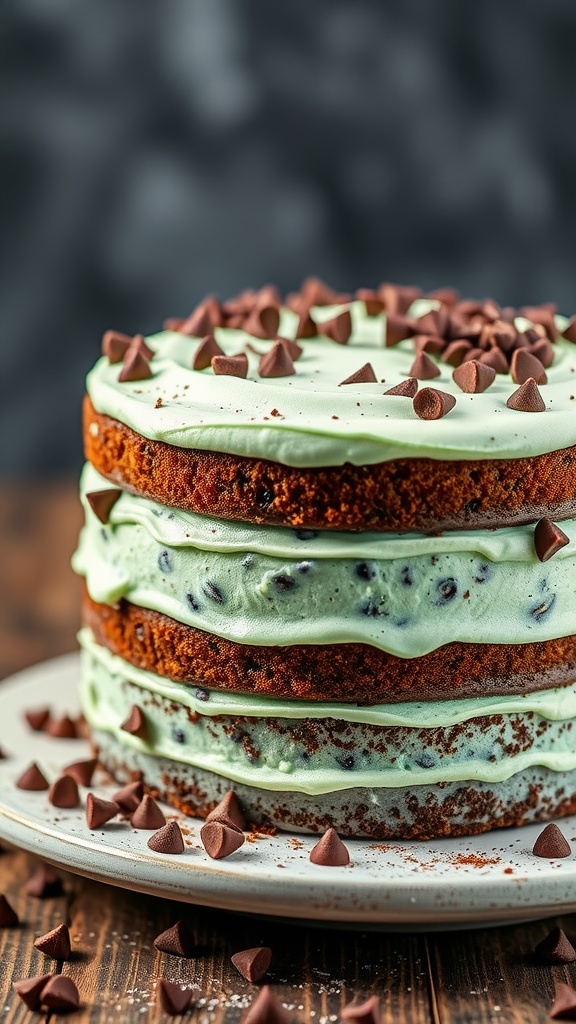
If you’re looking for a delightful twist on a classic dessert, mint chocolate chip cake is a fantastic choice. This cake combines the refreshing flavor of mint with rich chocolate, creating a treat that’s both vibrant and satisfying. It’s simple enough for bakers of any skill level, making it a fun and easy project for spring celebrations.
The mint flavor is refreshing, while the chocolate adds a depth that balances the sweetness perfectly. This cake is not only delicious but visually appealing with its bright green layers and chocolate chips. Celebrate a special birthday or just treat yourself with this delightful cake.
Ingredients
- 2 cups all-purpose flour
- 1 1/2 cups granulated sugar
- 1/2 cup unsweetened cocoa powder
- 1 1/2 teaspoons baking powder
- 1 teaspoon baking soda
- 1/2 teaspoon salt
- 1 cup buttermilk
- 1/2 cup vegetable oil
- 2 large eggs
- 1 teaspoon vanilla extract
- 1 teaspoon peppermint extract
- 1 cup boiling water
- 1 1/2 cups whipped cream
- 1/2 cup mint chocolate chips
- Green food coloring (optional)
Instructions
- Preheat Oven: Preheat your oven to 350°F (175°C). Grease and flour three round cake pans.
- Mix Dry Ingredients: In a large bowl, whisk together flour, sugar, cocoa powder, baking powder, baking soda, and salt.
- Add Wet Ingredients: Stir in buttermilk, vegetable oil, eggs, vanilla, and peppermint extracts. Mix until well combined. Gradually add boiling water to the batter; it will be thin.
- Bake: Divide the batter evenly among the prepared pans. Bake for 30-35 minutes, or until a toothpick inserted in the center comes out clean. Allow cakes to cool in pans for 10 minutes, then turn out onto wire racks to cool completely.
- Prepare the Frosting: In a separate bowl, whip the cream until soft peaks form. Gently fold in mint chocolate chips and a few drops of green food coloring if desired.
- Assemble the Cake: Once the cakes are cool, layer them with a generous amount of whipped cream mixture between each layer. Spread the remaining whipped cream on top and around the sides of the cake.
- Serve: Garnish with extra mint chocolate chips and serve chilled. Enjoy!
Blueberry Yogurt Cake
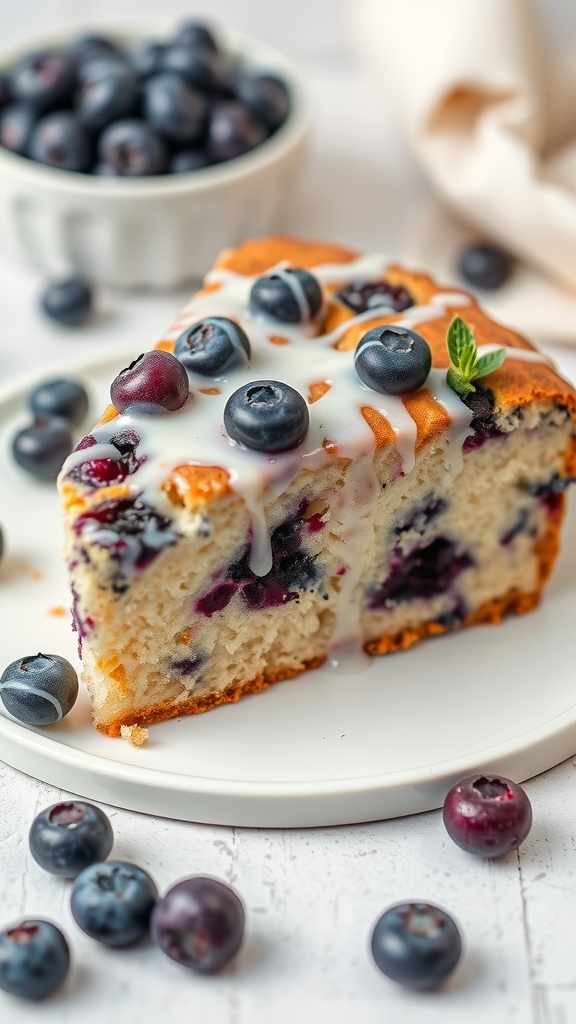
This blueberry yogurt cake is a delightful treat for any spring birthday celebration. It’s moist, fluffy, and bursting with fresh blueberries, making it a refreshing dessert that pairs well with the warmer weather. The use of yogurt not only enhances its flavor but also adds a lovely tanginess that balances the sweetness of the cake.
Making this cake is quite simple, even for beginner bakers. With just a few straightforward steps, you’ll have a beautiful cake that’s perfect for sharing. It looks lovely on any table and tastes just as good as it looks!
Ingredients
- 1 cup plain yogurt
- 1 cup granulated sugar
- 3 large eggs
- 1/2 cup vegetable oil
- 2 teaspoons vanilla extract
- 2 cups all-purpose flour
- 2 teaspoons baking powder
- 1/2 teaspoon salt
- 1 cup fresh blueberries
- 1 cup powdered sugar (for glaze)
- 2 tablespoons milk (for glaze)
Instructions
- Preheat your oven to 350°F (175°C) and grease a 9-inch round cake pan.
- In a large mixing bowl, whisk together yogurt, sugar, and eggs until well combined. Add in the oil and vanilla extract, stirring until smooth.
- In another bowl, whisk together the flour, baking powder, and salt. Gradually add the dry ingredients to the wet mixture, mixing until just combined. Gently fold in the blueberries.
- Pour the batter into the prepared cake pan and spread it evenly. Bake for 30-35 minutes, or until a toothpick inserted in the center comes out clean.
- Once baked, let the cake cool in the pan for about 10 minutes before transferring it to a wire rack to cool completely.
- For the glaze, mix powdered sugar with milk until smooth. Drizzle over the cooled cake before serving.
Apricot Almond Cake
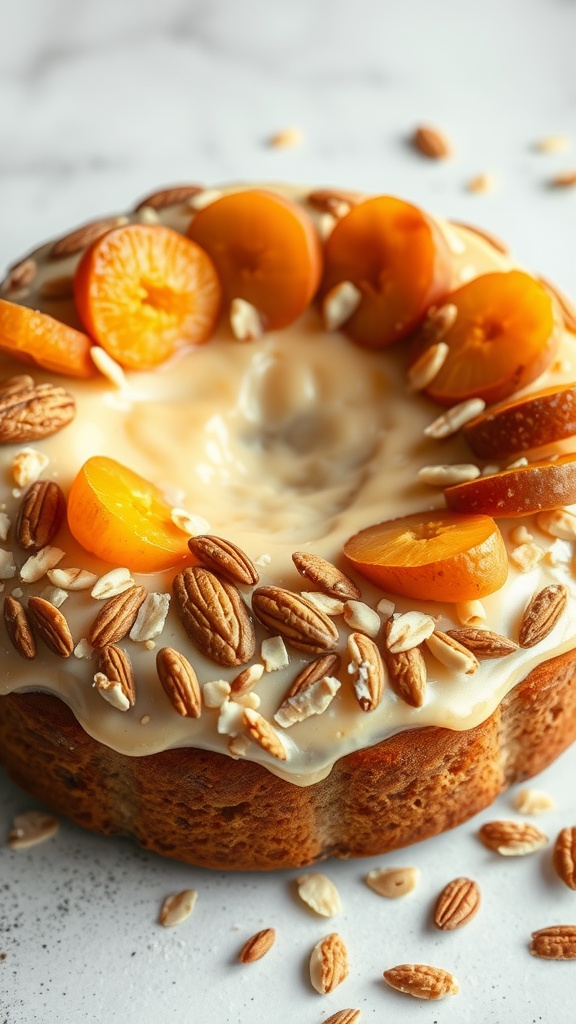
Apricot Almond Cake is a delightful spring treat that brings together the sweetness of apricots and the nutty flavor of almonds. This cake is moist and fluffy, making it a lovely addition to any birthday celebration. With its bright flavors, it’s sure to be a hit among your guests.
This recipe is simple to follow, perfect for both novice and experienced bakers. You can easily whip it up in an afternoon and enjoy it with a cup of tea or coffee. The combination of apricots and almonds not only tastes wonderful but also gives the cake an appealing look, ideal for a festive occasion.
Ingredients
- 1 cup unsalted butter, softened
- 1 1/2 cups granulated sugar
- 3 large eggs
- 2 teaspoons vanilla extract
- 2 cups all-purpose flour
- 1 teaspoon baking powder
- 1/2 teaspoon salt
- 1 cup ground almonds
- 1 cup chopped dried apricots
- 1/2 cup milk
- 1 cup sliced fresh apricots for topping
- 1/2 cup sliced almonds for garnish
Instructions
- Preheat your oven to 350°F (175°C) and grease a bundt pan.
- In a large bowl, cream the softened butter and sugar together until light and fluffy. Add the eggs one at a time, mixing well after each addition, then stir in the vanilla extract.
- In another bowl, combine the flour, baking powder, salt, and ground almonds. Gradually add the dry ingredients to the wet mixture, alternating with the milk until just combined.
- Fold in the chopped dried apricots gently into the batter.
- Pour the batter into the prepared bundt pan, smoothing the top with a spatula. Bake for 40-45 minutes, or until a toothpick inserted into the center comes out clean.
- Let the cake cool in the pan for about 10 minutes before transferring it to a wire rack to cool completely. Once cooled, top with fresh apricot slices and sprinkle with sliced almonds for a beautiful finish.
Chocolate Raspberry Cake
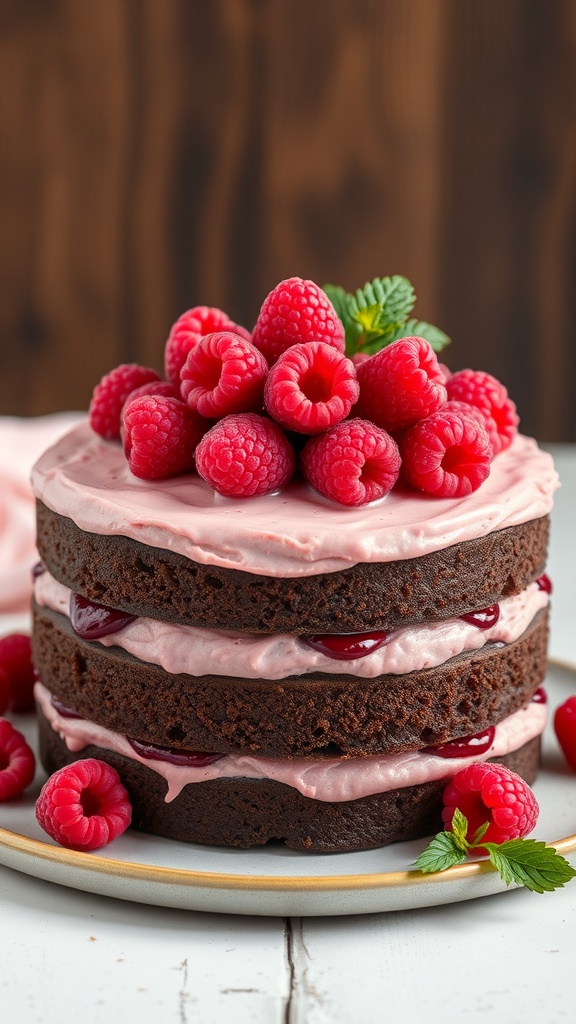
This Chocolate Raspberry Cake combines rich, moist chocolate layers with tangy raspberry filling, creating a delightful treat that’s perfect for spring birthdays. The balance of sweet chocolate and tart raspberries makes every bite a joy, leaving a refreshing taste that brightens any celebration.
Plus, this cake is surprisingly simple to whip up! With basic baking skills and some fresh raspberries, you can impress your friends and family with this elegant dessert. Let’s dive into how to create this delicious masterpiece for your next birthday party!
Ingredients
- 1 ¾ cups all-purpose flour
- 1 ½ cups granulated sugar
- ¾ cup unsweetened cocoa powder
- 1 ½ teaspoons baking powder
- 1 ½ teaspoons baking soda
- 1 teaspoon salt
- 2 large eggs
- 1 cup whole milk
- ½ cup vegetable oil
- 2 teaspoons vanilla extract
- 1 cup boiling water
- 1 cup raspberry preserves
- 2 cups heavy cream
- 2 tablespoons powdered sugar
- 1 cup fresh raspberries for topping
Instructions
- Preheat your oven to 350°F (175°C). Grease and flour two 9-inch round cake pans.
- In a large bowl, mix together flour, sugar, cocoa powder, baking powder, baking soda, and salt. Add eggs, milk, oil, and vanilla, and mix until well combined. Stir in the boiling water until the batter is smooth.
- Pour the batter evenly into the prepared pans. Bake for 30-35 minutes, or until a toothpick inserted into the center comes out clean. Allow the cakes to cool in the pans for 10 minutes before transferring them to a wire rack to cool completely.
- Once the cakes are cool, slice each layer in half horizontally to create four layers in total.
- In a mixing bowl, whip the heavy cream and powdered sugar until stiff peaks form. Spread a layer of raspberry preserves on the first cake layer, followed by a layer of whipped cream. Repeat with the next two layers.
- Top the final layer with a generous layer of whipped cream and garnish with fresh raspberries. Serve and enjoy!
Vanilla Citrus Olive Oil Cake
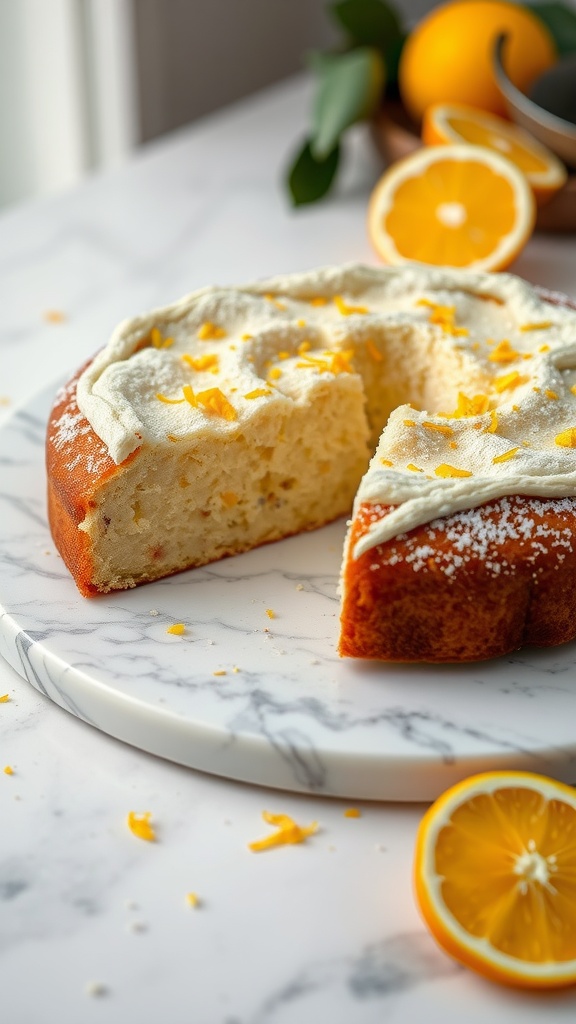
This Vanilla Citrus Olive Oil Cake is a delightful treat that brings a refreshing burst of flavor to any spring celebration. With its light and moist texture, it’s both satisfying and simple to prepare. The combination of olive oil, vanilla, and citrus creates a subtle yet vibrant taste that is perfect for those sunny birthday gatherings.
Not only is this cake easy to make, but it also adds a touch of elegance to your dessert table. The olive oil gives it a unique richness, while the citrus notes brighten the overall flavor. It’s a lovely option for anyone looking to celebrate with something a little different!
Ingredients
- 1 1/2 cups all-purpose flour
- 1 cup granulated sugar
- 1/2 cup olive oil
- 1/2 cup buttermilk
- 3 large eggs
- 1 tablespoon vanilla extract
- 1 tablespoon lemon zest
- 1 tablespoon orange zest
- 1 teaspoon baking powder
- 1/2 teaspoon baking soda
- 1/4 teaspoon salt
Instructions
- Preheat your oven to 350°F (175°C) and grease a 9-inch round cake pan.
- In a mixing bowl, whisk together the flour, baking powder, baking soda, and salt.
- In another bowl, beat the sugar and eggs until light and fluffy. Slowly add in the olive oil and buttermilk, mixing until combined.
- Stir in the vanilla extract, lemon zest, and orange zest.
- Gradually add the dry ingredients to the wet mixture, stirring until just combined.
- Pour the batter into the prepared cake pan and smooth the top. Bake for 30-35 minutes or until a toothpick inserted in the center comes out clean.
- Allow the cake to cool in the pan for 10 minutes, then transfer to a wire rack to cool completely before serving.
Coconut Lime Cake
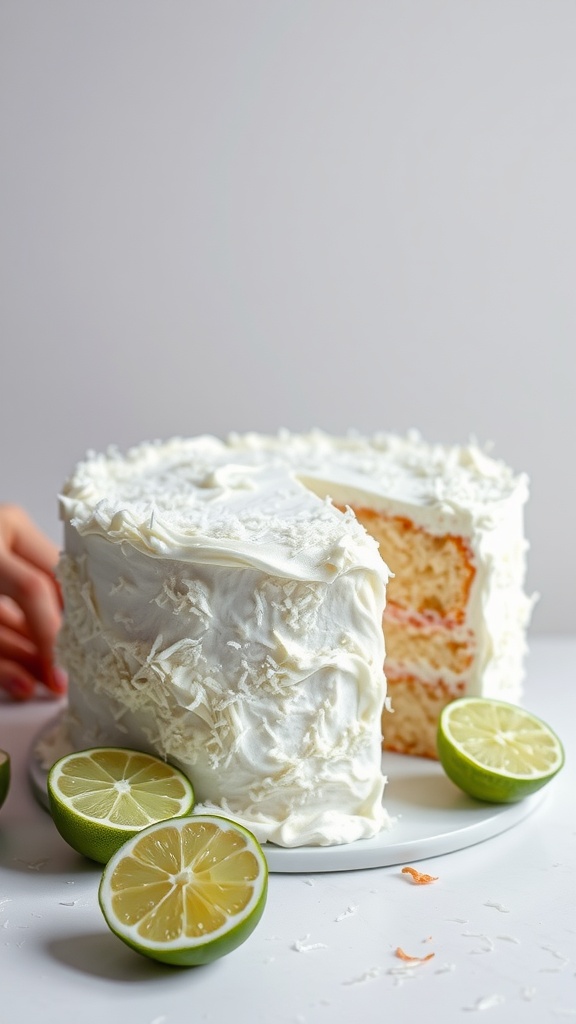
If you’re looking for a refreshing twist for spring birthdays, the Coconut Lime Cake is a delightful option! This cake combines the tropical flavors of coconut and lime, creating a light and zesty treat that’s perfect for welcoming warmer weather. Its fluffy layers and creamy frosting make it a treat that feels both indulgent and refreshing.
The tangy lime pairs beautifully with the rich coconut, giving each bite a burst of flavor. Plus, this recipe is fairly straightforward, making it a fun baking project for anyone, from beginners to seasoned bakers. Get ready to impress your guests with this cheerful cake!
Ingredients
- 2 cups all-purpose flour
- 1 1/2 cups granulated sugar
- 1/2 cup unsweetened shredded coconut
- 1/2 cup unsalted butter, softened
- 1 cup coconut milk
- 3 large eggs
- 1 tablespoon baking powder
- 1/2 teaspoon salt
- 1 tablespoon lime zest
- 1/4 cup fresh lime juice
- 1 teaspoon vanilla extract
Instructions
- Preheat your oven to 350°F (175°C) and grease two 9-inch round cake pans.
- In a large mixing bowl, cream together the softened butter and sugar until light and fluffy. Beat in the eggs one at a time.
- In another bowl, mix the flour, baking powder, and salt. Gradually add this to the butter mixture, alternating with the coconut milk. Stir in the lime juice, lime zest, shredded coconut, and vanilla extract until well combined.
- Divide the batter evenly between the prepared cake pans and bake for 25-30 minutes, or until a toothpick inserted into the center comes out clean.
- Once baked, allow the cakes to cool in the pans for 10 minutes before transferring them to a wire rack to cool completely.
- For frosting, you can use a simple whipped cream or cream cheese frosting, adding a bit of lime zest for extra flavor. Once the cakes are cool, frost and layer them, and top with additional shredded coconut if desired.
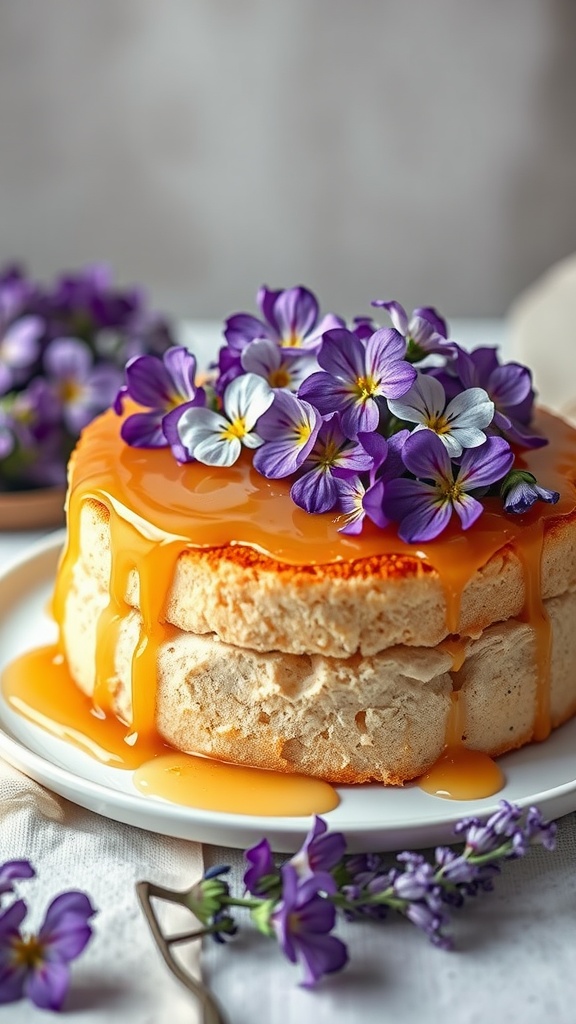
Floral Buttercream Cake
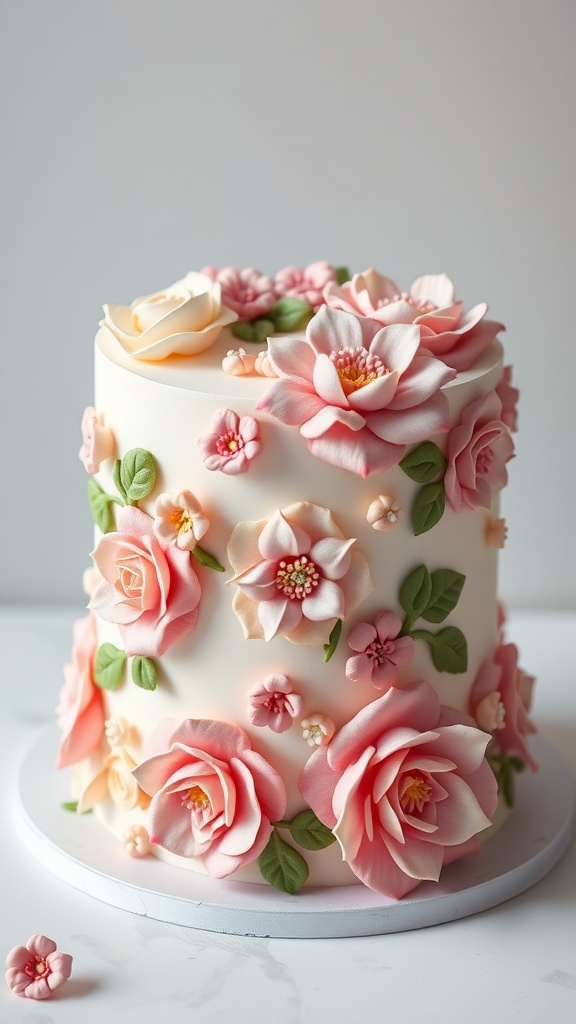
This Floral Buttercream Cake is a delightful celebration of spring flavors and vibrant colors. With its soft, buttery layers and a smooth, creamy frosting, it’s perfect for any birthday party or springtime gathering. The cake has a light sweetness that complements the floral decorations beautifully, making each slice a treat for the taste buds.
Making this cake is easier than it looks! With just a few simple steps, you can create a stunning centerpiece for your table. The key is in the buttercream frosting and the delicate flower decorations, which can be made using easy piping techniques.
Ingredients
- 2 cups all-purpose flour
- 1 ½ cups granulated sugar
- ½ cup unsalted butter, softened
- 1 cup milk
- 3 ½ teaspoons baking powder
- 1 teaspoon vanilla extract
- ½ teaspoon salt
- 4 cups butter, softened (for frosting)
- 8 cups powdered sugar
- 2 teaspoons vanilla extract (for frosting)
- Milk or water (as needed for consistency)
- Food coloring (for floral decorations)
- Piping bags and tips
Instructions
- Preheat your oven to 350°F (175°C). Grease and flour two 9-inch round cake pans.
- In a large mixing bowl, cream together the butter and sugar until light and fluffy. Add the eggs, milk, vanilla, and mix well.
- In another bowl, whisk together the flour, baking powder, and salt. Gradually add this dry mixture to the wet ingredients, stirring until just combined.
- Pour the batter evenly into the prepared cake pans and bake for 25-30 minutes or until a toothpick inserted in the center comes out clean. Let cool in the pans for 10 minutes before transferring to wire racks.
- For the buttercream frosting, beat the softened butter until creamy. Gradually add the powdered sugar and mix until combined. Add vanilla and enough milk or water to reach your desired consistency.
- Once the cakes are completely cooled, place one layer on a serving plate. Spread a layer of frosting on top, then place the second layer on top. Frost the entire cake with a thin layer of buttercream (this is the crumb coat) and chill for about 30 minutes.
- After chilling, apply a final layer of frosting and use piping techniques to create beautiful floral designs. Use food coloring to tint your frosting for added color and creativity.
- Let the cake set for a bit before slicing and serving.
Spring Garden Cake
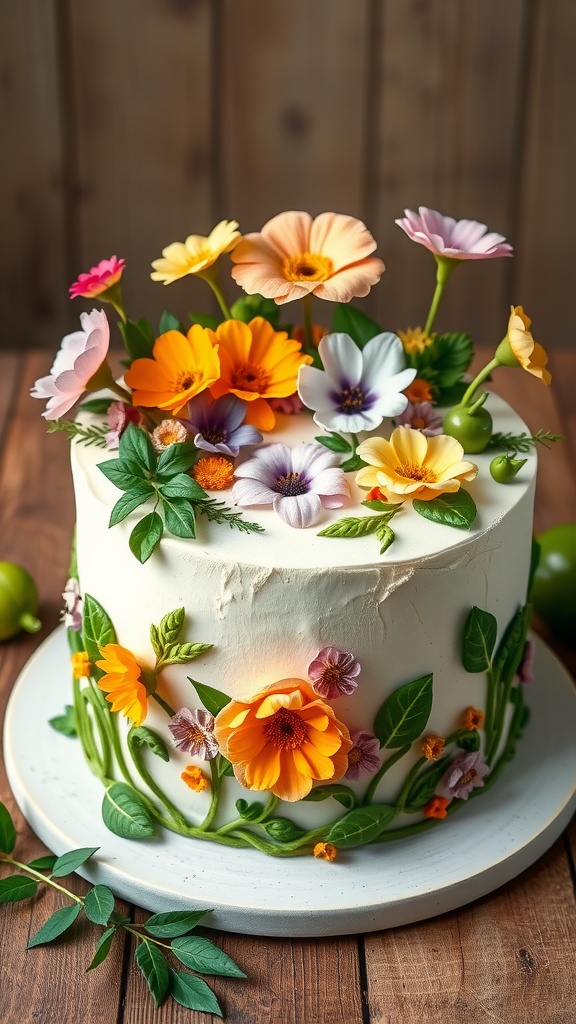
This Spring Garden Cake brings the flavors of the season right to your table. With a light, fluffy base and a delightful cream cheese frosting, it’s like a breath of fresh air in cake form. The cake is easy to make, making it a fun project for bakers of all levels.
Infused with hints of citrus and adorned with colorful, edible flowers, this cake not only looks stunning but tastes vibrant and refreshing. Whether it’s for a birthday celebration or a spring gathering, this cake is sure to brighten up any occasion.
Ingredients
- 2 cups all-purpose flour
- 1 ½ cups granulated sugar
- 2 teaspoons baking powder
- ½ teaspoon baking soda
- ½ teaspoon salt
- 1 cup unsalted butter, softened
- 4 large eggs
- 1 teaspoon vanilla extract
- 1 cup buttermilk
- 1 tablespoon lemon zest
- 1 tablespoon orange zest
- 8 oz cream cheese, softened
- 4 cups powdered sugar
- 2 tablespoons milk
- Edible flowers for decoration
Instructions
- Preheat the Oven: Preheat your oven to 350°F (175°C). Grease and flour two 9-inch round cake pans.
- Mix the Dry Ingredients: In a bowl, whisk together flour, baking powder, baking soda, and salt.
- Cream the Butter and Sugar: In a large bowl, beat the butter and sugar together until light and fluffy. Add eggs one at a time, mixing well after each addition. Stir in vanilla, lemon zest, and orange zest.
- Combine Wet and Dry Ingredients: Gradually add the dry ingredients to the butter mixture, alternating with the buttermilk. Mix until just combined.
- Bake the Cakes: Divide the batter evenly between the prepared pans. Bake for 25-30 minutes or until a toothpick inserted into the center comes out clean. Let them cool in the pans for 10 minutes before transferring to a wire rack to cool completely.
- Prepare the Frosting: In a bowl, beat the cream cheese until smooth. Gradually add in powdered sugar and milk, mixing until you reach your desired consistency.
- Assemble the Cake: Once the cakes are completely cooled, spread frosting between the layers and cover the top and sides. Decorate with edible flowers to create a beautiful spring garden effect.
Tropical Fruit Cake
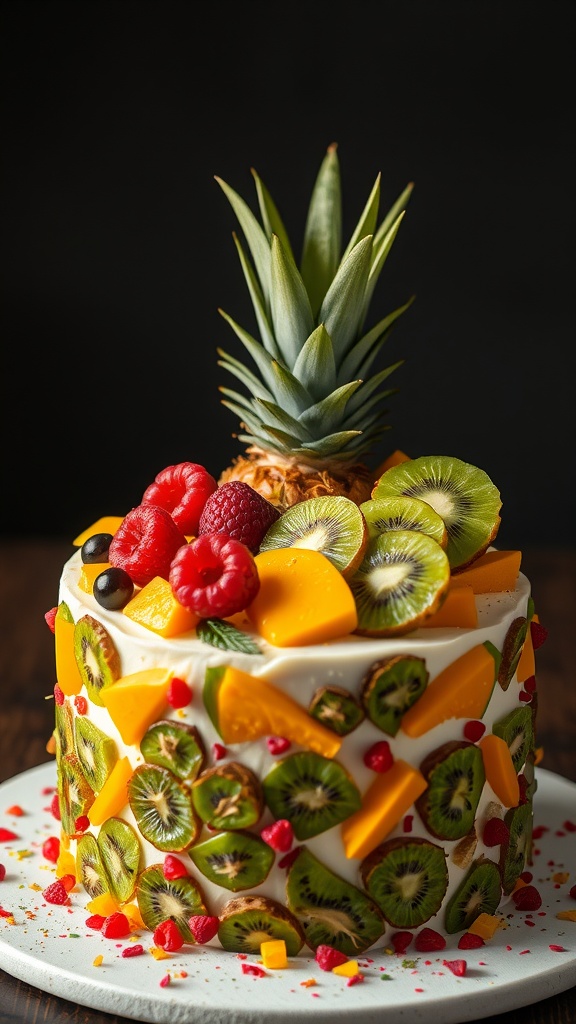
Looking for a delightful dessert to celebrate a spring birthday? A tropical fruit cake is a refreshing choice that brings the taste of the tropics right to your table. This cake is bursting with vibrant flavors from fresh fruits like pineapple, kiwi, and mango, combined with a light and fluffy cake base. It’s simple to make and perfect for those who love fruity treats.
This cake not only looks beautiful but also offers a delightful mix of sweetness and tartness. It’s a wonderful way to celebrate the season with a light dessert that doesn’t weigh you down. Plus, you can customize it with your favorite fruits!
Ingredients
- 1 cup all-purpose flour
- 1 teaspoon baking powder
- 1/2 teaspoon baking soda
- 1/4 teaspoon salt
- 1/2 cup unsalted butter, softened
- 1 cup granulated sugar
- 2 large eggs
- 1 teaspoon vanilla extract
- 1/2 cup buttermilk
- 1 cup diced fresh pineapple
- 1 cup diced mango
- 1/2 cup sliced kiwi
- 1 cup whipped cream for frosting
- Additional fresh fruits for decoration
Instructions
- Preheat the oven to 350°F (175°C). Grease and flour a round cake pan.
- In a mixing bowl, whisk together flour, baking powder, baking soda, and salt.
- In another bowl, beat together softened butter and sugar until creamy. Add eggs one at a time, mixing well after each addition, then stir in vanilla.
- Gradually add the dry ingredients to the wet mixture, alternating with buttermilk. Mix until just combined.
- Fold in diced pineapple and mango, ensuring they are evenly distributed.
- Pour the batter into the prepared pan and bake for 25-30 minutes or until a toothpick inserted in the center comes out clean.
- Let the cake cool for 10 minutes before transferring it to a wire rack to cool completely.
- Once cooled, frost with whipped cream and decorate with additional fresh fruits like kiwi slices and pineapple chunks.